How to Troubleshoot Black Screen Errors, Blue Screen Errors, or Stop Code Errors on a Dell Computer
Summary: This article provides information about how to identify and troubleshoot STOP Code Errors (Black Screen or Blue Screen errors) on a Dell computer. Find troubleshooting steps to resolve blue screen or stop errors. ...
This article applies to
This article does not apply to
This article is not tied to any specific product.
Not all product versions are identified in this article.
Instructions
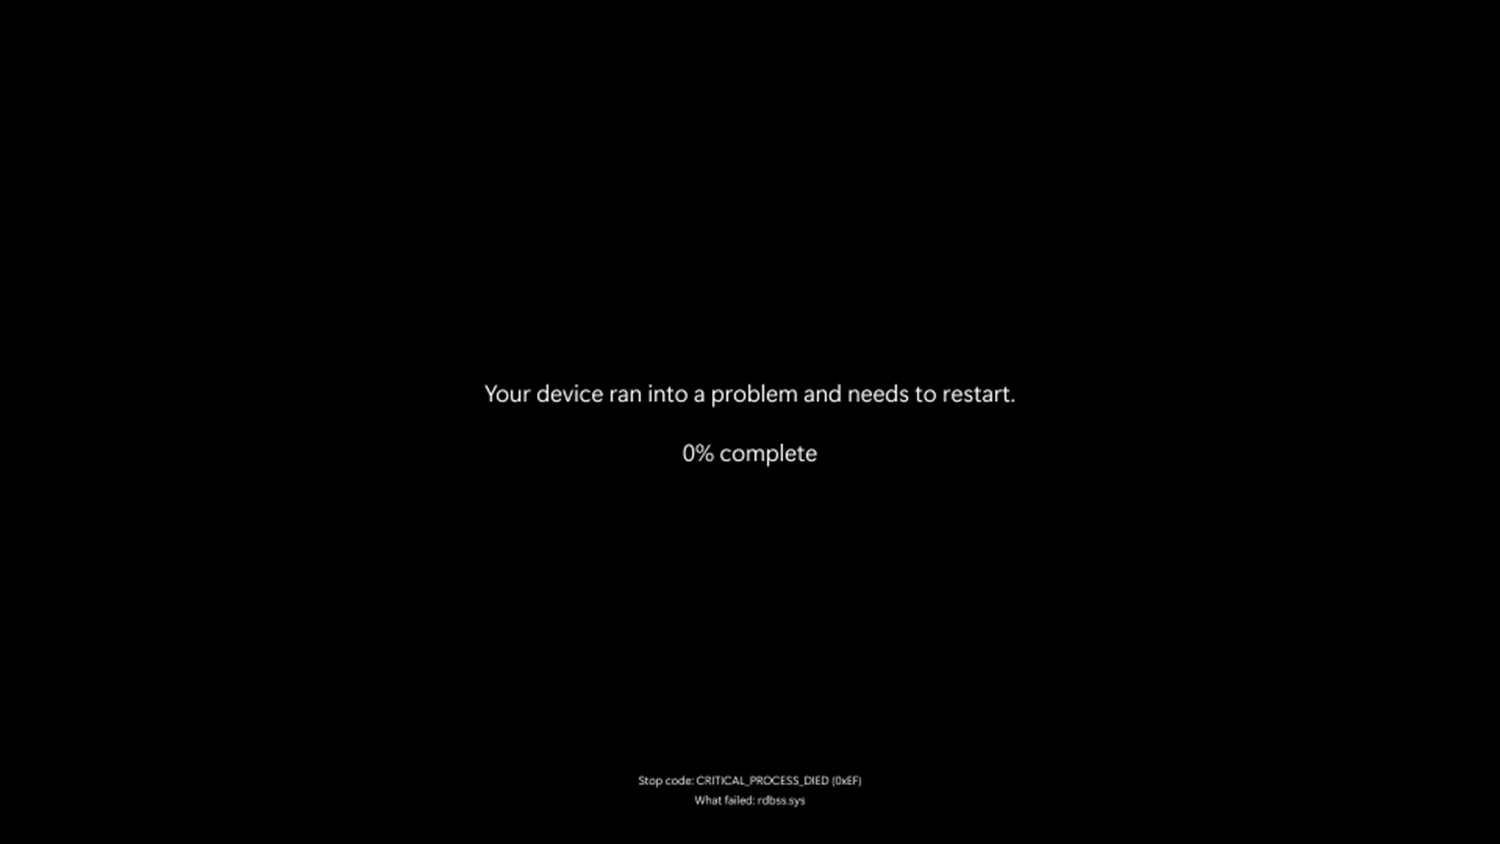
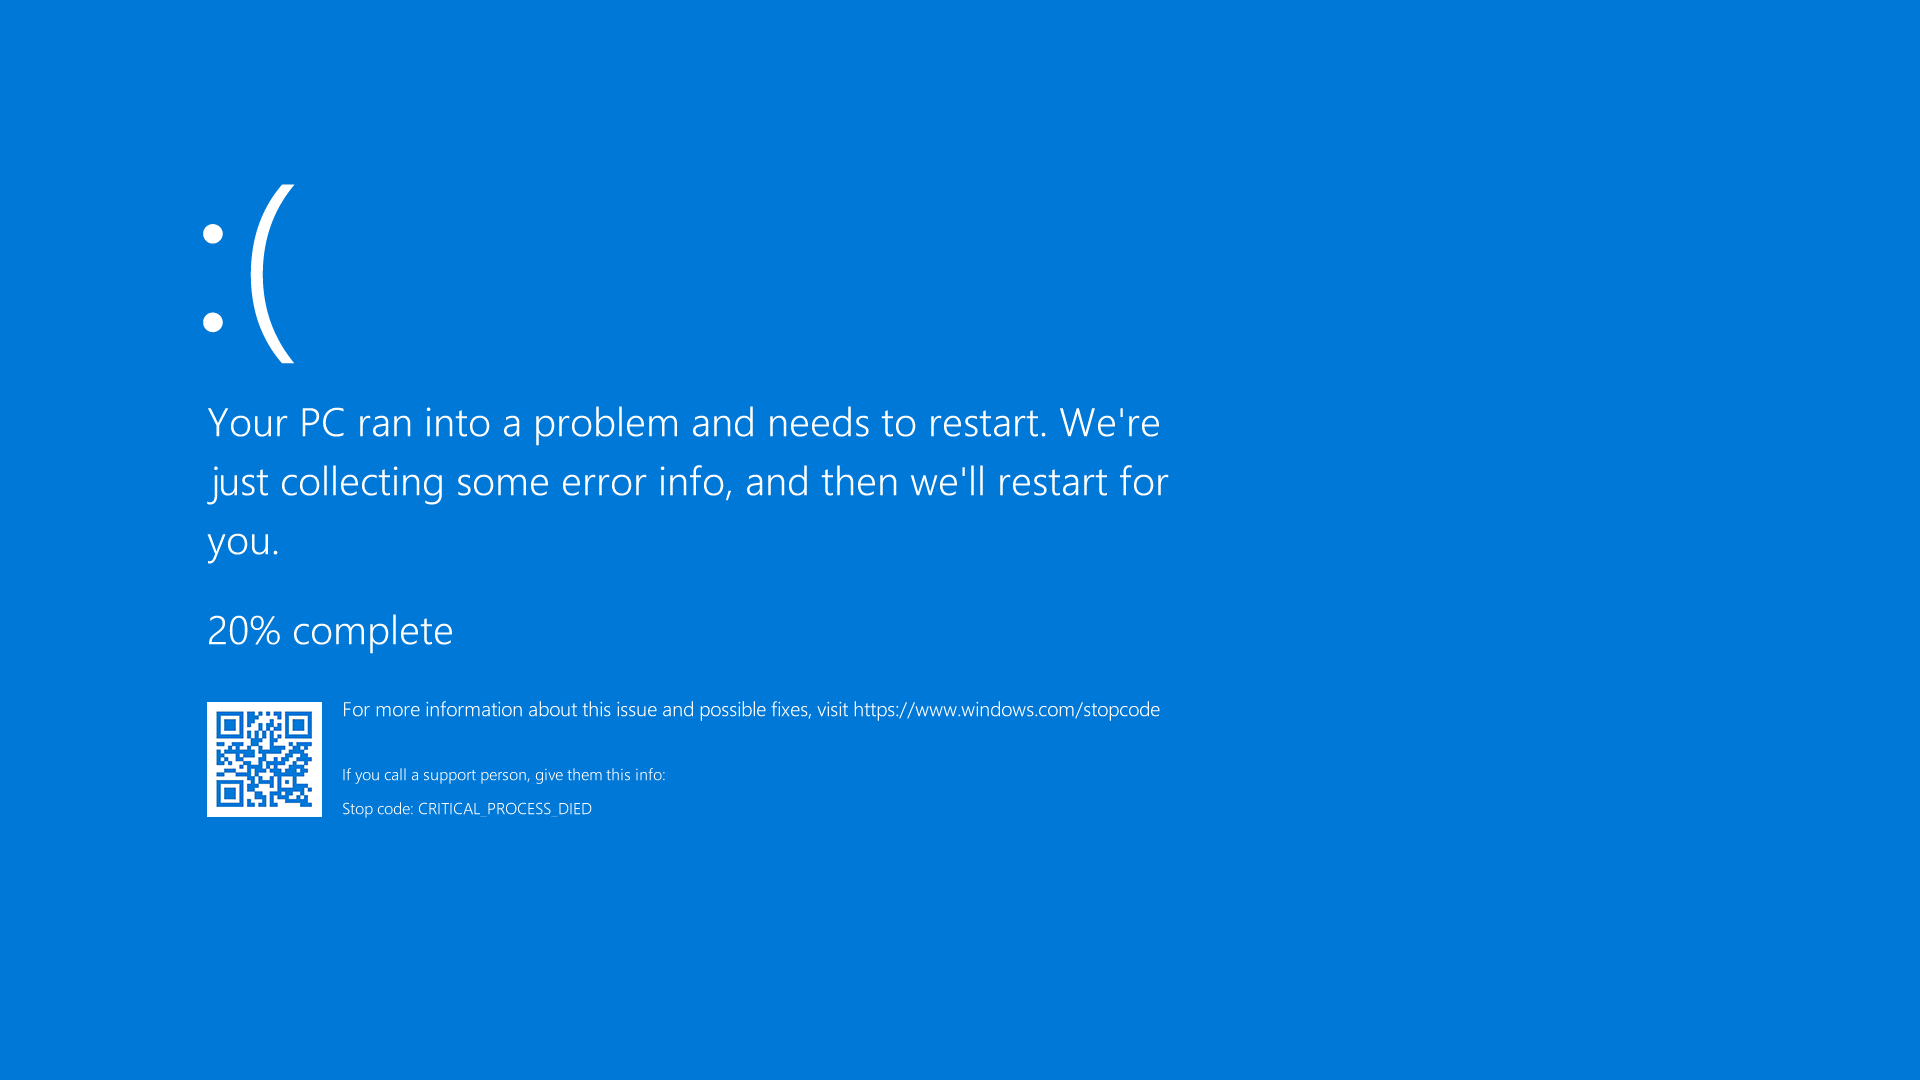
A Stop Code Error (also called a blue screen error, a black screen error, a stop error, a bug check, a or a kernel error) can occur if a problem causes your device to shut down or restart unexpectedly. You might see a stop code error on a black screen (Windows 11 version 24H2 and later, or a blue screen (Windows 11 version 23H2 and older, and Windows 10) with a message that your device ran into a problem and must restart. For consistency, we will call these stop code errors throughout this document.
Note: If your device is booting to a blank screen with no error message, see Computer Cannot Boot into Windows.
Some common stop code errors are:
- SYSTEM_SERVICE_EXCEPTION
- DRIVER_POWER_STATE_FAILURE
- DPC_WATCHDOG_VIOLATION
- VIDEO_TDR_FAILURE
- PAGE_FAULT_IN_NONPAGED_AREA
- DRIVER_IRQL_NOT_LESS_OR_EQUAL
- SYSTEM_THREAD_EXCEPTION_NOT_HANDLED
- IRQL_NOT_LESS_OR_EQUAL
- VIDEO_DXGKRNL_FATAL_ERROR
- KMODE_EXCEPTION_NOT_HANDLED
- INACCESSIBLE_BOOT_DEVICE
Note: You may also receive hexadecimal error codes. Newer codes (such as on a Windows 11 24H2 black screen) will appear in the format 0xXX. Older codes will be in the format 0x00000XXX.
Windows 11, version 24H2 and later:
Windows 11, version 23H2 and before, and Windows 10:
Stop code errors could occur due to incompatible drivers, corrupt operating system files, or potential hardware failure.
These should be attempted in the order shown until your issue is fixed.
- Turn off the computer. Press and hold the power button for 10 seconds.
- Disconnect the AC adapter or power cable from the computer, and remove the battery (for Dell laptops with removable battery).
NOTE: For Dell laptops that have a non-removable battery, learn How to Reset Real Time Clock (RTC). For Dell laptops with removable batteries, see the User Guide for your Dell laptop for step-by-step instructions to safely remove the battery.NOTE: On select Dell Latitude laptops, try to recover the laptop using the forced ePSA method from a POST or boot failure. Learn How to Use Forced ePSA to Recover from POST or Boot Failure on Dell Latitude PCs.
- Disconnect all devices such as USB drives, printers, webcams, and media cards (SD or xD). Except for the keyboard, and mouse.
- Press and hold the power button for 15 to 20 seconds to drain residual power.
- Connect the power cable (for Dell desktops), AC adapter, and the battery (for Dell laptops).
- Turn on the computer.
If this did not resolve the issue, go to the next step.
To determine if your Dell computer is experiencing a hardware problem, it is recommended that you first run a hardware diagnostic test. Dell offers both integrated and online diagnostics.
If the computer cannot boot into Windows, run the preboot diagnostic test on a Dell computer:
- Turn on the computer and tap the F12 key several times until you see the One Time Boot Menu.
- Select Diagnostics and press Enter.
- Follow the on-screen instructions to complete the preboot diagnostic test.
- If the tests pass, the hardware devices in the computer are working correctly. The issue is likely related to the operating system or software that is installed on the computer.
- If the test fails, make a note of the Service Tag, error code, and validation code. Look up the preboot diagnostic error code.
If the computer can boot into Windows and can access the Internet, run the Dell online diagnostics:
- Browse to Dell.com/support.
- Identify your Dell computer.
- Select Download & Install SupportAssist to auto-detect your Dell computer. Follow the on-screen instructions to install Dell SupportAssist.
- Or, enter the Service Tag or Express Service Code of the Dell computer and select Search.
- Or, select Browse all products and manually select your Dell computer from the catalog.
- Go to the Diagnostics tab.
- Select Run Full Test. This comprehensive test takes a more in-depth look at your hardware to find problems that are not found easily. If you have already run the Quick Test and the issue was not solved, we recommend running this test next.
NOTE: If SupportAssist is not installed on your Dell computer, you are prompted to download and install the SupportAssist app.
- If the test passes, go to the next step.
- If the test fails, contact Dell Technical Support for repair options in your region.
Sometimes, an external device can cause stop code errors. Unplug any external storage devices such as external drives, docking stations, and other hardware that is plugged into the computer and then restart the computer.
If you do not experience the issue after restarting the computer, the external device may be the cause of the problem, and you must contact the device manufacturer for additional support.
If this did not resolve the issue, go to the next step.
Safe mode starts Windows in a basic state, using a limited set of files and drivers, and allows you to perform troubleshooting steps. Before you enter safe mode, you must enter the Windows Recovery Environment (WinRE).
Boot into safe mode with networking in Windows 11 or Windows 10
- Press and hold the power button for 10 seconds to turn off the computer.
- Turn on the computer.
- At the Windows startup screen, press and hold the power button for 10 seconds to turn off the computer.
- Turn on the computer.
- At the Windows startup screen, press and hold the power button for 10 seconds to turn off the computer.
- Turn on the computer. The computer boots into the Windows Recovery Environment (WinRE).
- Select Troubleshoot.
- Select Advanced Options.
- Select Startup Settings.
- Select Restart.
- After the computer restarts, you will see a list of options. The preferred option is to select 5 or press F5 for Safe Mode with Networking.
After the computer boots into safe mode with networking, go to the next step.
Boot into Safe Mode with Networking
Duration: 00:50
Closed captions: Available in multiple languages. Select the CC icon, and then select the preferred language.
- Select Start and type the following text:
- SupportAssist
- Select the SupportAssist app in the search results.
- In the SupportAssist window, select the Support tab.
- Select View common issues, and select Get Started.
- Select My PC stopped responding or restarted unexpectedly.
- Select the Fix Now button to let SupportAssist run an automated repair process.
If this did not resolve the issue, go to the next step.
The System File Checker and Deployment Image Servicing and Management (DISM.exe) are command-line tools to scan Windows and repair the missing or corrupt system files.
- Restart the computer and boot into Windows. If the computer cannot boot into Windows, boot into safe mode with networking.
- Select Start and search for Command Prompt or cmd.
- Right-select Command Prompt and select Run as administrator.
- At the command prompt, type the following command and press Enter:
sfc /scannow
- The System File Checker scans and verifies the operating system files. Do not close the command prompt window until the verification is 100% complete.
- Restart the computer and check if the issue is resolved.
- If the issue is not resolved, repeat steps 1 and 2.
- At the command prompt, type the following command and press Enter:
DISM.exe /Online /Cleanup-image /Restorehealth
NOTE: The DISM tool requires an active Internet connection. Connect an Ethernet (RJ45) cable directly from the router to the computer. Safe mode with networking does not support wireless (Wi-Fi) Internet connection. - The Deployment Image Servicing and Management (DISM) tool connects to Windows Update online to download and replace missing or corrupted Windows system files (if applicable).
- After the repair process is complete, restart the computer.
If this did not resolve the issue, go to the next step.
Dell Technologies recommends updating the device drivers and BIOS as part of your scheduled update cycle. Device drivers and BIOS updates may contain feature enhancements or changes that help keep your system software current and compatible with other system modules (hardware and software) and can increase stability.
Learn how to download and install the latest BIOS update on your Dell computer.
Learn How to Download and Install Dell Drivers.
If this did not resolve the issue, go to the next step.
System Restore is a Microsoft Windows operating system feature that can help fix certain types of crashes and other computer problems. System Restore reverts your computer's state (including computer files, installed applications, Windows Registry, and computer settings) to a previous point in time.
Learn how to recover the computer using System Restore in Microsoft Windows.
If this did not resolve the issue, go to the next step.
If your Dell computer continues to lock up or the troubleshooting steps above did not resolve the issue, consider reinstalling the operating system. Learn how to Factory reset, restore, or reinstall Microsoft Windows on a Dell computer.
WARNING: Reinstalling the operating system results in the permanent loss of all data on the computer. Dell Technologies recommends that you back up all personal data to an external storage device, including but not limited to images, documents, email messages, contacts, browser bookmarks (favorites), music, videos, and so on.
Additional Information
How to do No Boot troubleshooting
Duration: 05:11
Closed captions: This video is available in multiple languages. Click the Closed Caption icon and select the language that you want.
How to Troubleshooting Windows 10 Blue Screen Errors
Duration: 02:52
Closed captions: This video is available in multiple languages. Click the Closed Caption icon and select the language that you want.
Affected Products
Alienware, Dell All-in-One, Dell Pro All-in-One, Dell Pro Max Micro, Dell Pro Max Slim, Dell Pro Max Tower, Dell Pro Micro, Dell Pro Slim, Dell Pro Tower, Dell Slim, Dell Tower, Inspiron, Legacy Desktop Models, OptiPlex, Vostro, XPS, G Series
, G Series, Alienware, Dell Plus, Dell Pro, Dell Pro Max, Dell Pro Plus, Dell Pro Premium, Inspiron, Latitude, Dell Pro Rugged, Vostro, XPS, Legacy Laptop Models, Fixed Workstations, Mobile Workstations, Dell Pro Max Micro XE FCM2250, Dell Pro Max Slim XE FCS1250, Dell Pro Max Tower T2 XE FCT2250, Dell Pro Max 16 XE MC16250, Dell Pro Micro Plus XE QBM1250, Dell Pro Slim Plus XE5 QBS1250, Dell Pro Tower Plus XE5 QBT1250
...
Article Properties
Article Number: 000123379
Article Type: How To
Last Modified: 19 Apr 2026
Version: 33
Find answers to your questions from other Dell users
Support Services
Check if your device is covered by Support Services.