XtremIO X2: How to Suspend/Resume Native Replication sessions on an X2 array
Oversigt: Instruction on how to Suspend and or Resume a Native Replication Session on an X2 array as noted in the XtremIO User guide under Managing Remote Protection Session.
Denne artikel gælder for
Denne artikel gælder ikke for
Denne artikel er ikke knyttet til et bestemt produkt.
Det er ikke alle produktversioner, der er identificeret i denne artikel.
Instruktioner
To Suspend a Native Replication session:
1. From the Data Protection menu, select the Sessions option to open the Sessions window.
2. Click Remote to display the list of defined Remote Protections Sessions.
3. Click to select the session.
Note: Verify that the selected session’s status is Active
4. Click Manage > Suspend
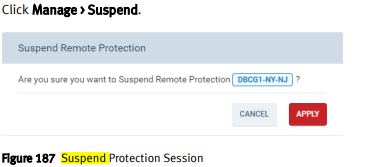
5. Click Apply
To Suspend a session from a selected Sessions Context:
1. From the Data Protection menu, select the Sessions option to open the Sessions window
2. Click Remote to display the list of defined Remote Protection Sessions.
3. Double-click a session to open the Session’s Details window.
Note: Verify that the displayed status is Active.
4. Click Manage > Suspend.
5. Click Apply
Resuming a Remote Protection Session:
Note: You can resume a suspended session.
You can resume a session from the Sessions window context or from a selected session context.
1. From the Data Protection menu, select the Sessions option to open the Sessions window
2. Click Remote to display the list of defined Remote Protection Sessions.
3. Click to select a session.
Note: Verify that the selected session’s status is Suspended.
4. Click Manage > Resume
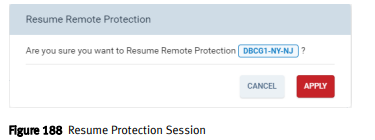
5. Click Apply
To resume a session from a selected Sessions context:
1. From the Data Protection menu, select the Sessions option to open the Sessions window
2. Click Remote to display the list of defined Remote Protection Sessions.
3. Double-click a session to open the Session’s Details window.
Note: Verify that the displayed status is Suspended.
4. Click Manage > Resume.
5. Click Apply.
1. From the Data Protection menu, select the Sessions option to open the Sessions window.
2. Click Remote to display the list of defined Remote Protections Sessions.
3. Click to select the session.
Note: Verify that the selected session’s status is Active
4. Click Manage > Suspend
5. Click Apply
To Suspend a session from a selected Sessions Context:
1. From the Data Protection menu, select the Sessions option to open the Sessions window
2. Click Remote to display the list of defined Remote Protection Sessions.
3. Double-click a session to open the Session’s Details window.
Note: Verify that the displayed status is Active.
4. Click Manage > Suspend.
5. Click Apply
Resuming a Remote Protection Session:
Note: You can resume a suspended session.
You can resume a session from the Sessions window context or from a selected session context.
1. From the Data Protection menu, select the Sessions option to open the Sessions window
2. Click Remote to display the list of defined Remote Protection Sessions.
3. Click to select a session.
Note: Verify that the selected session’s status is Suspended.
4. Click Manage > Resume
5. Click Apply
To resume a session from a selected Sessions context:
1. From the Data Protection menu, select the Sessions option to open the Sessions window
2. Click Remote to display the list of defined Remote Protection Sessions.
3. Double-click a session to open the Session’s Details window.
Note: Verify that the displayed status is Suspended.
4. Click Manage > Resume.
5. Click Apply.
Flere oplysninger
For these instructions and more related to Native Replication, please see the Dell EMC XtremIO Storage Array User Guide "Managing Local Data Protection"
Berørte produkter
XtremIO HW X2-R, XtremIO HW X2-S, XtremIO HW X2-T, XtremIO X2Artikelegenskaber
Artikelnummer: 000204396
Artikeltype: How To
Senest ændret: 15 maj 2026
Version: 5
Find svar på dine spørgsmål fra andre Dell-brugere
Supportservices
Kontrollér, om din enhed er dækket af supportservices.