Why Is My Dell System Not Going to Sleep Mode
Summary: Your Dell computer does not fully go into sleep mode? Learn how to fix Dell computers that do not go to sleep by updating BIOS, drivers, adjusting settings, and more for Windows 11.
This article applies to
This article does not apply to
This article is not tied to any specific product.
Not all product versions are identified in this article.
Symptoms
Affected Operating Systems:
- Windows 10
- Windows 11
If you are experiencing an issue with the Dell computer unable to enter the sleep mode, follow the troubleshooting steps in this article.
Cause
Sleep mode related issues can be caused due to outdated BIOS, chipset, or video drivers, incorrect power settings in Windows, old or corrupt hiberfil.sys file, third-party software or applications, corrupt operating system files, and so on.
Resolution
Dell Technologies recommends updating the device drivers and BIOS as part of your scheduled update cycle. Device drivers and BIOS updates may contain feature enhancements or changes that help keep your system software current and compatible with other computer modules (hardware and software) as well as increased stability.
It is essential to update the following device drivers to resolve computer sleep-related issues:
- BIOS
- Chipset
- Video or graphics card
Download and install the latest device drivers from the Dell Drivers & Downloads website.
To learn how to download and install the device drivers for your Dell computer, reference How to Download and Install Dell Drivers.
To learn how to download and update the BIOS on your Dell computer, see the Dell knowledge base article BIOS Update Guide.
NOTE: If the BIOS is already updated to the latest version, reset the BIOS to factory defaults. To learn more, reference BIOS Update Guide.
After updating the BIOS, chipset, and video driver, restart the computer and check if the computer can enter sleep mode. If the sleep mode issue persists, go to the next step.
Change the BIOS settings and Power Options settings in Windows.
NOTE: If using a mouse and keyboard, Ensure they are connected directly to the computer or docking station and not a USB hub.
BIOS
NOTE: For model-specific instructions to navigate the BIOS menu, see the User Manual of your Dell computer.
- Turn on the computer.
- At the Dell logo screen, tap F2 key several times until Entering BIOS or System Setup appears.
- In the BIOS, expand the Power Management option.
- Select USB Wake Support and check the box to Enable USB Wake Support.
- Click Apply at the bottom.
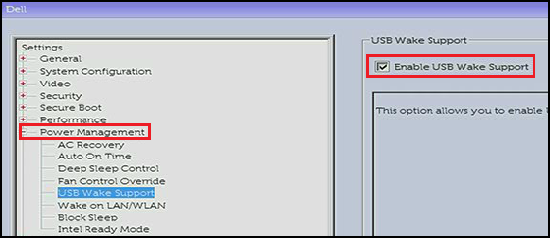
- The Block Sleep Option (also called Deep Sleep Control) is only available on Desktop computers, clear it to Disable it, and click Apply at the bottom.

- Save the settings and exit the BIOS.
Windows Power Options
- Click Start.
- In the search box, type
Power Options. - Click Power Options.
- Click Choose what the power buttons do on the left side of the window.

- Click Change settings that are currently unavailable.
- Under Shutdown settings, ensure Turn on fast startup is cleared.

After the BIOS and Windows Power Options are changed, check if the computer can enter sleep mode. If the sleep mode issue persists, go to the next step.
Power & sleep Settings Windows 10 (Official Dell Tech Support on YouTube)
Duration: 02:06
Closed captions: English only
Refresh the hiberfil.sys file by using the switch to disable and enable it (this resets the file if it is corrupted).
- Click Start.
- Type
cmdorcommand promptin the search box. - Right-click Command Prompt and select Run as Administrator.
- In the command prompt window, type
powercfg -h offand press Enter. 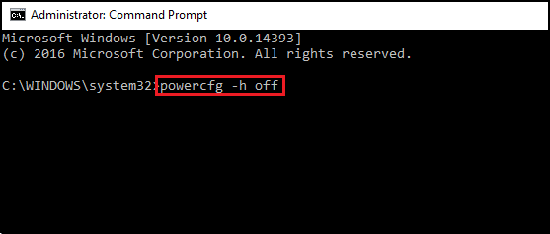
- Restart the computer, and repeat steps 1 to 3.
- In the Command Prompt window, type
powercfg -h onand press Enter to enable.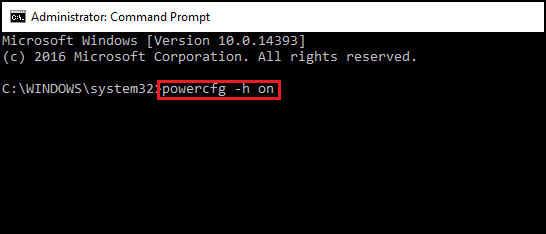
- Restart the computer one more time. The hiberfil.sys file is refreshed.
After the hiberfil.sys file has been refreshed, check if the computer can enter sleep mode. If the sleep mode issue persists, go to the next step.
You can run the Windows Power Troubleshooter to adjust your computer's power settings. The Power Troubleshooter checks your computer's timeout settings, which determine how long the computer waits before turning off the monitor display or entering sleep mode.
NOTE: Adjusting these settings helps conserve power and extend the laptop's battery life.
To run the Windows Power Troubleshooter, follow these instructions:
- In Windows, search for and open the Control Panel.
- In the Control Panel Search field, type
Troubleshooting. - Click Troubleshooting.

- Under System and Security, click Improve Power Usage.
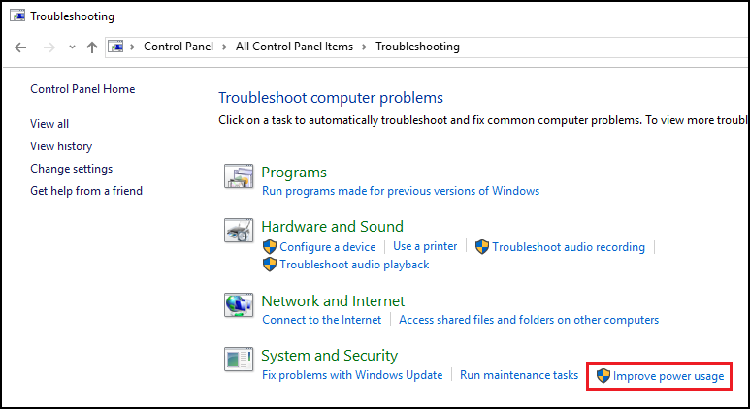
- Click Power to run the Troubleshooting tool.

A Detecting Issues window displays while Windows detects and attempts to fix any issues. - After Troubleshooting is complete, close the Troubleshooter, or click Explore Additional Options if needed.
After Windows Power Settings have been adjusted, check if the computer can enter sleep mode. If the sleep mode issue persists, go to the next step.
To perform a Clean Boot using the Microsoft Config Utility on the computer, follow the steps below. This procedure is critical to avoid unnecessary operating system reinstall. This process is temporary and helps identify if a startup program or service is causing the sleep mode issue.
WARNING: Do not disable the startup program or service that is related to anti-virus or anti-malware applications such as McAfee, Norton, TrendMicro, and so on.
- Click Start.
- In the Search Box, type
msconfigand press Enter. - Click the Startup tab. Click Disable all and click Apply.
- Click the Services tab. Check the box that says Hide all Microsoft services and then click Disable all.
- Restart the computer.
- Check if the computer can enter sleep mode.
If the sleep mode issue persists, repeat the steps above to enable all the services and startup items. If the sleep mode issue persists, go to the next step.
If the issue is not present, you must reenable services and startup items one by one until the cause of the issue is identified.
To return the boot process to normal startup mode using MSCONFIG.
- Click Start.
- In the Search Box, type
msconfigand press Enter. - Click the General tab.
- Click Normal startup.
- Click OK.
- Click Yes when you are prompted to restart your computer.
If the sleep mode issue persists, go to the next step.
To create a new user in Windows, ensure you are logged in with an account that has administrator privileges.
NOTE: Different versions of Windows 10 and 11 may appear different than the steps listed below.
Windows 11
- Select Start > Settings > Accounts > Other Users
- Click the Add Account Button
- Click the I don't have this person's sign-in information
- Click the Add a user without a Microsoft account Option.
- Enter the username into the Who's going to use this PC? field
- If you would like to use a password, enter the password in the password fields. If you are not wanting a password, leave these fields blank.
- Click Next
Windows 10
- Select Start > Settings > Accounts > Family & other users
- Under Other users, select Add someone else to this PC.
- Click I don't have this person's sign-in information
- Click Add a user without a Microsoft account
- Enter the username into the Who's going to use this PC? field
- If you would like to use a password, enter the password in the password field. If you are not wanting a password, leave these fields blank.
- Click Next
After creating a new user account, login to the new user account and check if the computer can enter sleep mode. If the computer can enter sleep mode with the new user account, the issue is with the old user profile, continue to use the new user account. If the sleep mode issue persists in the new user account, go to the next step.
System Restore is an integrated Windows tool that is designed to protect and repair the operating system. When something goes wrong with your computer, System Restore should be used before restoring the computer to factory default settings.
Select the operating system that is installed on your computer to find more information about how to perform System Restore:
- How to Reinstall Windows 10 on your Dell computer
- Reset or Reinstall Windows 11 on Your Dell Computer
After the performing Windows System Restore, restart the computer and check if the computer can enter sleep mode. If the sleep mode issue persists, go to the next step.
The System File Checker (SFC) tool is built into Windows and can scan your Windows computer files for corruption or any other changes. If a file has been modified, it automatically replaces that file with the correct version.
You must have administrator privileges in Windows to run the system file checker tool.
- Click Start.
- Type
cmdorcommand promptin the search box. - Right-click Command Prompt and select Run as Administrator.
- In the command prompt window, type
sfc /scannowand press Enter.
After the SFC scan is complete, restart the computer and check if the computer can enter sleep mode. If the sleep mode issue persists, go to the next step.
If the above troubleshooting steps did not resolve the sleep mode issue, you can try to restore the computer to factory default settings as a last resort.
Dell computers are built with a small amount of hard disk space that is reserved for reinstalling the operating system. This method is the easiest way to restore the computer to factory condition. The restoration process deletes all user data from the computer, so be sure to back up all your files before beginning this process.
WARNING: Restoring the computer to factory defaults or reinstalling the operating system using any recovery media erases all data on the computer. Be sure to back up all important data like documents, spreadsheets, pictures, videos before restoring or reinstalling the operating system.
Select the operating system that is installed on your computer to find more information about how to restore the computer to factory default settings:
- How to Reinstall Windows 10 on your Dell computer
- Reset or Reinstall Windows 11 on Your Dell Computer
NOTE: After restoring or reinstalling the operating system, it is recommended that you download and install the latest device drivers from the Dell Drivers & Downloads website.
If the computer sleep mode issue persists, contact Dell Technical Support.
See these Dell Knowledge Base articles for related information:
- Windows 11 and Windows 10: Troubleshooting sleep and hibernation issues on your Dell Computer
- Windows 11: Troubleshooting sleep and hibernation issues on your Dell Personal Computer
- Shut down, Sleep, Hibernate, or Change the Power Plan in Windows 11 and Windows 10
- Steps for Fixing Windows Computers that Do Not Wake Up or Resume from Suspend or Hibernate Mode but Will Power On
Affected Products
Alienware, Dell All-in-One, Dell Pro All-in-One, Dell Pro Max Micro, Dell Pro Max Slim, Dell Pro Max Tower, Dell Pro Micro, Dell Pro Slim, Dell Pro Tower, Dell Slim, Dell Tower, Inspiron, Legacy Desktop Models, OptiPlex, Vostro, XPS, G Series
, G Series, Alienware, Dell Plus, Dell Pro, Dell Pro Max, Dell Pro Plus, Dell Pro Premium, Inspiron, Latitude, Dell Pro Rugged, Vostro, XPS, Legacy Laptop Models, Fixed Workstations, Mobile Workstations, Dell Pro Max Micro XE FCM2250, Dell Pro Max Slim XE FCS1250, Dell Pro Max Tower T2 XE FCT2250, Dell Pro Max 16 XE MC16250, Dell Pro Micro Plus XE QBM1250, Dell Pro Slim Plus XE5 QBS1250, Dell Pro Tower Plus XE5 QBT1250
...
Article Properties
Article Number: 000149580
Article Type: Solution
Last Modified: 13 Nov 2025
Version: 13
Find answers to your questions from other Dell users
Support Services
Check if your device is covered by Support Services.