Dell EMC Unity/VNX: How to connect to Standalone CIFS Server using MMC Computer Management
Summary: Dell EMC Unity/VNX: How to connect to Standalone CIFS Server using MMC Computer Management
This article applies to
This article does not apply to
This article is not tied to any specific product.
Not all product versions are identified in this article.
Instructions
This article explains "How to connect to Standalone CIFS Server using MMC Computer Management (compmgmt.msc)"
Windows XP, Windows 7, and Windows 10 may able to connect without issue if the correct admin credentials are given. For Windows 8 and Windows 2012, it may want to resolve the NetBIOS name to IP address, so an entry in the local hosts file or DNS is required. For Domain Joined CIFS Servers, this may be easier as a DNS entry will be most likely exist and admin credentials are also not going to be hard to enter as usually the managing Windows client will be on same domain.Note: NetBIOS name can be different from Unity's NAS Server name.
- How to find the NetBIOS Name and add to the local hosts file:
On Unity, to find the NetBIOS name using the GUI:
Unisphere > File > NAS Servers > Double Click or Edit NAS Server > Protocols > SMB
OR using the command "uemcli" /net/nas/cifs show:
spa:~> uemcli -u admin -p pass -d array_ipaddr /net/nas/server show
4: ID = nas_5
Name = NASFTP
NetBIOS name = FTPSERV5 <-- This is the name we need to note, not the NAS Server name which is different here.
SP = spa
Storage pool = pool_1
On VNX, the NetBIOS name can be seen using "server_cifs ALL" command or from the CIFS Server properties on Unisphere.
Once the NetBIOS name is correctly noted, add an entry in c:\Windows\system32\Drivers\etc\hosts similar to below:
C:\>type c:\Windows\system32\Drivers\etc\hosts
# localhost name resolution is handled within DNS itself.
# 127.0.0.1 localhost
# ::1 localhost
10.1.1.1 FTPSERV5
Note: Step 1 may not be required on all Windows clients (for example, Windows 7 and Windows 10, without entry in hosts file, compmgmt.msc successfully worked). Also, step 1 is optional if the user added this entry in DNS. If all else fails, do this step.
- How to launch compmgmt.msc using Standalone CIFS Server's credential:
There are two methods that can be used in this case.
Method 1: Using runas command.
C:\>runas /netonly /user:FTPSERV5\administrator "mmc compmgmt.msc -a /computer=FTPSERV5"
Enter the password for FTPSERV5\administrator:
Attempting to start mmc compmgmt.msc -a /computer=FTPSERV5 as user "FTPSERV5\administrator
C:\>runas /netonly /user:10.1.1.1\administrator "mmc compmgmt.msc -a /computer=10.1.1.1"
Enter the password for FTPSERV5\administrator:
Attempting to start mmc compmgmt.msc -a /computer=FTPSERV5 as user "FTPSERV5\administrator
Method 2: Mapping first using net use and then compmgmt.msc directly:
We can map any share from the CIFS Server using the local administrator.
net use \\<standalone_server> /user: <standalone_server\administrator>
where:
<standalone_server> = name or IPv4 or IPv6 address; for MMC snap-in, stand-alone NetBIOS name.
Examples:
C:\>net use \\NASFTP5 /user:NASFTP5\administrator
The password or user name is invalid for \\FTPSERV5.
Enter the password for 'administrator' to connect to 'FTPSERV5':
The command completed successfully.
C:\>net use \\10.1.1.1\share1 /user:10.1.1.1\administrator Password1234$
The command completed successfully.
C:\>net use \\test /user:administrator
The password or user name is invalid for \\test. <-- If the password is incorrect, it will be reported.
Enter the password for 'administrator' to connect to 'test':
The command completed successfully.
C:\>net use
New connections will be remembered.
Status Local Remote Network
-------------------------------------------------------------------------
OK \\NASFTP5\IPC$ Microsoft Windows Network
OK \\10.1.1.1\share1 Microsoft Windows Network
The command completed successfully.
C:\> compmgmt.msc /computer=10.1.1.1
C:\> compmgmt.msc /computer=FTPSERV5

The MMC Console opens, and the local group's database will be manageable on the server. The security credentials are valid for the existing logon session only. Repeat step 2 to connect to a system from which access is desired each time after login.
Additional Information
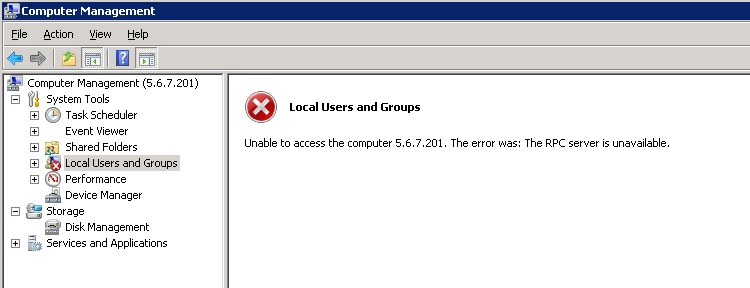
If the message "RPC Server is unavailable" is reported, this is most likely due to the NetBIOS name to the IP is unresolvable (Step 1 on the instructions).
It is also good to logout and log back to clear the credential cache if previous attempts were not by "administrator" user of the CIFS Server.
If all else is ruled out, the firewall may be blocking the access to RPC Ports.
Example: Screenshot from a Windows 8 client with the wrong (NAS Server) IP entered in hosts file, instead of NetBIOS:
Note: If there is no firewall issue, Shared Folders may still work in the above scenario.
Affected Products
Dell EMC Unity FamilyProducts
Celerra, Dell EMC Unity Family, VNX1 Series, VNX2 Series, VNXe1 Series, VNXe2 Series, VNX/VNXeArticle Properties
Article Number: 000022486
Article Type: How To
Last Modified: 16 Oct 2025
Version: 7
Find answers to your questions from other Dell users
Support Services
Check if your device is covered by Support Services.