PowerEdge: Configuring NVDIMM-N With Windows Server 2019
Summary: This article provides great information about how persistent memory (NVDIMM) works and how to configure NVDIMM on a PowerEdge Server with Windows Server 2019.
This article applies to
This article does not apply to
This article is not tied to any specific product.
Not all product versions are identified in this article.
Instructions
This article explains persistent memory (NVDIMM) and its configuration on a PowerEdge Server with Windows Server 2019. NVDIMM retains data during power loss. Dell EMC introduced support for NVDIMM-N from their 14th generation of PowerEdge servers. Microsoft provides NVDIMM-N support. NVDIMM-N in Windows Server 2016 and 2019 fits in a standard DIMM slot, placing data closer to the processor, reducing latency, and boosting performance with new features
NVDIMM-N in Windows Server 2016 and 2019 uses a standard DIMM slot, placing data closer to the processor, reducing latency, and maximizing performance with new features"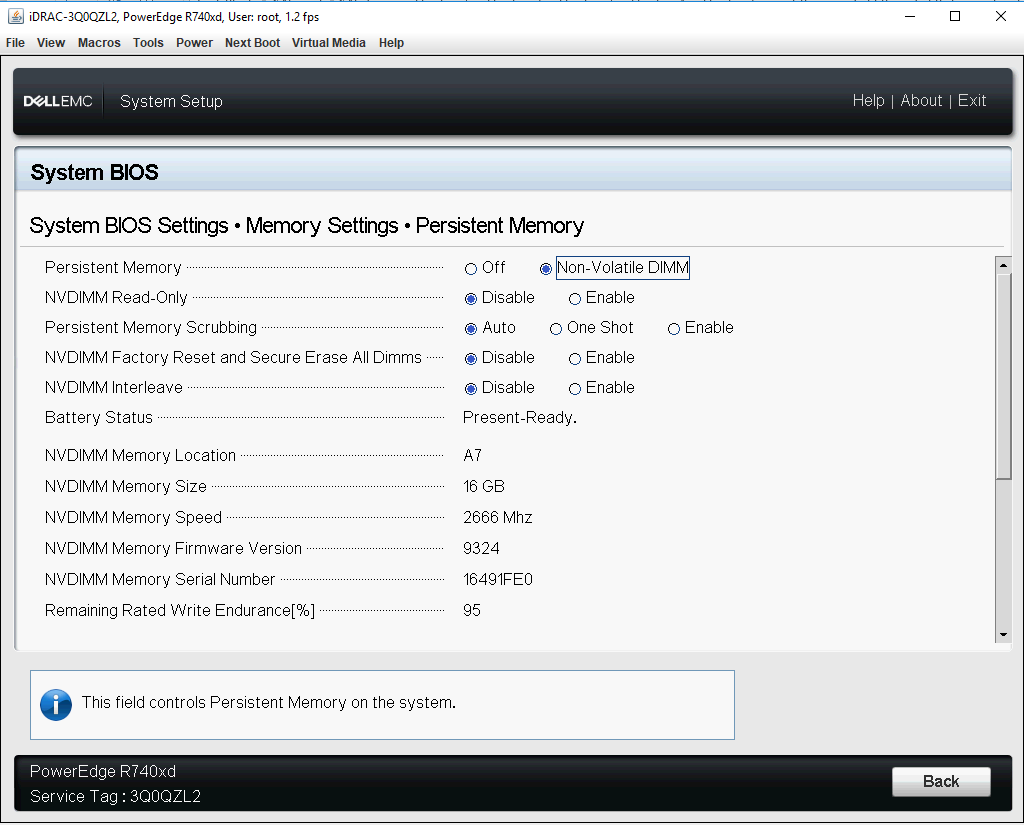
Figure 1 - BIOS Memory - Persistent Memory Configuration
Note: NVDIMM should have firmware (FW) version 9324 or above. Dell recommends updating BIOS, firmware, drivers, and Operating System as part of your scheduled update cycle. BIOS, firmware, driver, and Operating System (OS) updates are intended to improve the reliability, stability, and security of your system.
NVDIMM Driver Architecture Overview:
There are two types of device objects related to persistent memory on Windows - physical NVDIMMs and logical persistent memory disks. In Device Manager, physical NVDIMMs appear under "Memory devices," while logical disks are under "Persistent memory disks." The screenshot below shows a system with 2 NVDIMMs:

Figure 2 - Device Manager
The nvdimm.sys driver controls all NVDIMM-N devices, while the pmem.sys driver controls the logical disks. Both drivers are the same for all types of persistent memory, such as NVDIMM-N and AEPs.
scmbus.sys creates both types of device objects, the bus driver for persistent memory. You can find the bus driver object in Device Manager under "System Devices."
NVDIMM-N behavior when the battery is not proper or it is configured as "Read Only" at BIOS:
When a battery is not functional, or NVDIMM-N is configured as 'Read Only' in the BIOS, the OS does not make the PMEM disk read-only and does not stop ongoing write operations. By default, Windows allows read/write access to the disk, but all written data is lost after a reboot.
If the user must make NVDIMM as read-only when battery is not proper or it has been configured as "Read Only" at BIOS then below setting has to be done at registry of OS:
"HKLM\System\CurrentControlSet\Services\pmem\ReadOnlyOnPersistenceLoss (REG_DWORD): non-zero to make it read-only on application resilience loss"
New features with WS 2019
1. Label support and namespace management
With WS 2019, OS supports Label and namespace management. When NVDIMM will be exposed to OS first time or after factory-reset/secure erase, the namespace will not be created by default. Users must create the namespace before using it as storage device. User can use the below commands to manage the namespace of NVDIMM.

Figure 3 - Available PMEM PowerShell Cmdlets
Examples:

Figure 4 - List PMEM Unused Regions, PMEM Physical Devices, and PMEM Disks

Figure 5 - List/Remove PMEM Disk
---------------------------------
PowerShell Cmdlets
---------------------------------
#Get-PmemDisk
- Return one or more logical persistent memory disks
- The returned object has information about size, atomicity type, health status, and underlying physical devices
#Get-PmemPhysicalDevice
- Return one or more physical persistent memory devices (NVDIMMs)
- The returned object has information about sizes, RFIC, device location, and health or operational status
#New-PmemDisk
- Creates a new disk out of a given unused region
- Writes out the labels to create the namespace then rebuilds the SCM stacks to expose the new logical device
- Optional parameters:
- FriendlyName gives the persistent memory disk a friendly name. The default is "PmemDisk <N>"
- AtomicityType lets you set BTT. The default is "none."
#Remove-PmemDisk
- Removes the given persistent memory disk It accepts the output of Get-PmemDisk
- Deletes the namespace’s labels and then rebuilds the SCM stacks to remove the logical device
- Requires user confirmation, which can be overridden with -Force
#Get-PmemUnusedRegion
- Returns aggregate pmem regions available for provisioning a logical device
- The returned object has a unique region ID, total size, and list of physical devices that contribute to the unused region
#Initialize-PmemPhysicalDevice
- Writes zeroes to the label storage area, writes new label index blocks, and then rebuilds the SCM [Storage class memory] stacks to reflect the changes
- Requires user confirmation, which can be overridden with -Force
- This cmdlet is intended as a "big hammer" recovery mechanism. It is not recommended for normal use
2. NVDIMM-N Node Interleaving
WS 2019 provides NVDIMM-N node interleaving feature which further enhances the performance of NVDIMM-N with various applications. Enable 'NVDIMM Interleave' in System BIOS under Memory Settings. Ensure that each CPU has an even number (≥ 2) of NVDIMM-N modules available.
After enabling this OS sees it different physical device but it exposes a single logical disk under "Persistent memory disks" 
Figure 6 - NVDIMM - PMEM Interleaving in Device Manager
Figure 7
3. NVDIMM-N can now be exposed to Hyper-V VMs.
With WS2019, NVDIMM can be exposed to Hyper-V VMs directly. Get more detail here.
Affected Products
Microsoft Windows Server 2016, Microsoft Windows Server 2019, PowerEdge XR2, Poweredge C4140, PowerEdge C6400, PowerEdge C6420, PowerEdge R240, PowerEdge R340, PowerEdge R440, PowerEdge R540, PowerEdge R640, PowerEdge R6415, PowerEdge R740
, PowerEdge R740XD, PowerEdge R740XD2, PowerEdge R7415, PowerEdge R7425, PowerEdge R840, PowerEdge R940, PowerEdge R940xa, PowerEdge T140, PowerEdge T340, PowerEdge T40, PowerEdge T440, PowerEdge T640, PowerEdge XE2420, PowerEdge XE7100, PowerEdge XE7420, PowerEdge XE7440
...
Article Properties
Article Number: 000122099
Article Type: How To
Last Modified: 02 Jun 2025
Version: 4
Find answers to your questions from other Dell users
Support Services
Check if your device is covered by Support Services.