PowerEdge: How to use the Virtual Media Function on iDRAC6, iDRAC7, iDRAC8, and iDRAC9
Summary: This article shows how to use and set up the virtual media function of Integrated Dell Remote Access Controller (iDRAC) 6, 7, 8, or 9.
This article applies to
This article does not apply to
This article is not tied to any specific product.
Not all product versions are identified in this article.
Instructions
The virtual media function allows the remote usage of software image files (ISO files). ISO files can be used for installing operating systems or updating servers. This article provides information about using the virtual media function of the Integrated Dell Remote Access Controller (iDRAC) 6, 7, 8 and 9.
Benefits of using the virtual media function are:
- Updating all server firmware using the matching bootable image (ISO file) for your server.
- Installing an operating system on your server directly from the ISO. Read How to Install the Operating System on a Dell PowerEdge Server for more information.
- Viewing video output from the server and using the local mouse and keyboard as if you were in the same room.
If you want to find more detailed information about this and other functions available through the Enterprise iDRAC, reference the iDRAC manuals.
Note: An Enterprise or greater license (iDRAC7, iDRAC8, and iDRAC9) or Enterprise module (iDRAC6) is required to access this function.
Note: With iDRAC7 firmware version 1.30.30, the interface changed from old (iDRAC6 style) to new (iDRAC8 style)
All screenshots are captured using a JAVA or ActiveX console. HTML5 controls do differ from the screenshots.
The instructions differ depending on the iDRAC model used. Click the iDRAC that is in use for more information.
- iDRAC9
- iDRAC8 and iDRAC7 (firmware versions 1.30.30 and later)
- iDRAC6 and iDRAC7 (firmware versions 1.00.00 to 1.20.20)
iDRAC9
Follow this video for information:
How to Use Virtual Media in iDRAC9
Duration: 00:00:59 (hh:mm:ss)
When available, closed caption (subtitles) language settings can be chosen using the CC icon on this video player.
Follow these directions to use the virtual media function on an iDRAC9:
- Obtain the IP address and login details of the iDRAC of the server that you want to attach virtual media to.
Note: If your iDRAC has not previously been used, it must first be configured. For more information about configuring the iDRAC, reference How to configure the Integrated Dell Remote Access Controller 9 (iDRAC9) with Lifecycle Controller network settings?
- Log in to the iDRAC using the IP on your preferred browser.
- Click Launch Virtual Console from the iDRAC web interface.
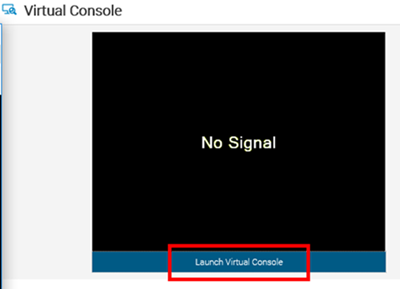
Figure 1: iDRAC9 UI - Launch Virtual Console.
- Click Connect Virtual Media to activate the function (Figure 2).
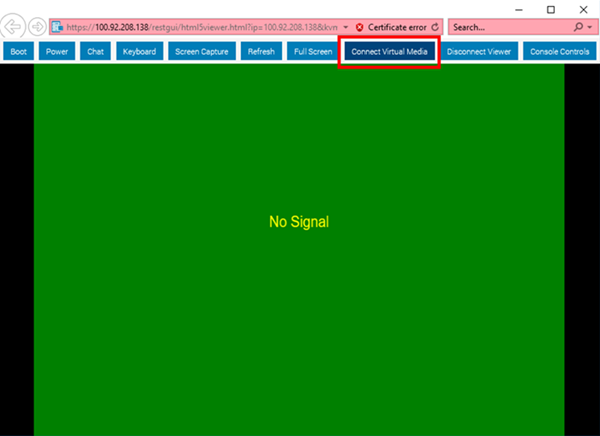
Figure 2: iDRAC9 UI - Connect Virtual Media.
- Click Virtual Media and browse to the device you want to pass through. In this example image (Figure 3), Map CD/DVD is chosen for the usage of an image (ISO file).
- Browse to the ISO location, choose the ISO then click Map Device.

Figure 3: iDRAC9 - Virtual Media UI
- Click Boot.
- Choose Virtual CD/DVD/ISO.

Figure 4: iDRAC9 - Boot Controls.
- Confirm the boot action by clicking Yes.
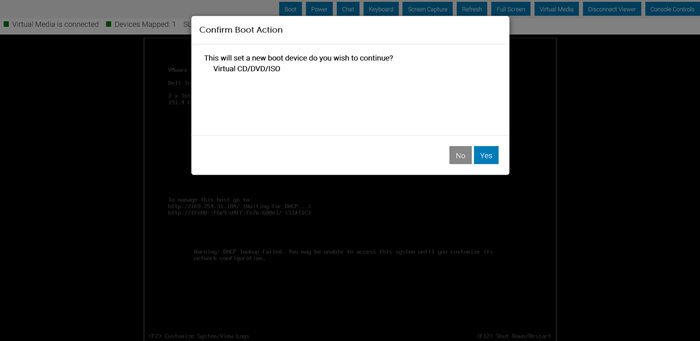
Figure 5: iDRAC9 - Boot Controls.
- The system reboots and shows Virtual CD boot Requested by iDRAC. The installation interface is then displayed.
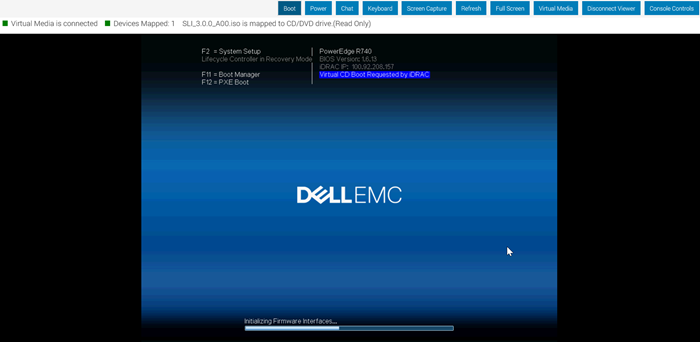
Figure 6: iDRAC9 - Hardware Boot Screen.
iDRAC8 and iDRAC7 (firmware versions 1.30.30 and later)
Follow this video for instructions:
How to create mount and troubleshoot Virtual Media in iDRAC
Duration: 00:05:23 (hh:mm:ss)
When available, closed caption (subtitles) language settings can be chosen using the CC icon on this video player.
Follow these directions to use the virtual media function on iDRAC8 and iDRAC7 (firmware versions 1.30.30 and later):
- Follow the system prompts as normal.
- Once you have finished the installation, Dell Technologies recommends disconnecting the virtual media.
- Open the Virtual Console from the iDRAC web interface. Click Virtual Media and then choose Connect Virtual Media to activate the function.
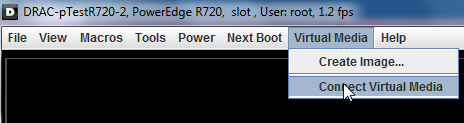
Figure 7: iDRAC8 - Connect Virtual Media.
The next steps differ depending on whether you want to Map a CD/DVD or Map a Removable Disk (USB Key Mapping). Click the appropriate option for more information.
Map a CD/DVD.
- Click Virtual Media and then select the device that you want to pass through. In this example, Map CD/DVD is selected for the usage of an image (ISO file).

Figure 8: iDRAC8 - Select Media
- Select the drive of the local system or the image file that you want to pass through by clicking Browse.
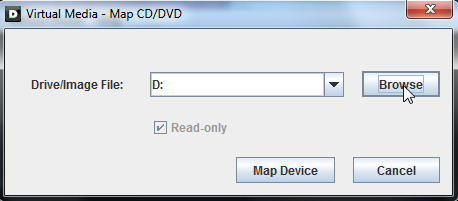
Figure 9: iDRAC8 - Select source.
- If you want to pass through an image, select the file and click Open.
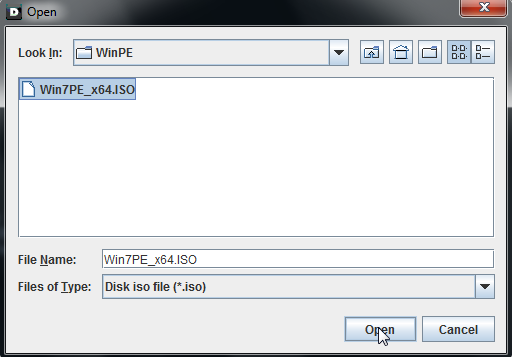
Figure 10: Select iDRAC8 file.
- Click Map Device to finish the source selection. The selected device is now visible in the operating system and can be used as boot source if supported.
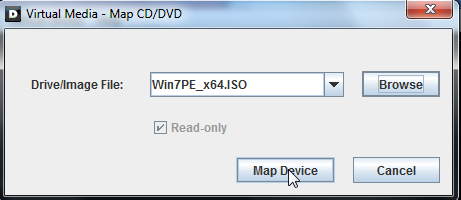
Figure 11: iDRAC8 Mapping the source device
- For booting from the selected device, you can click Next Boot and choose Virtual CD/DVD/ISO. After a restart, the server starts from this source automatically.
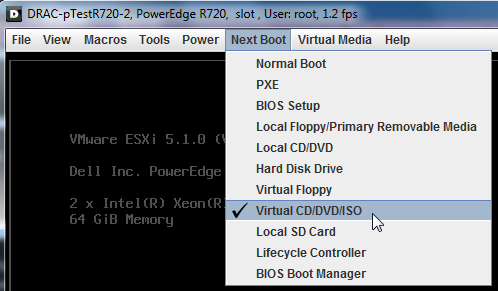
Figure 12: iDRAC8 Next Boot Selection.
Map a Removable Disk (USB Key Mapping)
Note: USB drive mapping requires the use of Java connection mode.
Mapping a Removable Disk allows you to mount a USB drive on the remote server and use the files.
- Click Virtual Media and select the device that you want to pass through. In the example image (Figure 13), Map Removable Disk is chosen.
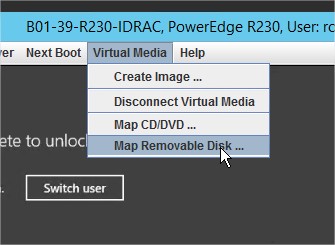
Figure 13: iDRAC8 Select Media
- Select the drive of the local USB drive and then select Map Device.
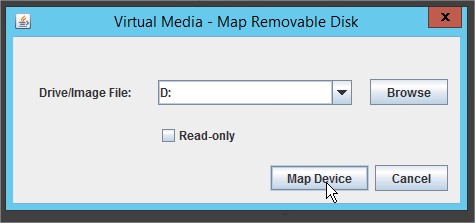
Figure 14: iDRAC8 Select USB Drive
Once the USB drive is mapped, the drive appears in the server's device list.

Figure 15: iDRAC8 Server Device List
iDRAC6 and iDRAC7 (firmware versions 1.00.00 to 1.20.20)
Follow these directions to use the virtual media function on an iDRAC6 or iDRAC7 (firmware version 1.00.00 to 1.20.20):
- Open the Virtual Console from the iDRAC web interface.
Figure 16: iDRAC6 and iDRAC7 Virtual Console
- Click Virtual Media and choose Launch Virtual Media.
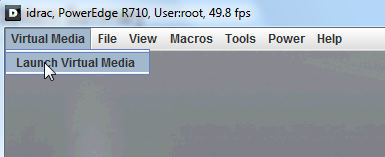
Figure 17: iDRAC6 and iDRAC7 Launch Virtual Media
- Now you see the management window. Click Add Image to open the image selection window.

Figure 18: iDRAC6 and iDRAC7 Management Window
- Select the image (ISO file) that you want to use as virtual media and then click Open.
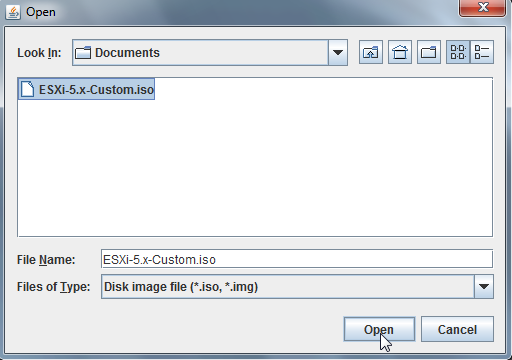
Figure 19: iDRAC6 and iDRAC7 Image file selection.
- Check the Mapped checkbox to associate the selected file as a virtual device and pass it through to the server. The selected device is now visible in the operating system and can be used as boot source if supported. Restart the server and press F11 to enter the boot manager.
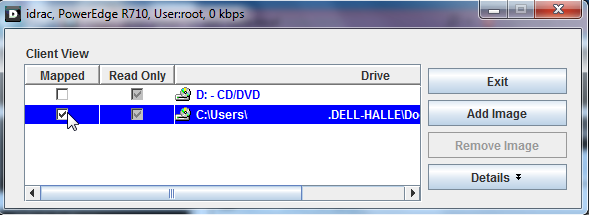
Figure 20: iDRAC6 and iDRAC7 Mapping the image file
Caution: Do not close the management window for if you want to use the file and device association.
iDRAC6 and iDRAC7 video:
How to use the iDRAC Virtual Media Function:
Duration: 00:00:54 (hh:mm:ss)
Closed caption (subtitles) language settings can be chosen using the CC icon on this video player.
Affected Products
C Series, HS Series, Modular Infrastructure, Rack Servers, Tower Servers, XE Servers, XR Servers, iDRAC6, iDRAC7, iDRAC8, OEM Server Solutions, iDRAC6 for Monolithic Servers Version 2.91, iDRAC6 for Monolithic Servers Version 2.92
, iDRAC7 with Lifecycle Controller Version 2.43.43.43, iDRAC7 with Lifecycle Controller Version 2.41.40.40, iDRAC8 with Lifecycle Controller version 2.84.84.84, iDRAC8 with Lifecycle Controller version 2.85.85.85, iDRAC9 - 7.xx Series, OEMR XL R570, OEMR XL R670, OEMR XL R770, OEMR R210II, OEMR R210, OEMR R220, OEMR R230, OEMR R240, OEMR R250, OEMR XE R250, OEMR R260, OEMR XE R260, OEMR R310, OEMR R320, OEMR R330, OEMR R340, OEMR R350, OEMR XE R350, OEMR R360, OEMR XE R360, OEMR R410, OEMR R420, OEMR R430, OEMR R440, PowerEdge XR2, OEMR R450, OEMR R510, OEMR R520, OEMR R530, OEMR R540, OEMR R550, OEMR R5500, OEMR R610, OEMR R620, OEMR R630, OEMR R640, OEMR XL R640, OEMR R6415, OEMR R650, OEMR R650xs, OEMR R6515, OEMR R6525, OEMR R660, OEMR XL R660, OEMR R660xs, OEMR R6615, OEMR R6625, OEMR R710, OEMR R720, OEMR R720xd, OEMR R730, OEMR R730xd, OEMR R740, OEMR XL R740, OEMR R740xd, OEMR XL R740xd, OEMR R740xd2, OEMR R7415, OEMR R7425, OEMR R750, OEMR R750xa, OEMR R750xs, OEMR R7515, OEMR R7525, OEMR R760, OEMR R760xa, OEMR R760XD2, OEMR XL R760, OEMR R760xs, OEMR R7615, OEMR R7625, OEMR R810, OEMR R820, OEMR R830, OEMR R840, OEMR R860, OEMR R910, OEMR R920, OEMR R930, OEMR R940, OEMR R940xa, OEMR R960, OEMR T130, OEMR T140, OEMR T150, OEMR T320, OEMR T330, OEMR T340, OEMR T350, OEMR T360, OEMR T420, OEMR T430, OEMR T440, OEMR T550, OEMR T560, OEMR T610, OEMR T620, OEMR T630, OEMR T640, OEMR XL T640, OEMR T710, OEMR XL R210, OEMR XL R210II, OEMR XL R220, OEMR XL R230, OEMR XL R240, OEMR XL R330, OEMR XL R340, OEMR XL R520, OEMR XL R610, OEMR V2 XL R610, OEMR XL R620, OEMR XL R630, OEMR XL R660xs, OEMR XL R6615, OEMR XL R6625, OEMR XL R6715, OEMR XL R6725, OEMR XL R710, OEMR XL V2 R710, OEMR XL R720, OEMR XL R720xd, OEMR XL R730, OEMR XL R730XD, OEMR XL R760xs, OEMR XL R7615, OEMR XL R7625, OEMR XL R7715, OEMR XL R7725, OEMR XR11, OEMR XR12, PowerEdge Rack Enclosure 2410, PowerEdge Rack Enclosure 2420, PowerEdge Rack Enclosure 4020S, PowerEdge Rack Enclosure 4210, PowerEdge Rack Enclosure 4220, PowerEdge Rack Enclosure 4620S, PowerEdge Rack Enclosure 4820, PowerEdge C4130, Poweredge C4140, PowerEdge C5220, PowerEdge C5230, PowerEdge C6145, PowerEdge C6220, PowerEdge C6220 II, PowerEdge c6300, PowerEdge c6320, PowerEdge c6320p, PowerEdge C6400, PowerEdge C6420, PowerEdge C6520, PowerEdge C6525, PowerEdge C6600, PowerEdge C6615, PowerEdge C6620, Poweredge FC430, Poweredge FC630, PowerEdge FC640, Poweredge FC830, PowerEdge FD332, PowerEdge FM120x4 (for PE FX2/FX2s), PowerEdge HS5610, PowerEdge HS5620, PowerEdge M420, PowerEdge M520, PowerEdge M520 (for PE VRTX), PowerEdge M610, PowerEdge M610x, PowerEdge M620, PowerEdge M620 (for PE VRTX), PowerEdge M630, PowerEdge M630 (for PE VRTX), PowerEdge M640, PowerEdge M640 (for PE VRTX), PowerEdge M710, PowerEdge M710HD, PowerEdge M7701, PowerEdge M7725, PowerEdge M805, PowerEdge M820, PowerEdge M820 (for PE VRTX), PowerEdge M830, PowerEdge M830 (for PE VRTX), PowerEdge M905, PowerEdge M910, PowerEdge M915, PowerEdge MX5016s, PowerEdge MX7000, PowerEdge MX740C, PowerEdge MX750c, PowerEdge MX760c, PowerEdge MX840C, PowerEdge R200, PowerEdge R210, PowerEdge R210 II, PowerEdge R220, PowerEdge R230, PowerEdge R240, PowerEdge R250, PowerEdge R260, PowerEdge R300, PowerEdge R310, PowerEdge R320, PowerEdge R330, PowerEdge R340, PowerEdge R350, PowerEdge R360, PowerEdge R410, PowerEdge R415, PowerEdge R420, PowerEdge R420XR, PowerEdge R430, PowerEdge R440, PowerEdge R450, PowerEdge R470, PowerEdge R510, PowerEdge R515, PowerEdge R520, PowerEdge R530, PowerEdge R530xd, PowerEdge R540, PowerEdge R550, PowerEdge R570, PowerEdge R610, PowerEdge R620, PowerEdge R630, PowerEdge R640, PowerEdge R6415, PowerEdge R650, PowerEdge R650xs, PowerEdge R6515, PowerEdge R6525, PowerEdge R660, PowerEdge R660xs, PowerEdge R6615, PowerEdge R6625, PowerEdge R670, PowerEdge R6715, PowerEdge R6725, PowerEdge R710, PowerEdge R715, PowerEdge R720, PowerEdge R720XD, PowerEdge R730, PowerEdge R730xd, PowerEdge R740, PowerEdge R740XD, PowerEdge R740XD2, PowerEdge R7415, PowerEdge R7425, PowerEdge R750, PowerEdge R750XA, PowerEdge R750xs, PowerEdge R7515, PowerEdge R7525, PowerEdge R760, PowerEdge R760XA, PowerEdge R760xd2, PowerEdge R760xs, PowerEdge R7615, PowerEdge R7625, PowerEdge R770, PowerEdge R7715, PowerEdge R7725, PowerEdge R805, PowerEdge R810, PowerEdge R815, PowerEdge R820, PowerEdge R830, PowerEdge R840, PowerEdge R860, PowerEdge R900, PowerEdge R905, PowerEdge R910, PowerEdge R920, PowerEdge R930, PowerEdge R940, PowerEdge R940xa, PowerEdge R960, PowerEdge T130, PowerEdge T140, PowerEdge T150, PowerEdge T160, PowerEdge T30, PowerEdge T330, PowerEdge T340, PowerEdge T350, PowerEdge T360, PowerEdge T40, PowerEdge T430, PowerEdge T440, PowerEdge T550, PowerEdge T560, PowerEdge T630, PowerEdge T640, PowerEdge XE2420, PowerEdge XE7100, PowerEdge XE7420, PowerEdge XE7440, PowerEdge XE7745, PowerEdge XE8545, PowerEdge XE8640, PowerEdge XE9640, PowerEdge XE9680, PowerEdge XR11, PowerEdge XR12
...
Article Properties
Article Number: 000124001
Article Type: How To
Last Modified: 12 Jun 2026
Version: 20
Find answers to your questions from other Dell users
Support Services
Check if your device is covered by Support Services.