Using the Rugged Control Center Admin portal to set user policies, access, and deployment
Summary: Using the Rugged Control Center admin portal for user policies and access settings and for mass OS deployment.
This article applies to
This article does not apply to
This article is not tied to any specific product.
Not all product versions are identified in this article.
Symptoms
With the Admin portal in the Rugged Control Center (RCC), Administrators will be able to apply user policies and controls to limit user access to features and pre-configure RCC settings for customized mass deployment. Follow the steps outlined in this article for using the Admin portal in the Rugged Control Center.
Rugged Control Center Admin portal
Follow the steps below to create and distribute it_admin_profile.json using the Rugged Control Center (RCC):
- Launch the Rugged Control Center (RCC) Admin portal from the Windows start menu:
- Open the Windows start menu and navigate to the Rugged Control Center (RCC) icon
- Press and hold the following keys: CTRL+ALT+A
- While still holding above keys click on the RCC icon and keep the keys still pressed afterwards
- Edit the Admin options (Figure 1):
- Editable – Uses RCC default and end-user can edit
- Locked – Custom default from admin portal session and end-user cannot edit
- Preset – Custom default from admin portal session and end-user can edit

Figure 1: RCC Admin portal settings - For Locked and Preset options, customize the RCC application to create your custom default settings; Ribbon, Dashboard, P-buttons (tablet only), Settings, etc.
- Exit RCC Admin portal using the RCC System tray icon and choose Exit RCC (Figure 2):
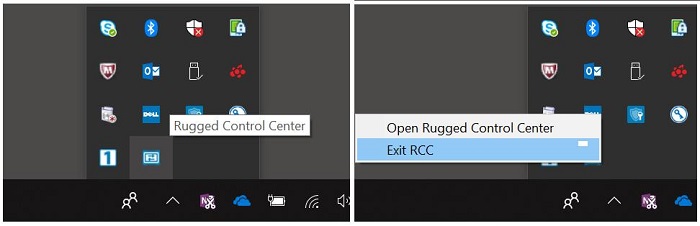
Figure 2: Exit RCC Admin portal from system tray icon - Exiting will create the file dist_profile.json in the path of current user:
- C:\Users\<user>\AppData\Local\Packages\DellInc.DellRuggedControlCenter_xxxxx\Local Cache\Roaming\Dell\RCC
- Copy/paste the dist_profile.json file.
- Change the name of the copied file to it_admin_profile.json
- If there are customized "Open App/items" added by the "Browser" option and the target is a file, edit the it_admin_profile.json FilePath and IconPath sections.
- Edit profile FilePath section:
- Change file path to reflect location of application/file with the same path and name as will be on target machines.
- Any folder is OK so long as it can be accessed by a user.
- Example:
- C:\RCC\RCC Refactor.pptx
- C:\Program Files\Dell\Dell Rugged Control Center\RCC Refactor.pptx
- C:\ProgramData\Dell\Dell Rugged Control Center\RCC Refactor.pptx
- Edit profile IconPath section:
- Change file path to reflect location of icons with the same path and name as will be on target machines.
- Any folder is OK so long as it can be accessed by a user.
- Example:
- C:\Program Files\Dell\Rugged Control Center\Images\e2899436-3e78-4e5e-b0af-e41eca0d657f.ico
- C:\ProgramData\Dell\Dell Rugged Control Center\Images\e2899436-3e78-4e5e-b0af-e41eca0d657f.ico
- Example of customized open App/item in user profile (Note: please input double "\" as path separator):
- {"Name":"RCC Refactor.pptx","UniqueID":"e2899436-3e78-4e5e-b0af-e41eca0d657f","FilePath":"C:\\Leo\\RCC\\RCC
Refactor.pptx","IconPath":"C:\\Users\\chao_liu5\\AppData\\Roaming\\Dell\\RCC\\Images\\e 2899436-3e78-4e5e-b0af-e41eca0d657f.ico"}
- Edit profile FilePath section:
- Distribute the it_admin_profile.json file to all target machines into the following folder:
C:\Program Files\Dell\Rugged Control Center\ - Distribute all target files and icon files according to the changes made in Step 7.
Cause
NA
Resolution
Refer to Symptoms section.
Affected Products
Rugged Control CenterArticle Properties
Article Number: 000132566
Article Type: Solution
Last Modified: 15 Feb 2024
Version: 4
Find answers to your questions from other Dell users
Support Services
Check if your device is covered by Support Services.