How to Access the RAID Controller Setup in UEFI Configured Computers
Summary: This article is a guide to access and manage RAID in the UEFI BIOS and IRST User Interface on Precision, OptiPlex, Alienware, and Other Dell products. RAID configurations in the UEFI BIOS configuration cannot be accessed through the legacy CTRL+I or CTRL+H hotkey combinations. ...
This article applies to
This article does not apply to
This article is not tied to any specific product.
Not all product versions are identified in this article.
Instructions
Legacy hotkey combinations cannot access the Basic Input/Output System (BIOS) Redundant Arrays of Inexpensive Disks Controller (RAID) controller configuration Read-Only Memory (ROM). Where the BIOS is configured for Unified Extensible Firmware Interface (UEFI) boot mode on Precision, OptiPlex, Alienware, and other Dell computers. Learn how to launch and manage RAID Arrays through this article.
Overview
Where Precision, OptiPlex, Alienware, or other Dell products with RAID controllers are configured for UEFI boot mode, it affects the hotkeys. Because of this configuration, the RAID setup utility built into the BIOS does not open using CTRL + I, CTRL + H, or other hotkey combinations.
The hotkey access to the RAID setup functions only when the BIOS is configured for the Legacy boot mode.
Usually, RAID can be managed from the Intel Rapid Storage Technology (IRST) user interface (For Example) inside Windows. If you cannot manage the RAID array in Windows, you should access the RAID configuration from the UEFI BIOS F12 Device Configuration menu.
For more information, see the following Dell Knowledge Base articles:
- RAID Configuration for Dell Precision Mobile Workstations
- Precision Workstation: RAID Controller Setup
- Configuring RAID in a Dell Precision Workstation
- How to Configure Intel Based RAID on a Dell Computer
- How to Troubleshoot a RAID Hard Drive Issue on a Dell Computer
Creation of a Recovery Array in the IRST User Interface
The RAID setup utility runs and allows for configuration of the computer’s RAID array. See Figures 2-19 for examples of the Intel Integrated RAID in UEFI mode. Intel Integrated RAID can be configured from either the Intel Rapid Storage Technology (IRST) user interface or from the RAID BIOS.
Below are examples of the IRST User Interface (UI) and the UEFI BIOS during the configuration of Intel Integrated RAID. Other RAID controllers may have different screens, but the basic configuration functionality should be similar.
Recovery Array
The IRST user interface allows you to create RAID array configurations from within the operating system with ease.
- Creating a Recovery Array (Default) using the Intel Integrated RAID controller and the Intel Rapid Storage Technology user interface. (See Figure 1.)
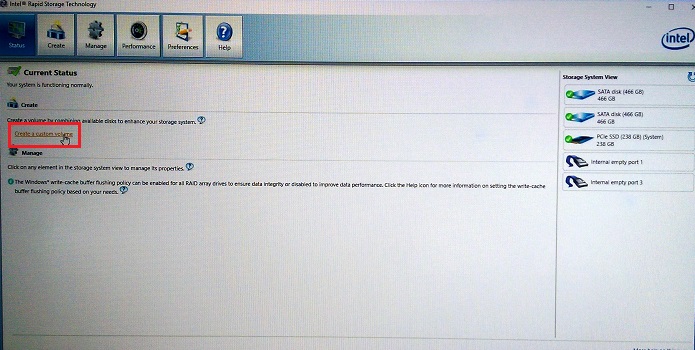
Figure 1. The first step in creating a Recovery RAID Array - Select the type of RAID array that you want to create. (See Figure 2.)
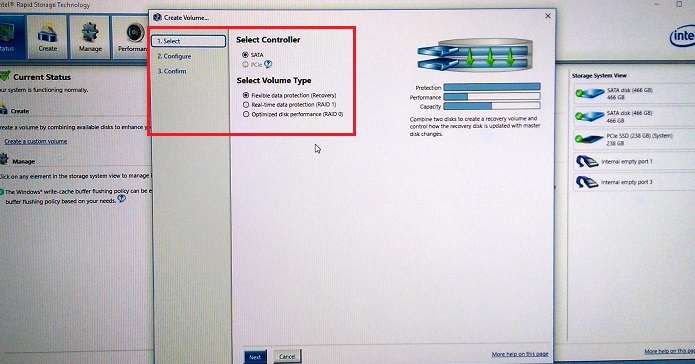
Figure 2. RAID array selection choices - Configure the selected drives in the RAID array. (See Figure 3.)
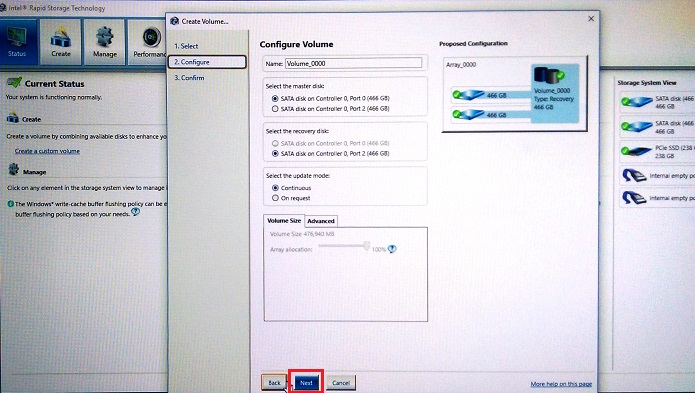
Figure 3. Selection of the disk assignments in the Recovery array - Confirm the creation of the recovery volume. (See Figure 4.)
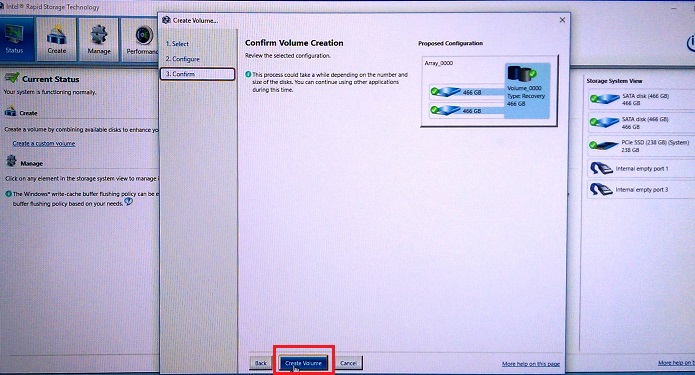
Figure 4. Creation of the Recovery volume array - Click OK on the volume creation complete. (See Figure 5.)

Figure 5. Recovery Volume array creation completes
NOTE: After the array is created, you are prompted to open Disk Management to create and format partitions on the array.
How to Access RAID BIOS in UEFI mode
When these computers are configured in UEFI BIOS mode, the RAID setup is accessed from the F12 preboot menu.
Press F12 on power up while at the Dell logo splash screen. Then, select "Device Configuration" from the list shown in the F12 preboot menu. (See Figure 6.)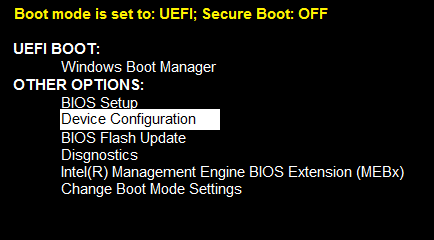
Figure 6. UEFI Pre-Boot Menu, Device Configuration option
Creation of a RAID 1 (Mirror) in the IRST User Interface
- Creating a RAID 1 Array (Mirror) using the Intel Integrated RAID controller and the Intel Rapid Storage Technology user interface. (See Figure 7.)
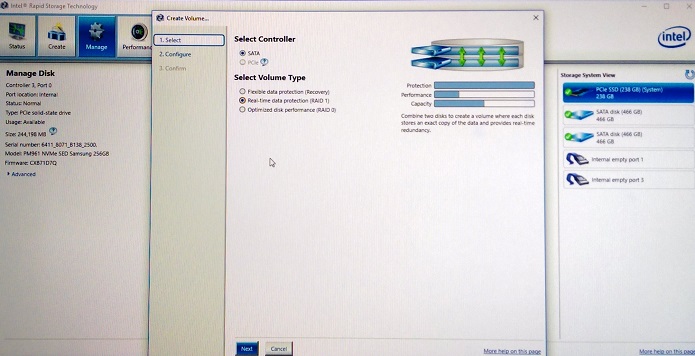
Figure 7. Creating a RAID 1 Array (Mirror) - Select the drives to create the RAID array. (See Figure 8.)
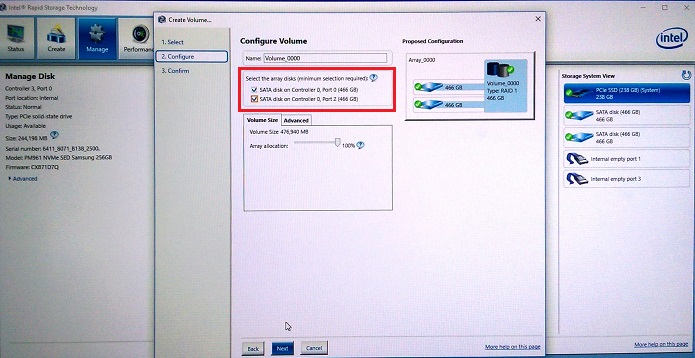
Figure 8. RAID 1 (Mirror) drive selection - There is an optional selection of the size of the RAID 1 array (Default is 100%). (See Figure 9.)
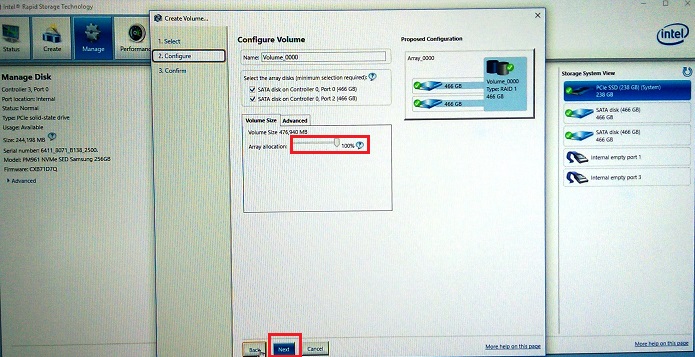
Figure 9. Selection of the size of the RAID 1 array - Confirm the RAID 1 Volume. (See Figure 10.)
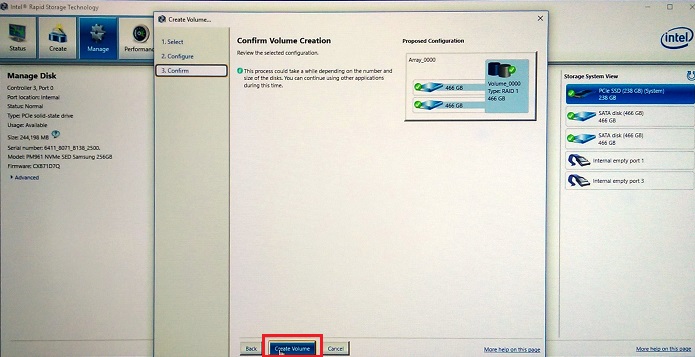
Figure 10. Confirmation of the RAID 1 Volume - The volume creation finishes (See Figure 11.)
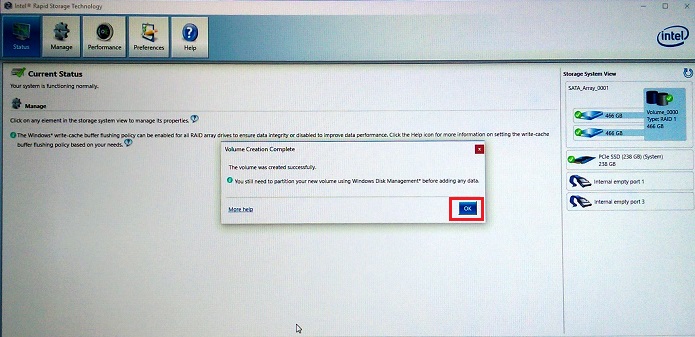
Figure 11. RAID 1 volume creation is complete
Creation of a RAID Array in the UEFI BIOS
You can also create RAID volumes in the UEFI RAID BIOS that you access from the F12 Device configuration menu (See Figure 6 above.)
- Once you select Device Configuration and press the "Enter" key, you are presented with the RAID status page. To create a RAID array, ensure "Create RAID Volume" is highlighted (using the array keys) then press the "Enter" key to start the array creation process. (See Figure 12.)

Figure 12. Create RAID Volume - In this configuration, we change from the Default RAID 1(Mirror) to the RAID 0(Stripe) option using the "+" Key. (See Figure 13.)
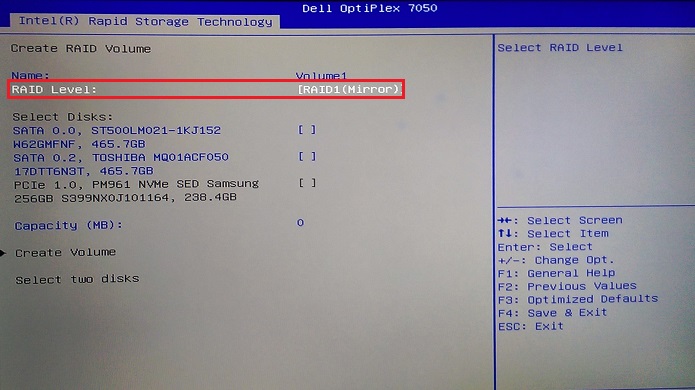
Figure 13. Changing from the default RAID 1 to RAID 0 striped array - Once you have selected your array type, you then must select the drives to be configured in the array. Use the arrow keys to highlight the drive, then press the "Enter" key to select the drive to add. (See Figure 14.)
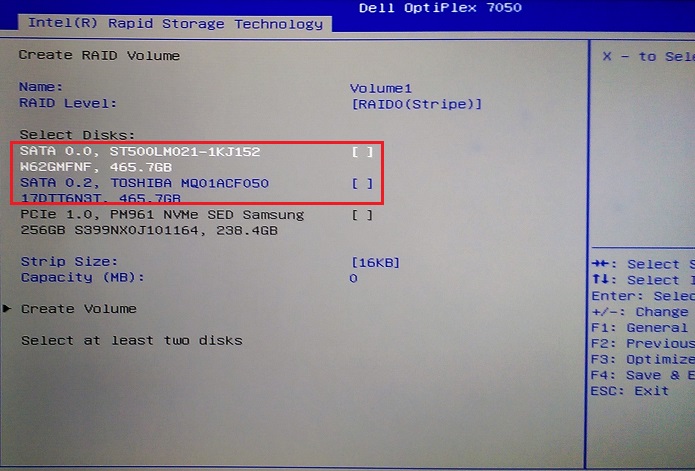
Figure 14. Selecting the first drive to add to the array - An on-screen box appears for the drive, use the arrow key to highlight the selection space, type an "X" to select then press the "Enter" key to complete the drive selection. (See Figure 15.)
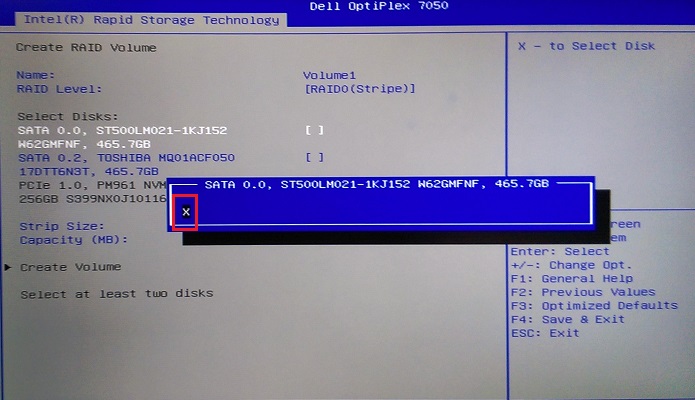
Figure 15. The drive selection screen - Repeat the selection process for the second, third, or even fourth drive (Depending on drive and chassis configuration) (See Figure 16.)
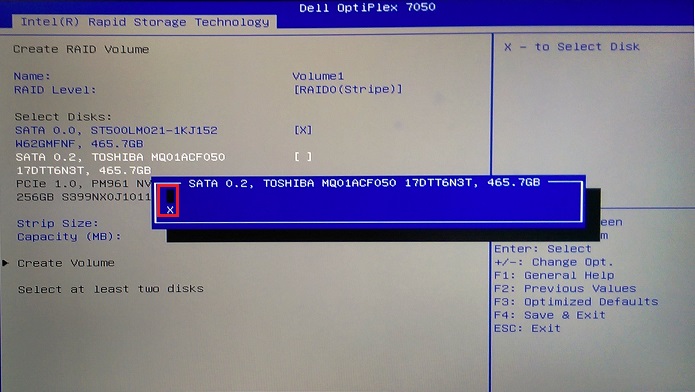
Figure 16. Selection of the second drive for the array - Use the arrow keys to go to the "Create Volume" option that becomes available once there are at least two drives selected. (See Figure 17.)
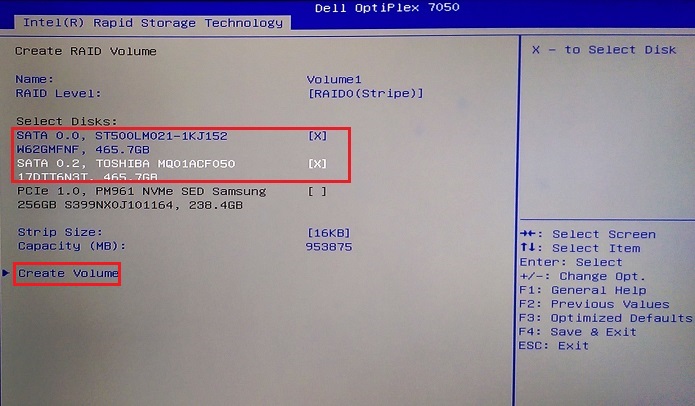
Figure 17. Creation of the Volume after drive selection is completed - Once the Array is complete, you can see the status of the array. (See Figure 18.)
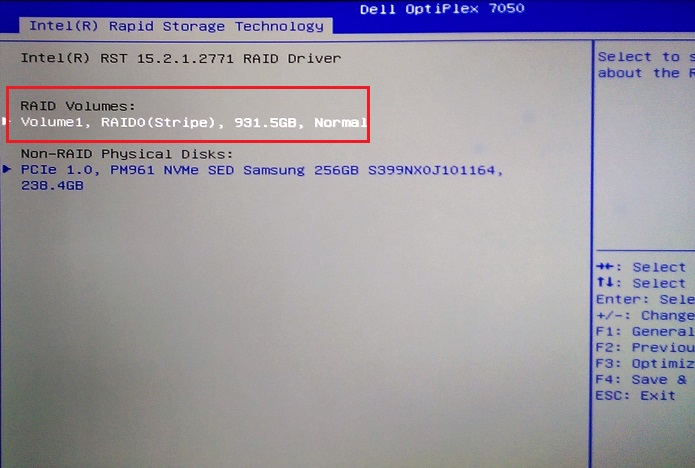
Figure 18. Array status after array completion
Deleting an Array in the UEFI BIOS
If an array already exists, there is an option available to delete the array. When the delete option is selected, you must confirm the array deletion, and you receive a warning that the Volume is being wiped. (See Figure 19. Below.)
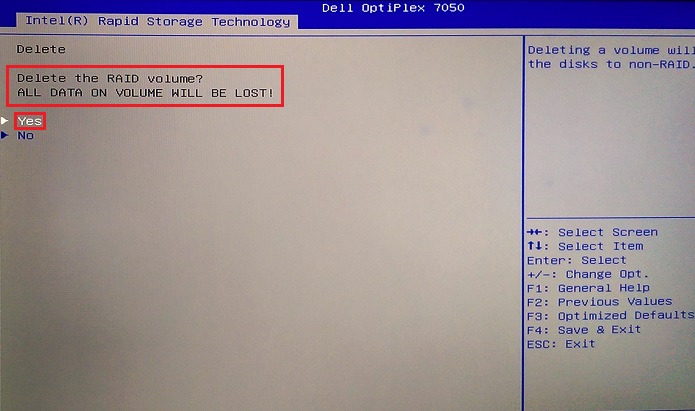
Figure 19. Deleting an array confirmation in the UEFI BIOS
Affected Products
Alienware m16 R1, Alienware m18 R1, OptiPlex 5050 Tower, OptiPlex 5050 Micro, OptiPlex 5050 Small Form Factor, OptiPlex 7020 Tower (End of Life), OptiPlex 7020 Small Form Factor (End of Life), OptiPlex 7040 Tower, OptiPlex 7040 Micro
, OptiPlex 7040 Small Form Factor, OptiPlex 7050 Tower, OptiPlex 7050 Micro, OptiPlex 7050 Small Form Factor, Optiplex 9020, Precision Rack 7910, Dell Precision Tower 3420, Precision T3610, Dell Precision Tower 3620, Precision T5610, Precision Tower 5810, Precision T7610, Dell Precision Tower 7810, Precision Tower 7910
...
Article Properties
Article Number: 000140131
Article Type: How To
Last Modified: 06 Jan 2025
Version: 10
Find answers to your questions from other Dell users
Support Services
Check if your device is covered by Support Services.