IDPA: Data collection fails in DPA after a DPA redeployment
Summary: This KB article provides instructions to resolve DPA data collection issues after the IDPA DPA has been redeployed.
This article applies to
This article does not apply to
This article is not tied to any specific product.
Not all product versions are identified in this article.
Symptoms
DPA was redeployed on the IDPA system, but there is no data in the reports. Attempts to run debug data collection fail.
The dpaagent.log has stopped or shows "store and forward queues is full." This indicates that the agent cannot communicate with the APP server.
Cause
The Agent has lost connection to the APP service. The cause is not known.
Resolution
NOTE: A fix for this issue has been added to the goidpa tool, follow the below KB to install goidpa:
Then run the following command on the ACM:
./goidpa dpa agent-register
If the goidpa command does not resolve this, then manually configure and re-register the agent with the APP server, with the following procedure.
- In the DPA UI go to Administrator>System>Configure System Settings. In the popup box, click the arrow next to Data Collection Agents to expand the list. Highlight the agent that is being used, APP, or separate Data collection server. Then click the Remove Agent button.
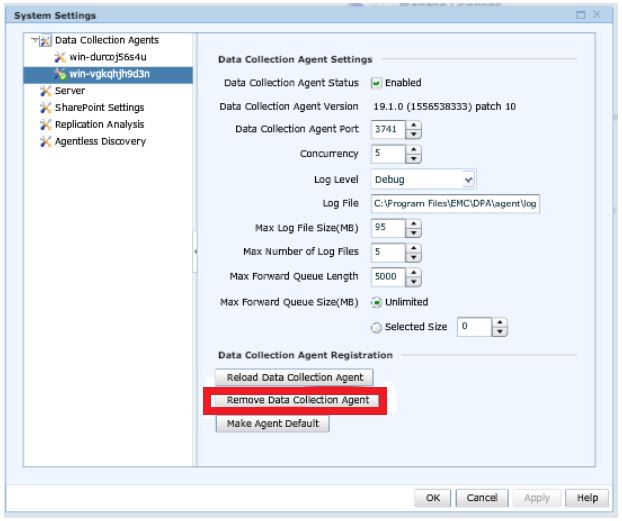
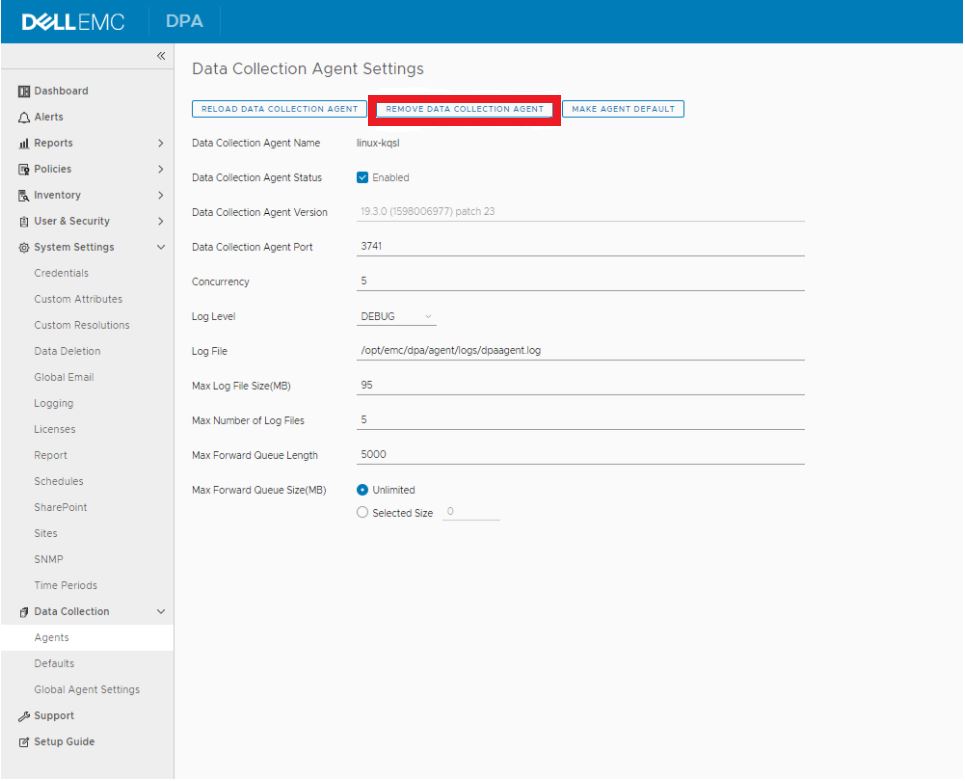
In IDPA 2.6 or DPA 19.3 go to Data Collection>Agents and then highlight the agent and click the Data Collections Agent Settings button. Then click the Remove Agent button.
- Log in to the DPA APP server and go to
/opt/emc/dpa/services/bin directoryand run the following commands:
./dpa.sh app agentpassword
Put in a password (usually IDPA Common Password) and confirm the password.
./dpa.sh app restart - Log in to the DPA Agent server (for DP 4400 this is the APP server).
- Navigate to
/opt/emc/dpa/agent/etcand run the following:
- Navigate to
vi dpaagent_config.xml
#Check the <servername> tag, is this the DPA APP IP address? If it is not then change to the DPA APP IP. Once this is the DPA APP IP save and exit.
./dpa stop-
- Navigate to
/opt/emc/dpa/agent/dataand run the following:
- Navigate to
mkdir olddata
mv * olddata/-
- Navigate to
/opt/emc/dpa/agent/etcand run the following:
- Navigate to
./dpa start -
- Navigate to
/opt/emc/dpa/agent/binand run the following:
- Navigate to
./dpaagent --set-credentials
#put in the passwork you set in step 2, confirm the password -
- Navigate to
/opt/emc/dpa/agent/etcand run the following:
- Navigate to
./dpa start -
- Navigate to
/opt/emc/dpa/agent/logsand check the dpaagent.log to see if there are any errors after the restart.
- Navigate to
- Open the DPA UI again and go to Administrator>System>Configure System Settings. In the popup box, click the arrow next to Data Collection Agents to expand the list. See if the agent is showing up again.
Go to Inventory>Object Library>Applications tab. Select the Avamar and click the Properties button, in the Properties popup box, click the Data Collection tab. Select Avamar Job Monitor collections and click the history button. Check to see if the last data collection was successful.
Contact Dell support if you have any questions.
Affected Products
Integrated Data Protection Appliance FamilyProducts
Data Protection Advisor, PowerProtect Data Protection SoftwareArticle Properties
Article Number: 000181653
Article Type: Solution
Last Modified: 02 Dec 2025
Version: 3
Find answers to your questions from other Dell users
Support Services
Check if your device is covered by Support Services.