Dell Unity: Managing FAST VP or Auto Tiering relocation through Unisphere user interface
Summary: This article describes managing the auto tiering of data in Unity hybrid storage pools through Unisphere.
This article applies to
This article does not apply to
This article is not tied to any specific product.
Not all product versions are identified in this article.
Instructions
Goals
- Provide information about managing the auto tiering in Unity hybrid storage pools through Unisphere.
- Briefly explain FAST VP.
Facts
Fully Automated Storage Tiering for Virtual Pools (FAST VP) functionality is available in traditional, hybrid pools or dynamic pools. (FAST VP for dynamic pool is supported on OE 5.3 or upper. Older OE does not support it)
FAST VP keeps the most frequently accessed data on fast, high-performance drives and moves less frequently accessed and less important data to lower performance, cost-effective drives.
FAST VP:
- Monitors the usage of the data in a tiered pool. Tiered pools are heterogeneous pools that are configured with multiple classes of drives (SAS Flash 2 or SAS Flash 3, or both, plus SAS or NL-SAS, or both).
- Depending on the tiering policy, uses the monitoring statistics to automatically relocate data chunks, at 256 MB granularity, to other tiers within the pool.
- Performs load balancing across the drives in tiered and non-tiered pools
Data relocation (Auto-Tiering) can be configured and managed at the system level, and at the pool level, and can be set to be automated (scheduled) or manual.
Solution
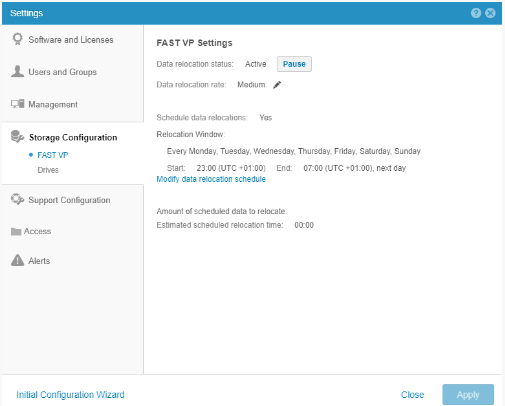
System-level automatic (scheduled) relocations:
- Select the Settings icon, and then select Storage Configuration > FAST VP.
- You have the options to:
- Select Pause to disable data relocations for the storage system.
- Select Resume to enable data relocations for the storage system
- Select Modify data relocation schedule to change the automatic data relocation schedule.
- Edit Data Relocation Rate (Low, Medium, High); the higher the rate, the bigger the potential impact on performance.
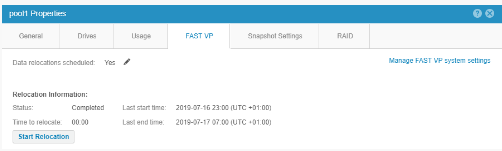
Pool-level automatic (scheduled) or manual relocations:
- Under Storage, select Pools.
- Select the pool for which you want to initiate or stop data relocations, and then select the Edit icon.
- Select FAST VP.
- You have the options to:
- Edit 'Data Relocations scheduled' to change this particular pool from following the system-wide relocation schedule. If you change this field to No, this pool will now have manual start or stop relocation.
- Start data relocations for the pool, choose Start Relocation, and select the rate and end time for the data relocation.
- Stop data relocations, choose Stop Relocation. This stops all data relocations for the pool, including manually initiated data relocations that are currently in progress and scheduled data relocations.
NOTE:
- Scheduled data relocations for the storage system are enabled by default.
- If you stop a pool from participating in scheduled data relocations when a data relocation is taking place, the system completes the data relocation.
- Pausing data relocations on the system-level stops all scheduled data relocations and manual data relocations that are in progress.
Affected Products
Dell EMC UnityArticle Properties
Article Number: 000205852
Article Type: How To
Last Modified: 10 Sep 2024
Version: 6
Find answers to your questions from other Dell users
Support Services
Check if your device is covered by Support Services.