The Features of the Dell Pro Max All-in-One Stand CFS25
Summary: The following article provides information about the features, assembly, and range of movement for the Dell Pro Max All-in-One Stand CFS25.
This article applies to
This article does not apply to
This article is not tied to any specific product.
Not all product versions are identified in this article.
Instructions
Reference each section below to learn more about the features of the Dell Pro Max All-in-One Stand CFS25 and how to use it.
Table of Contents:
Introduction

Figure 1: Dell Pro Max All-in-One Stand CFS25 without the monitor attached
Secure your Dell Precision Compact Workstation and Dell monitor with an all-in-one stand with effortless setup and a cable management system for a clean workspace.
You can locate further information about the Dell Pro Max All-in-One Stand CFS25 from the following link:
You can search the Dell Sales Site for the Dell Pro Max All-in-One Stand CFS25 to find out information such as the price.
Features
| Product Type | Desktop Stand |
| Color | Silver |
| VESA Mounting |
|
| Compatibility |
|
| Minimum Load Capacity | 2.18 kg (4.80 lbs) |
| Maximum Load Capacity | 5.8 kg (12.8 lbs) |
| Minimum Screen Size Supported | 19" |
| Maximum Screen Size Supported | 27" |
| Cable Management | Slot in stand arm for cable management |
Assembly
Note: The adapter plate, screws, spacers, thumbscrew, and cable cover are packaged in the box for the Dell Pro Max All-in-One Stand CFS25.
Assembly Steps:
- Use screws to connect the base extender to the Dell Pro Max All-in-One Stand CFS25.
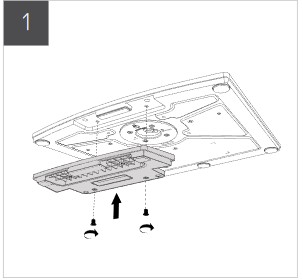
Figure 2: Connecting the base extender
- With the Dell Pro Max All-in-One Stand CFS25 standing on a desk, connect it to the Dell Pro Max All-in-One Stand CFS25 stand arm from under the stand.

Figure 3: Connecting the stand arm
- Screw and tighten the mounting bolts into the base of the compact computer.

Figure 4: Tightening mounting bolts into the compact computer
- Position the mounting bolts into the computer plate on the Dell Pro Max All-in-One Stand CFS25. Secure the compact computer to the stand.
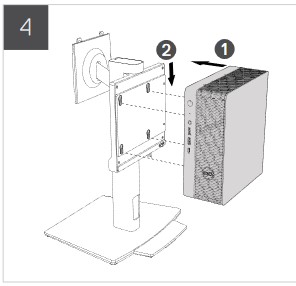
Figure 5: Securing the compact computer to the stand
- Route the compact computer and monitor cables through the slot in the stand and into the computer. Leave the monitor cables free until the monitor has been fitted.
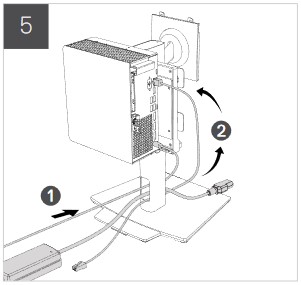
Figure 6: Routing cables
- Slide the cable cover over the cables connected into the computer.

Figure 7: Sliding the cable cover over cables
- Lock the slide latch under the front of the compact computer.

Figure 8: Locking the slide latch
- Optionally, using a lock (not included) and the hasp on the stand, you can lock the compact computer in place.
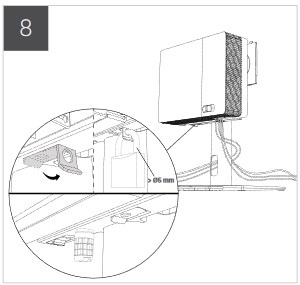
Figure 9: Security lock
- Connect the monitor onto the monitor arm of the stand.
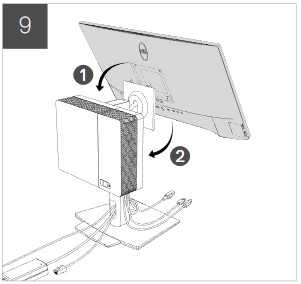
Figure 10: Connecting the monitor onto the monitor arm
- Use the hooks on the back of the cable cover to take up any slack in the monitor cabling.
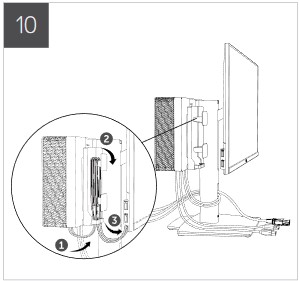
Figure 11: Using the cable hooks
- Plug in the monitor cables.

Figure 12: Connecting monitor cables
Range of Movement
Do not attempt to swivel the monitor from portrait mode to landscape mode with a 27" monitor.

Figure 13: Do not swivel from portrait to landscape with a 27" monitor
The top of the monitor arm has a monitor quick release mechanism.

Figure 14: Monitor quick release mechanism
| Movement | Height adjustable, swivels, rotates, and tilting |
| Swivel | 45° |
| Height | 150 mm (5.91") |
| Tilt | -5° to 21° |
Affected Products
Dell Pro Max All-in-One Stand CFS25Article Properties
Article Number: 000224144
Article Type: How To
Last Modified: 17 Apr 2025
Version: 3
Find answers to your questions from other Dell users
Support Services
Check if your device is covered by Support Services.