PowerEdge: CMOS Battery Customer Replaceable and Basic Warranty Handling
Summary: CMOS Battery replacements for Basic Warranty contracts are under warranty through Dell for up to 1 year. This article outlines how to order and replace CMOS batteries once these batteries are no longer under warranty and replaced by Dell. ...
This article applies to
This article does not apply to
This article is not tied to any specific product.
Not all product versions are identified in this article.
Instructions
Warranty
Customers with Basic Warranty contracts must self-purchase and self-replace CMOS batteries for those impacted systems that have been installed longer than 1 year.
See the article How to Replace or Change a CMOS Battery on Your Dell Desktop for instructions on replacing a CMOS battery.
Dell Approved Battery Types
Dell approves the below CMOS battery types for purchase and replacement by customers. Customers can purchase these batteries through a local retailer or through Amazon.
|
Brand |
Type |
|---|---|
|
Panasonic |
CR2032 |
|
Energizer |
CR2032 |
|
Duracell |
CR2032 |
|
Maxell |
CR2032 |
Battery Replacement Handling
Outlined below are helpful reminders and instructions on how to replace CMOS batteries.
IMPORTANT REMINDERS:
- Prepare your PowerEdge (or comparable) system, the system must be shut down to complete the battery replacement.
- Custom BIOS settings for INTEL systems are lost when the battery is removed. These must be reset when the system is back online. **CRITICAL, do not skip**
- Remember to backup the BIOS information prior to shutting the PowerEdge (or comparable) system down.
- Restore the BIOS information after the system is back online.
WARNING: There is a danger of a new battery exploding if it is incorrectly installed. Replace the battery only with the same or equivalent type recommended by the manufacturer.
Battery Replacement Handling
SolVe procedures are available for this scenario along with PowerEdge (or comparable) Installation, and service manuals are available from the standard product support site. Located below are the generic replacement instructions:
- Complete the BIOS backup (INTEL systems only) - Backup information is found in the product guide: Integrated Dell Remote Access Controller 9 User's Guide.
- Remove the air shroud
- If applicable, disconnect the power or data cables from the expansion card riser
- If installed, remove the expansion card risers
- If installed, remove the PCIe expansion cards
- Locate the battery socket
CAUTION: To avoid damage to the battery connector, you must firmly support the connector while installing or removing the battery.
-
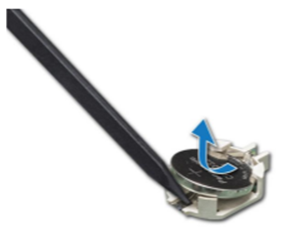
Use a plastic scribe to pry out the system battery
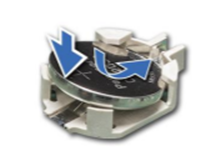
- To install a new system battery, hold the battery with the positive side facing and slide it under the securing tabs.
- Press the battery into the connector until it snaps into place
- If applicable, install the low-profile PCIe cards
- If applicable, install the expansion card riser. Connect the power or data cables to the expansions card risers.
- Install an air shroud
- While booting, press F2 to enter the System setup and ensure that the battery is operating properly
- Enter the correct data and time in the System Setup Time and Date fields
- Restore the BIOS settings (if applicable)
- Exit the system setup
Dispose of Battery.
CMOS batteries should be properly disposed of. Reference https://www.epa.gov/recycle/used-household-batteries for local recycling and disposing of these button batteries properly.
Place electrical or masking tape over the '+' terminal to prevent accidental contact, which could short-circuit the battery and cause a fire.
Affected Products
PowerFlex rack, VxRail, C Series, HS Series, Modular Infrastructure, Rack Servers, Tower Servers, XE Servers, XR Servers, OEM Server SolutionsArticle Properties
Article Number: 000227359
Article Type: How To
Last Modified: 07 May 2026
Version: 11
Find answers to your questions from other Dell users
Support Services
Check if your device is covered by Support Services.