UEFI Windows Install Error
概要: Information about resolving a UEFI Window install error.
この記事は次に適用されます:
この記事は次には適用されません:
この記事は、特定の製品に関連付けられていません。
すべての製品パージョンがこの記事に記載されているわけではありません。
現象
原因
No cause information is available.
解決方法
UEFI Windows Install Error
When installing a Unified Extensible Firmware Interface (UEFI) based Windows Operating System (OS). You may receive the following error message: "Windows cannot be installed to this disk. The selected disk has an MBR partition table."
When installing Windows on a UEFI-based computer using Windows Setup, your hard drive partition style must be set up to support either UEFI mode or legacy BIOS-compatibility mode.
For example, if you receive the error message: "Windows cannot be installed to this disk. The selected disk is not of the GPT partition style", it is because your PC is booted in UEFI mode, but your hard drive is not configured for UEFI mode.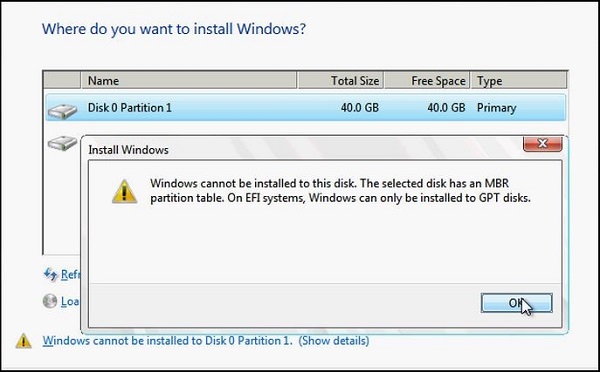
Windows Partition
- Reboot the computer in legacy BIOS-compatibility mode. This option lets you keep the existing partition style. For more info, see Boot to UEFI Mode or Legacy BIOS mode
.
- Configure your drive for UEFI by using the GPT partition style. This option lets you use the PC’s UEFI firmware features.
You can preserve your data and convert the drive using the MBR2GPT Tool
Reformatting the Drive Using a Different Partition Style
To wipe and convert the drive by using Windows Setup:
- Turn off the computer, and put in the Windows installation DVD or USB drive.
- Boot the computer to the DVD or USB drive in UEFI mode. For more info, see Boot to UEFI Mode or Legacy BIOS mode
- When choosing an installation type, select Custom.
- On the "Where do you want to install Windows" screen, select each of the partitions on the drive, and select Delete. The drive shows a single area of unallocated space.
- Select the unallocated space and click Next. Windows detects that the computer was booted into UEFI mode, and reformats the drive using the GPT drive format, and begins the installation.
To manually wipe a drive and convert it to GPT:
- Turn off the computer, and put in the Windows installation DVD or USB drive.
- Boot the computer to the DVD or USB drive in UEFI mode. For more info, see Boot to UEFI Mode or Legacy BIOS mode
- From inside Windows Setup, press Shift+F10 to open a command prompt window.
- Open the diskpart tool:
diskpart - Identify the drive to reformat:
list disk - Select the drive, and reformat it:
select disk <disk number>

       clean

       convert gpt

exit - Close the command prompt window.
- Continue the Windows Setup installation.
When choosing an installation type, select Custom. The drive appears as a single area of unallocated space.
Select the unallocated space and click Next. Windows begins the installation.
文書のプロパティ
文書番号: 000146878
文書の種類: Solution
最終更新: 25 8月 2025
バージョン: 5
質問に対する他のDellユーザーからの回答を見つける
サポート サービス
お使いのデバイスがサポート サービスの対象かどうかを確認してください。