Välkommen
Dells webbplatser
Dells webbplatser
Välkommen till Dell
Mitt konto
- Lägg beställningar snabbt och enkelt
- Visa beställningar och kontrollera leveransstatus
- Skapa och kom åt en lista över dina produkter
- Hantera dina webbplatser, produkter och kontakter på produktnivå från Dell EMC med hjälp av företagsadministration.
Artikelnummer: 000181163
How to Run a Preboot Diagnostic Test on a Dell Computer
Sammanfattning: This article provides instructions on how to run hardware diagnostics using preboot diagnostics on a Dell computer.
Artikelns innehåll
Instruktioner
Table of Contents

Figure 4: Configuration Tab

Figure 5: Health Tab

Figure 6: Firmware Tab

Figure 7: Diagnostics Logs Tab
Diagnostic Quick Test
- Turn on your computer.
- At the Dell logo, press the F12 key several times until the One Time Boot Menu appears.
- On the boot menu screen, select the Diagnostics option (Figure 1.)

Figure 1: One Time Boot Menu
The diagnostic quick test begins (Figure 2.)
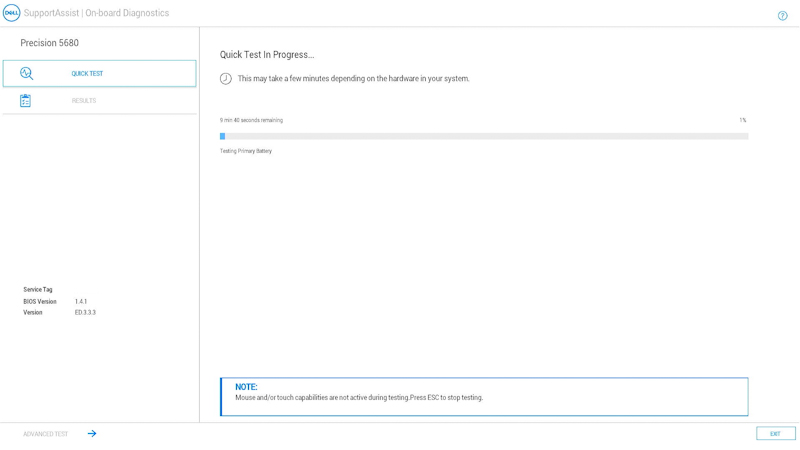
Figure 2: Diagnostic Quick TestNOTE: The mouse and touch screen (if installed) are not active during testing.NOTE: To run a diagnostic test on a specific device, press Esc and then select Advanced test on the lower left corner and then follow the steps in the Diagnostic advanced test section.Once the quick test completes, the results are shown.
It will state either:
- All tests passed successfully, either:
- Scan the QR code for additional help.
- Select EXIT in the lower right corner to reboot the computer.
- Select ADVANCED TEST on the lower left corner to run a specific test, follow the steps in the Diagnostic advanced test section to learn how to run a specific test.
- A message stating what hardware is not working correctly, either:
- See the following articles for troubleshooting steps to possibly resolve the issue.
Select the article which matches the error range and look up the specific error you have, and perform the troubleshooting steps.
- Scan the QR code to report the issue.
- Browse to SupportAssist Pre-Boot System Performance Check to report the issue (Make a note of the error code, validation code, and service tag.)
- Browse to Contact Technical Support to see what your options are (Make a note of the error code, validation code, and service tag.)
- See the following articles for troubleshooting steps to possibly resolve the issue.
- All tests passed successfully, either:
Advanced Diagnostic Test
NOTE: The default is that all the tests are selected.
- When you want to run a specific test, select to clear the Select all check box and then select the tests you want to run. (Figure 3.)

Figure 3: Advanced Test ScreenNOTE: The hardware test options may vary depending on the hardware installed on your Dell computer.NOTE: To run a thorough test on the hardware, select to check the Thorough mode box. - Select RUN TEST.
NOTE: On Dell laptops, user response is required during the LCD test.
Once the test completes, the results are shown.
It will state either:
- All tests passed successfully, either:
- Scan the QR code for additional help.
- Select EXIT in the lower right corner to reboot the computer.
- Select QUICK TEST on the lower left corner.
- A message stating what hardware is not working correctly, either:
- See the following articles for troubleshooting steps to possibly resolve the issue.
Select the article which matches the error range and look up the specific error you have, and perform the troubleshooting steps.
- Scan the QR code to report the issue.
- Browse to SupportAssist Pre-Boot System Performance Check to report the issue (Make a note of the error code, validation code, and service tag.)
- Browse to Contact Technical Support to see what your options are (Make a note of the error code, validation code, and service tag.)
- See the following articles for troubleshooting steps to possibly resolve the issue.
- All tests passed successfully, either:
Return to Top of Article
Other Resources:
The Preboot Diagnostic tool also provides information as outlined below:
Configuration
NOTE: To access the Configuration tab, select SYSTEM INFO from the options on the left.
Figure 4: Configuration Tab
Health
NOTE: To access the Health tab, select SYSTEM INFO from the options on the left.
Figure 5: Health Tab
Firmware
NOTE: To access the Firmware tab, select SYSTEM INFO from the options on the left.
Figure 6: Firmware Tab
Logs of Previous Diagnostics Tests
NOTE: To access the logs of the previous diagnostics tests, select LOGS from the options on the left.
Figure 7: Diagnostics Logs Tab
How to Run a Preboot Diagnostics on a Dell Computer
Watch this video to learn how to use integrated preboot diagnostics to identify hardware issues on your Dell computer.
Duration: 01:34 (mm:ss)
When available, closed caption (subtitles) language settings can be chosen using the Settings or CC icon on this video player.
Ytterligare information
Recommended Articles
Here are some recommended articles related to this topic that might be of interest to you.
- How to Run a Diagnostic Test Using SupportAssist.
- How to Run a Dell Online Diagnostic Test.
- How to Run a Diagnostic Test on a Dell Monitor.
- How to Run the LCD Built-in Self-Test on a Dell Laptop.
- How to Run a Power Supply Unit Self Test On a Dell Desktop or All-in-One Computer.
- How to Run Hardware Diagnostics on your PowerEdge Server.
Artikelegenskaper
Berörd produkt
Alienware, Inspiron, Legacy Desktop Models, OptiPlex, Vostro, XPS, G Series, G Series, Alienware, Inspiron, Latitude, Vostro, XPS, Legacy Laptop Models, Fixed Workstations, Mobile Workstations
Senaste publiceringsdatum
14 feb. 2024
Version
18
Artikeltyp
How To