Article Number: 000179433
How to install Windows onto a system with mSATA
Article Content
Symptoms
This article provides information on how to install Windows onto a system with an mSATA drive after HDD replacement or format.
Table of Contents:
Dell ships systems that have mSATA Accelerators with the OS installed on the Main SATA drive instead of the mSATA. This is because mSATA is used as a cache drive to increase system performance. Dell does not recommend or suggest installing Windows on an MSATA drive.
1 - Pre-installation BIOS settings
The mSATA card needs to be enabled in BIOS before an operating system can be installed.
- Boot into system BIOS (press F2 at Dell logo)
- Change the SATA operation to AHCI (Both drives will now be active and visible)
- Save settings and Exit.
2 - Windows 7
Boot to the BIOS and change SATA operation to AHCI, save settings and then reboot to the Windows 7 media.You will need a USB flash drive and the Windows 7 install media. Before you begin you will need to download the Intel® Matrix Storage Manager driver from HERE and unzip it onto your flash drive.
- With the SATA controller in ACHI mode you can see both the HDD and the mSATA drive. Format both of these drives from within Windows setup.
- Boot to the BIOS and switch the SATA operation to Intel Rapid Start, save settings and reboot to the Windows 7 media.
- You can then load the driver from the pre-prepared USB stick on to the system at the prompt ( need drivers) at this point only one drive should be available, most likely the main SATA drive.
- Continue with the installation of Windows 7, and install the drivers as normal. You will need to install the Intel Rapid Storage Technology Driver from www.dell.com/support
- When this has been installed and the system has been re-booted you will need to enable acceleration. See Section 4.
3 - Windows 8
When installing Windows 8 booting from the media, the system will not show "Windows is loading files". It just displays the Windows logo and looks like the system is unresponsive/ not posting as caps lock etc do not respond. This is normal, the system will stay like this for around 5 minutes or so before it will show the next screen. Leave the system to complete loading files.
You will need a USB flash drive and the Windows 8 install media. Before you begin you will need to download the Intel® Matrix Storage Manager driver from HERE and unzip it onto your flash drive.
- Boot to the BIOS and change SATA operation to AHCI, save settings and then reboot to the Windows 8 media.
- With the SATA controller in ACHI mode you can see both the HDD and the mSATA drive. Format both of these drives from within Windows setup.
- Boot back into the BIOS and switch the SATA operation to Intel Rapid Start, save settings and reboot to the Windows 8 media.
- You will receive an error asking for drivers to be loaded at the screen where you select to install : this is due to the accelerator SSD you have in the system.
- You can then load the driver from the pre-prepared USB stick on to the system at the prompt ( need drivers) at this point only one drive should be available, most likely the main SATA drive.
- Once Windows 8 is installed you will need to install the Intel Rapid Storage Technology Application from HERE
- The system will now show the SATA HDD and SSD (mSATA) working together one for storage one for cache.
- When this has been installed and the system has been re-booted you will need to enable acceleration. See Section 4
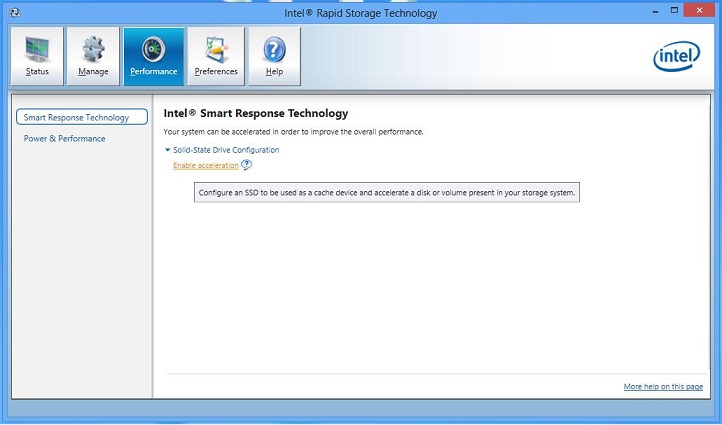
4 - Enable Acceleration
Once you have installed Windows and updated all the relevant drivers, you will want to enable acceleration again to improve the performance of your system. This is achieved by running the Intel Rapid Storage Technology Console.

- Click on the Performance tab at the top, then Enable acceleration
- In the popup window, select Full disk capacity and Enhanced mode (these are the default)
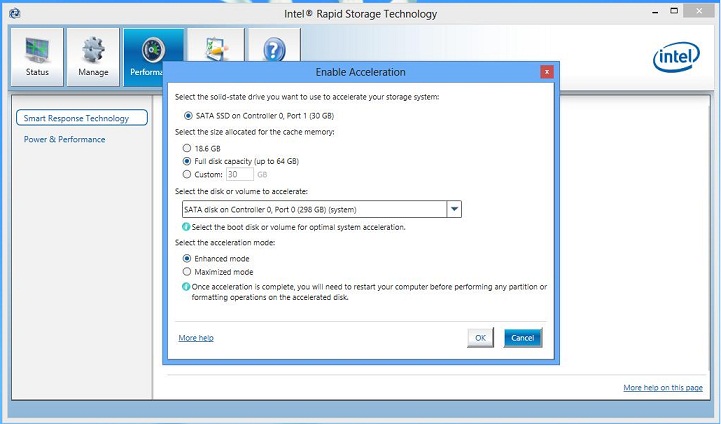
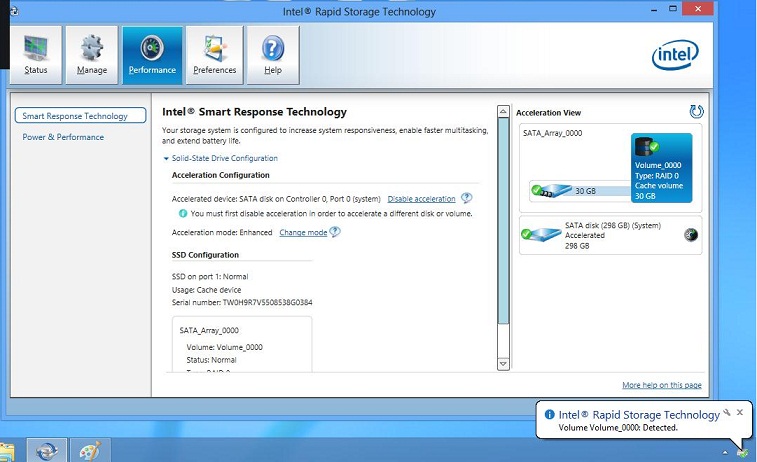
- Click OK, then the system will accelerate and after a reboot the system will be ready to use as normal.
Article Properties
Affected Product
Inspiron, Latitude, Vostro, XPS, Fixed Workstations
Last Published Date
21 Feb 2021
Version
4
Article Type
Solution