Dell MS819 Wired Mouse With Fingerprint Reader Set-up, Usage, and Troubleshooting Guide
Summary: The Dell MS819 Wired Mouse With Fingerprint Reader allows you to log in to your computer using your finger! Learn how to install the needed software, setup and use the mouse, and resolving issues. ...
This article applies to
This article does not apply to
This article is not tied to any specific product.
Not all product versions are identified in this article.
Symptoms
The Dell MS819 Wired Mouse With Fingerprint Reader allows you to log in to your computer using your finger!
Refer to the different sections to learn how to install the needed software, setup and use the mouse, and resolving issues.
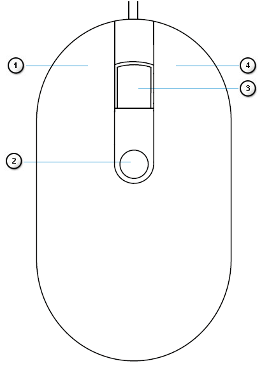
Getting to know your Dell Wired Mouse With Fingerprint Reader MS819.
 |
 |
Figure 1: MS819 Features
| Numbers reference image above: | |
|---|---|
 |
Left Button |
 |
Fingerprint Sensor |
 |
Scroll and Middle Button |
 |
Right Button |
 |
Optical Sensor |
For the MS819 Quick Start Guide, browse to the Support for Wired Mouse with Fingerprint Reader - MS819 page, and then touch or click PDF to the right of Dell Wired Mouse With Fingerprint Reader MS819 Quick Start Guide.
For the MS819 User's Guide, browse to the Support for Wired Mouse with Fingerprint Reader - MS819 page, and then touch or click PDF under Dell Wired Mouse With Fingerprint Reader MS819 User's Guide.
Setup
- Insert the USB connector as shown in Figure 3.

Figure 3: USB Connector InsertionNote: The receiver only goes in one way. When the connector does not seem to fit, adjust the angle or flip it over. - Wait for windows to install the 'USB2.0 Hub' drivers.
- Browse to the Wired Mouse with Fingerprint Reader - MS819 driver page.
- Touch or click Download to the right of Ultramarine (MS819) Fingerprint Reader Driver.
- Touch or click Run.
- Touch or click Continue.
- Touch or click OK.
- Touch or click OK.
- Touch or click Yes.
- Touch or click OK.
- Double touch or double-click the folder in the window that opens.
- Touch and hold or right click the file to the left of Setup Information, and then select Install.
- The User Account Control window may appear, if so, Touch or click Yes (you should get a message that the operation was completed successfully).
- Ensure that the computer has a password setup or give it one.
- Touch or click the Start icon.
- Touch or click Settings.
- Touch or click Accounts.
- Touch or click Sign-in options.
- Touch or click Add or Setup under Password.
Note: When a password is already set-up the option reads Change under Password, in that case go to Step 16.
- Input the new password, confirm the password and give yourself a hint.
- Touch or click Next.
- Touch or click Finish.
- Restart the computer (it may take some time to reboot as new features are being installed).
- Log in to the computer using the new password set up.
- Setup Windows Hello process.
- Touch or click the Start icon.
- Touch or click Settings.
- Touch or click Accounts.
- Touch or click Sign-in options.
- Touch or click Setup under Fingerprint.
- Touch or click Get started.
- Follow the prompts provided.
Note: When you get a message that something went wrong, restart the computer and try again.
- Once the set-up is complete, you are prompted to set up a PIN.
- Touch or click Set up PIN.
- Enter your computer account password, and then touch or click OK.
- Enter and confirm your new PIN., and then touch or click OK.
Troubleshooting
Unable to use the mouse.
- Disconnect and then connect the mouse USB cable to the computer.
- Disconnect the mouse USB cable, and then reconnect to another USB port.
- Restart the computer.
Unable to access by registered fingerprints.
- You must have a password setup before you can setup a fingerprint.
- Touch or click the Start icon.
- Touch or click Settings.
- Touch or click Accounts.
- Touch or click Sign-in options.
- Touch or click Setup under Password.
Note: When a password is already set up the option reads Change under Password, in that case go to Step 2.
- Remove registered fingerprint.
- Touch or click the Start icon.
- Touch or click Settings.
- Touch or click Accounts.
- Touch or click Sign-in options.
- Touch or click Setup under Fingerprint.
- Remove.
- Register your fingerprint again
- Touch or click the Start icon.
- Touch or click Settings.
- Touch or click Accounts.
- Touch or click Sign-in options.
- Touch or click Setup under Fingerprint.
- Follow the prompts provided.
Note: When you get a message that something went wrong, restart the computer and try again.
Additional Information
- Browse to the Wired Mouse with Fingerprint Reader - MS819 driver page, to download the Intel Online Connect (IOC) and SGX Platform Software for Windows (PSW)
Note: When your computer is running Windows RS3 or later, the PSW installation is not required. For more information, refer to the Installation instructions on the Wired Mouse with Fingerprint Reader - MS819 driver page, on how to install only the Intel Online Connect (IOC) software.
- For more information about the Intel Online Connect (IOC) software, refer to the Microsoft Intel Online Connect page.
Cause
N/A
Resolution
N/A
Affected Products
Wired Mouse with Fingerprint Reader - MS819Article Properties
Article Number: 000123668
Article Type: Solution
Last Modified: 12 Aug 2025
Version: 4
Find answers to your questions from other Dell users
Support Services
Check if your device is covered by Support Services.