DCNM Server IP Address Changed
Summary: After changing the server IP, DCNM fails to function. This article talks about how to get DCNM working again.
This article applies to
This article does not apply to
This article is not tied to any specific product.
Not all product versions are identified in this article.
Symptoms
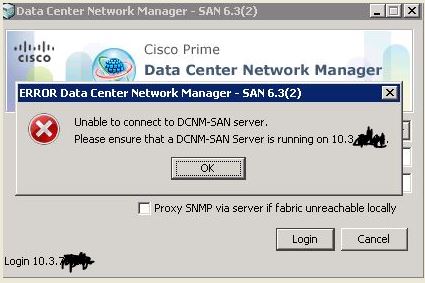
ISSUE: After changing server IP at NIC, DCNM can no longer login.
DCNM still launches, but with the original DCNM Server IP populated at the login prompt.
Even if you change the IP to the new one here, DCNM login fails.
This article talks about how to get DCNM working again. There are different ways to do it depending on your DCNM version.
Cause
Once the server IP is changed, the config files for DCNM do not update on their own, and DCNM continually tries to use the original IP, which is no longer applicable.
Resolution
DCNM 5.2(x) and Earlier:
From the Cisco DCNM 5.2(x) Fundamentals Guide
To update the IP address of a Cisco DCNM-SAN Server, follow these steps:
1. Stop the Cisco DCNM-SAN Server.
2. Change the following parameter in the $INSTALLDIR/conf/FMServer.conf file.
wrapper.app.parameter.4=new-server-IP-here
3. Change the following parameter in the $INSTALLDIR/conf/server.properties file.
server.bindaddrs = new-server-IP-here
4. Enter the following command to actually assign the new IP address:
run $INSTALLDIR/bin/PLMapping.bat -p newipaddress 0
(Assume $INSTALLDIR is the top directory of DCNM-SAN installation. The above command is for single server instances [not federation], where 0 is the server ID.)
If this does not work, as well as if you are running DCNM 5.2(x) and Later, you'll have to uninstall DCNM completely, and do a clean Install. You could also try to find the PLMapping file, and double click it to try and reinstall manually (w/o uninstall 1st), but the install may not work that way.
DCNM Clean Install Instructions Below:
From the Cisco DCNM 5.x Fundamentals Guide, for Windows:
1. Ensure that the IP address of the Cisco DCNM server is statically assigned.
2. Reinstall the Cisco DCNM server under Programs & Features, and choose the Full Reinstall option, if available, which allows you to specify the server IP address during install again.
3. Log into the Cisco DCNM client and specify the new IP address of the Cisco DCNM server in the DCNM Server field of the login dialog box. It may still populate the original IP address, so just change it to the new one, and you'll be set!
From the Cisco DCNM 5.x Installation Guide, for Linux (RHEL):
1. Full Reinstall Re-installs the Cisco DCNM server and the Cisco DCNM client download service. (No re-installation type available allows you to change the installation folder or archive folder.) *If you are using RHEL and you change the Cisco DCNM server IP address, you must also manually change the IP address in the INSTALL_DIR/bin/stopDCNM.sh script.*
Note: If you change the web server port number during install, it affects the URL that Cisco DCNM users use to download the Cisco DCNM client.
Note: If you change the naming service port, it affects the port that Cisco DCNM users specify when they log into the Cisco DCNM client.
Affected Products
ConnectrixProducts
Connectrix, Connectrix MDS-Series SoftwareArticle Properties
Article Number: 000064785
Article Type: Solution
Last Modified: 28 Mar 2024
Version: 3
Find answers to your questions from other Dell users
Support Services
Check if your device is covered by Support Services.