Repair and Restore your Computer Using SupportAssist OS Recovery
Summary: SupportAssist OS Recovery environment consists of tools to repair or reset the operating system, backup files, and diagnose hardware issues.
This article applies to
This article does not apply to
This article is not tied to any specific product.
Not all product versions are identified in this article.
Instructions
When your computer is unable to boot to the operating system even after repeated attempts, SupportAssist OS Recovery automatically starts. This recovery environment enables you to diagnose hardware issues, repair your computer, back up your files, or restore your computer to factory defaults.
SupportAssist OS Recovery is available only on certain Dell system models that run a Dell factory-installed Microsoft Windows 10 or Microsoft Windows 11 operating system. For the list of system models where SupportAssist OS Recovery is available, see the Dell SupportAssist OS Recovery Support Matrix on the SupportAssist OS Recovery documentation page.
If your computer does not support SupportAssist OS Recovery, you can download the operating system recovery image. Learn How to Download and Use the Dell Operating System Recovery Image in Microsoft Windows.
NOTE: SupportAssist OS Recovery does not support Dell computers with Qualcomm processors, and you should first attempt to reinstall Windows using Push-Button Reset. For more information, see KB article How to use Windows Push-Button Reset to reinstall Windows on a Dell Computer.
CAUTION: Manually formatting the hard drive of your computer deletes the SupportAssist OS Recovery environment.
Perform an Operating System Restore (With Data Backup).
Watch this video to learn how to backup the data and restore the operating system on your Dell computer using SupportAssist OS Recovery.
Duration: 01:30
When available, closed caption (subtitles) language settings can be chosen using the Settings or CC icon on this video player.
SupportAssist OS Recovery provides you with different options to recover your computer depending on the scenario you are facing.
Important: If the recovery image on the hard drive is corrupted or deleted, the computer cannot boot to the recovery environment. Newer Dell computers support BIOSConnect, a feature that allows you to restore the recovery image on the hard drive. Learn more about Using BIOSConnect to recover SupportAssist OS Recovery Partition.
- SupportAssist OS Recovery Cloud Restore (Recommended): This option downloads and installs the latest version of the operating system on your Dell computer.
Requirements:- An active Internet connection
- A USB drive with 16 GB capacity
- SupportAssist OS Recovery Local Restore: This option restores the computer from the recovery image that is stored in the computer's hard drive. This option is only available on Dell, Inspiron, Vostro, XPS, and Alienware products.
- Dell BIOSConnect: Dell BIOSConnect helps you restore the recovery image on the hard drive if the recovery partition is corrupted or deleted. Learn more about Using BIOSConnect to recover SupportAssist OS Recovery Partition.
Dell Technologies recommends the following fixes outlined to help determine or fix the issue.
Run hardware diagnostics on your computer
- Turn the computer on and repeatedly tap the F12 key at the Dell screen to access the One Time Boot Menu (Figure 1).
NOTE: If you wait too long, the operating system loads. Restart the computer and try again.
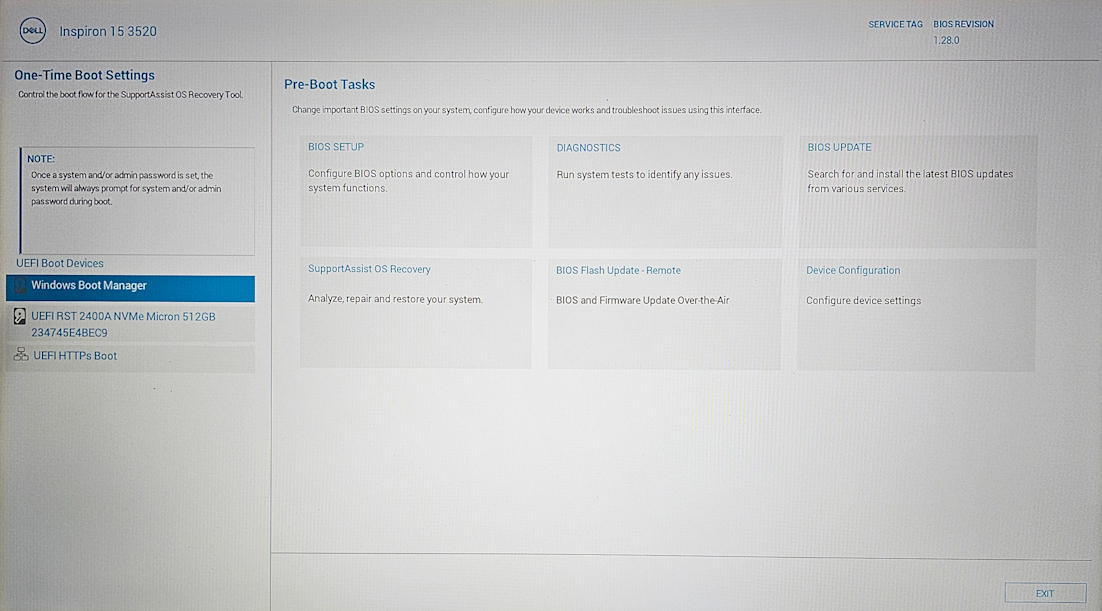
Figure 1: SupportAssist OS Recovery Main Page. Image available in English only. - Select SupportAssist OS Recovery.
- A screen appears asking you to approve access to your system information, select APPROVE.
- Select Scan in the Scan Hardware tile.
- Select Start Scan.
NOTE: The scan takes 10-15 minutes.
- When completed the results are shown:
- When no hardware issue is detected, the Everything looks good status is displayed. Select DONE.
When no issues are found it most likely means you are having a software-related issue, browse to the Back up files section. - When a hardware issue is detected, a page with the details of the detected issue is displayed. Make note of any failed test including the error, validation code, and the Service Tag.
Browse to the SupportAssist Pre-Boot System Performance Check page to access the SupportAssist Pre-Boot System Performance Check page and follow the instructions to submit a trouble ticket, if the computer cannot boot, you can also scan the QR code to request support on your mobile device.
- When no hardware issue is detected, the Everything looks good status is displayed. Select DONE.
Back up the files on your computer
Before a repair or reinstall of the OS occurs, your data (such as your documents, music, images and so forth) must be backed up to ensure its integrity. This does not back up any system settings or programs installed.
- Select Start in the Back up Files/ Disk Cloning tile (Figure 2).
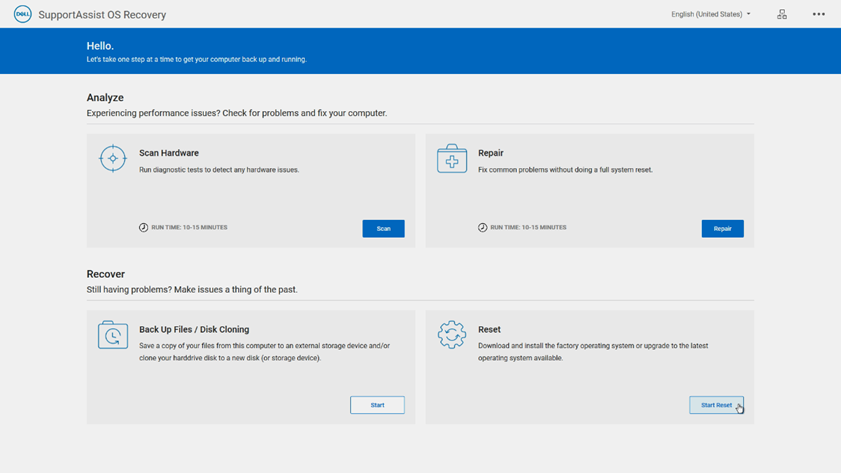
Figure 2: Main menu in SupportAssist OS Recovery. Image available in English only.
When Bitlocker (Device Encryption) is enabled, you are asked to provide the BitLocker key. Follow the prompts to provide it.
To use the Backup files option, follow these steps:
- Select the radio button next to Back Up Files, then select Next (Figure 3).
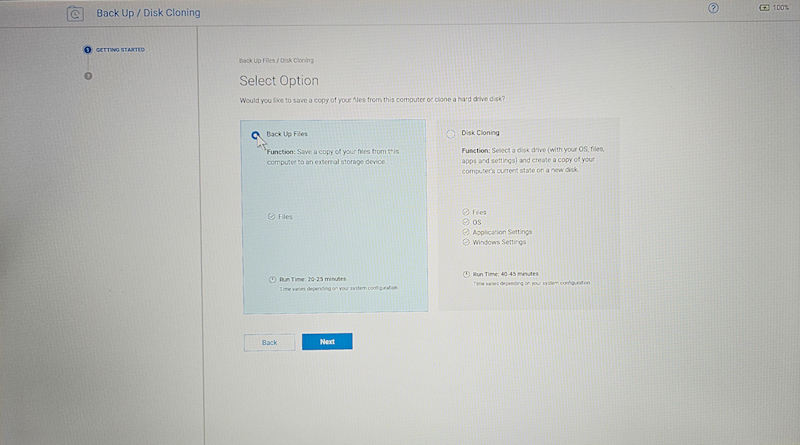
Figure 3: Back Up Files Options Page. Image available in English only. - Select Start Backup.
- You are given a list of folders that will be backed up.
NOTE: You can choose not to back up a folder by clearing the checkbox next to the folder (Figure 4).
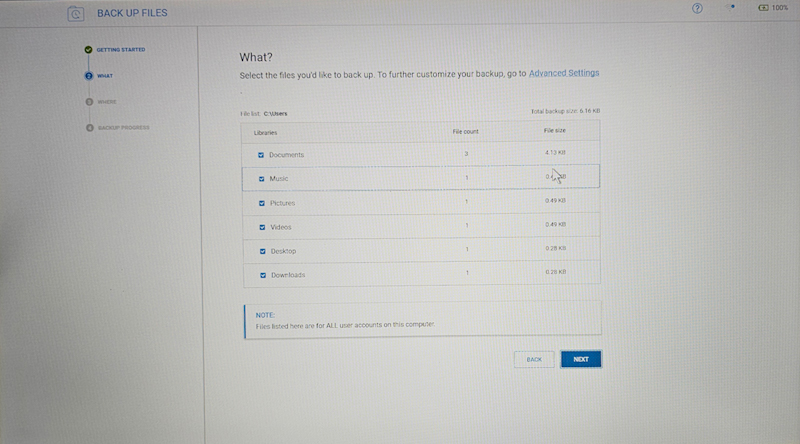
Figure 4: Files to Back up Option List. Image available in English only. - Make note of the Total backup size: listed. You must use or buy a USB flash or external drive that has more space available than the total listed.
NOTE: Flash or external drives can be purchased from the Dell Technologies website, or any major retailer.
- Insert the USB flash or external drive cable into the corresponding port on the computer, then select NEXT.
- Select the USB flash or external drive from the list that you want to use as your backup device and select NEXT.
- When the backup process completes, select DONE (Figure 5).
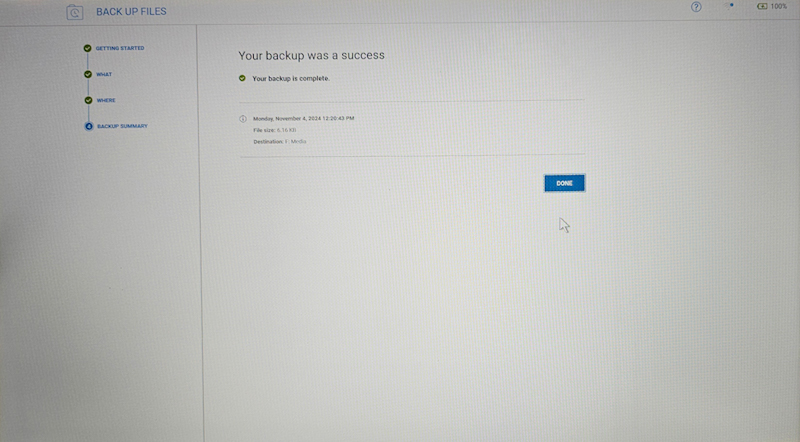
Figure 5: Back Up Successful Page. Image available in English only.
Repair the Windows operating system
CAUTION: Ensure to back up your files and other personal data before you proceed with the steps Repairing your computer. Browse to the Back up files section.
The Repair option enables you to diagnose and troubleshoot common issues that may occur before your computer boots to the operating system. It checks and fixes the partition table, boot files, and the health of the Windows operating system.
- Select Repair on the Repair software tile (Figure 6).
NOTE: If software encryption is enabled on your computer, you are prompted to unlock your computer before you start the repair process. You need the Microsoft account login email or phone number and account password.
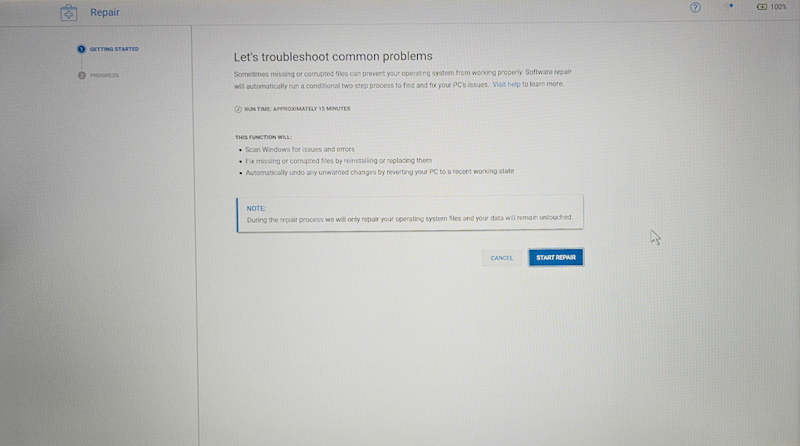
Figure 6: OS Repair Page. Image available in English only. - Select START REPAIR.
- The repair process starts, and the progress of the repair is displayed.
- When the issue is fixed successfully, the "Everything back to normal" screen is displayed. Select DONE (Figure 7).
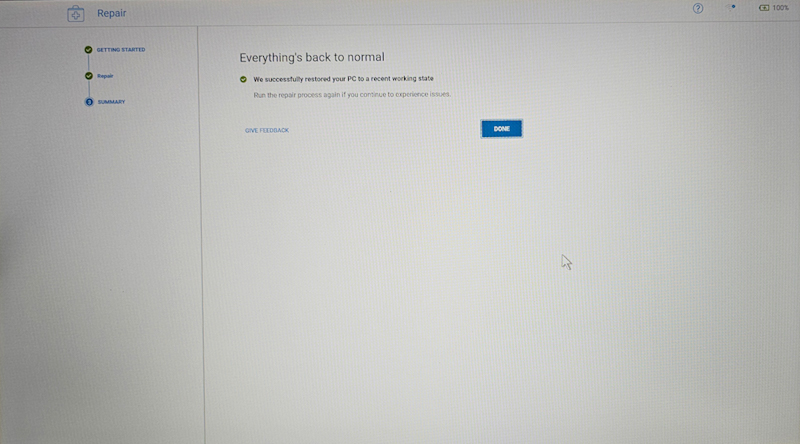
Figure 7: Repair successful Page. Image available in English only. - When the issue cannot be fixed or if the repair is unsuccessful, an error message is displayed. Goto the Reset your computer section.
Reset your Windows operating system
CAUTION: Ensure to back up your files and other personal data before you proceed with the steps Repairing your computer. Browse to the Back up files section.
- From the SupportAssist OS Recovery page, select Start Reset.
NOTE: Before proceeding, you might be prompted to connect to your wireless network. If prompted, select Set up network and follow the instructions to connect.
- Depending upon which computer you have and the state of the OS, the following options may be available:
- Reset to factory settings — Install the operating system and software to the state it was in when your computer was shipped from the Dell factory. For instructions see the Reset to factory settings section.
NOTE: If your computer is irreparable or SupportAssist OS Recovery is unable to detect the factory installed operating system on your computer, only the Reset and update option is displayed.NOTE: Resetting your computer using the Reset to factory settings option permanently deletes all data on the hard drive and uninstalls any programs or drivers that you installed, and will require you to enter product or license keys for software such as Microsoft Office 365 and other licensed software.
- Reset and update — Downloads and install the latest operating system on your computer along with the critical drivers and applications. For instructions see the Reset and update section.
NOTE: Resetting your computer using the Reset and update option permanently deletes all data on the hard drive and uninstalls any programs or drivers that you installed, and will require you to enter product or license keys for software such as Microsoft Office 365 and other licensed software.
- Reset to factory settings — Install the operating system and software to the state it was in when your computer was shipped from the Dell factory. For instructions see the Reset to factory settings section.
Reset to factory settings
- Select Reset to factory settings, then select NEXT (Figure 8).

Figure 8: Reset options in SupportAssist OS Recovery. Image available in English only. - The option to back up your files is displayed:
- If you want to back up your files, select Yes, back up my files, then select NEXT, and perform the following steps:
- Look in the upper right corner of the file list box to see what the total backup size is. You must use or buy a USB flash or external drive that is bigger than the total listed.
NOTE: USB Flash or external drives can be purchased from the Dell Technologies website, or any major retailer.
- Select NEXT to accept backing up the recommended files, or clear any checkbox next to a folder you do not want to back up.
- Select which USB flash or external drive you want your files backup to, then select NEXT.
- Once the bakup has been completed, select CONTINUE.
- On the Confirm your reset page, select the I understand that the reset will delete all of my system data and personal files check box, then select NEXT. The factory reset process begins and may take several minutes to complete.
NOTE: Optionally, from the Select reason list, select a reason for resetting your computer.
- After the process is complete, select RESTART to restart your computer.
- The Transferring your system data and setting process begins. Once finished, the computer restarts.
NOTE: Connect to your wireless network before signing in. Select the Internet icon in the bottom right. You must select a PIN and may be asked for other settings.NOTE: You must also reinstall all the applications (including third-party applications) that were not originally installed on your computer.
- Look in the upper right corner of the file list box to see what the total backup size is. You must use or buy a USB flash or external drive that is bigger than the total listed.
If you have already created a backup of your files or you do not want to back up your files, select No, do not back up my files, then select NEXT, and perform the following steps:
- On the Confirm your reset page, select the I understand that the reset will delete all of my system data and personal files check box (Figure 9), a confirmation page appears, select YES, CONTINUE.
NOTE: Optionally, from the Select reason list, select a reason for resetting your computer.

Figure 9: Confirm Your Reset Page. Image available in English only. - Select NEXT The factory reset process begins and may take 45 or more minutes to complete.
- After the process is complete, select RESTART to restart your computer.

Figure 10: Recovery process guide screen in SupportAssist OS Recovery. Image available in English only. - The Transferring your system data and setting process begins. Once finished, the computer restarts.
NOTE: Connect to your wireless network before signing in. Select the Internet icon in the bottom right. You must select a PIN and may be asked for other settings.NOTE: You must also reinstall all the applications (including third-party applications) that were not originally installed on your computer.
Reset and update
- Select Reset and update, then select Next (Figure 11).
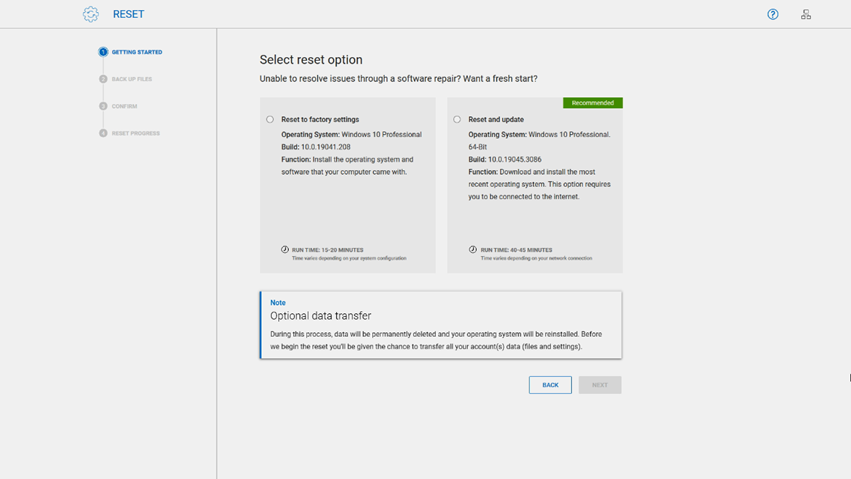
Figure 11: Reset options in SupportAssist OS Recovery. Image available in English only. - The option to back up your files is displayed. If you want to back up your files, select Yes, give access and transfer my settings and personal file, then perform the following steps:
- Select the checkbox next to I accept the MicroSoftware License Terms and the Dell's End User License Agreement, then select NEXT.
- When BitLocker (Device Encryption) is enabled you are asked to provide the BitLocker key. Follow the prompts to provide it.
- Accept the account or accounts that you want to transfer, or clear any checkbox next to an account you do not want to back up.
NOTE: Using the Advanced Transfer Options you can select which files to backup.
- Enter a Password (if wanted or if offered) to protect your backup from anyone else accessing it, then select BEGIN TRANSFER.
NOTE: You may receive a message that the amount of data selected exceeds the storage available on your local drive. You must use or buy a USB flash or external drive that is bigger than the total listed. USB Flash or external drives can be purchased from the Dell Technologies website, or any major retailer.
- Once the backup has been completed, select CONTINUE.
- On the Confirm your reset page, select the I understand that the reset will delete all of my system data and personal files check box.
NOTE: Optionally, from the Select reason list, select a reason for resetting your computer.
- Select NEXT. The factory reset process begins and may take 45 or more minutes to complete.
- After the process is complete, select RESTART to restart your computer.
- The Transferring your system data and setting process begins. Once finished, the computer restarts.
NOTE: Connect to your wireless network before signing in. Select the Internet icon in the bottom right. You must select a PIN and may be asked for other settings.NOTE: You must also reinstall all the applications (including third-party applications) that were not originally installed on your computer.
If you have already created a backup of your files or you do not want to back up your files, select No, do not transfer my settings and personal files, then select NEXT, and perform the following steps:
- On the Confirm your reset page, select the I understand that the reset will delete all of my system data and personal files check box (Figure 12), a confirmation page appears, select YES, CONTINUE.
NOTE: Optionally, from the Select reason list, select a reason for resetting your computer.

Figure 12: Confirm Your Reset Page. Image available in English only. - Select NEXT The factory reset process begins and may take 45 or more minutes to complete.
- After the process is complete, select RESTART to restart your computer (Figure 13).
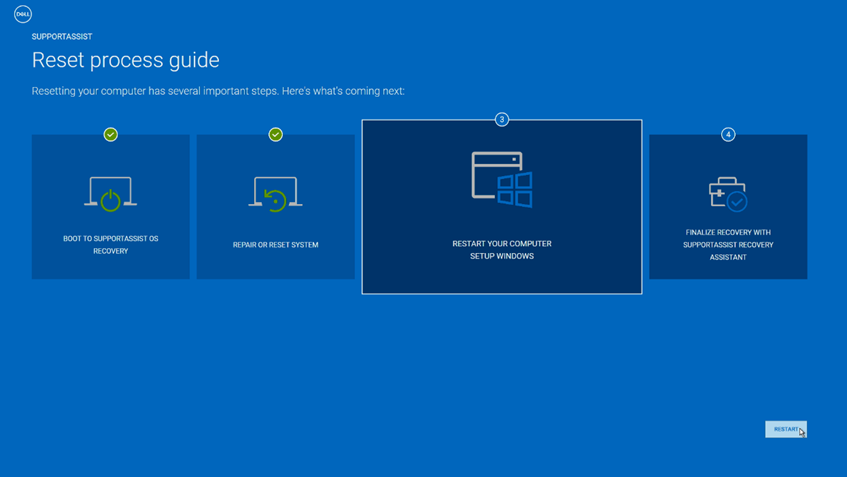
Figure 13: Recovery process guide screen in SupportAssist OS Recovery. Image available in English only. - The Transferring your system data and setting process begins. Once finished, the computer restarts.
NOTE: Connect to your wireless network before signing in. Select the Internet icon in the bottom right. You must select a PIN and may be asked for other settings.NOTE: You must also reinstall all the applications (including third-party applications) that were not originally installed on your computer.
The SupportAssist Recovery Assistant is displayed after login to help you install the latest Windows and Dell updates. It also installs Dell factory-installed software and recovers your backup files if you used the SupportAssist OS Recovery backup feature.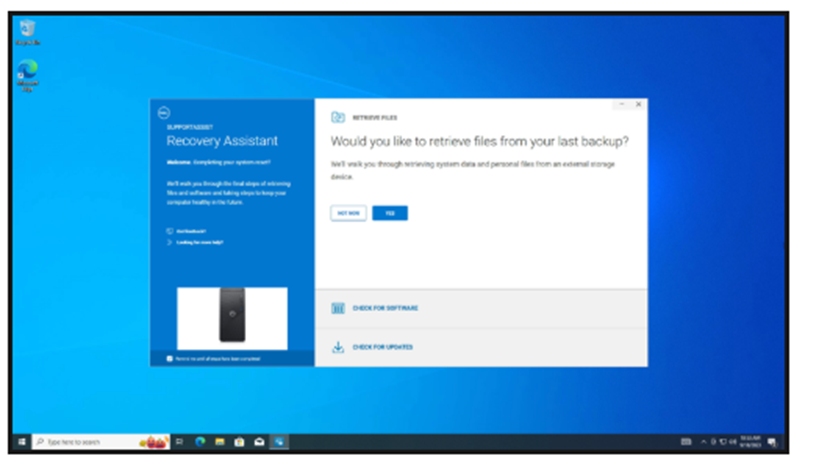
Figure 14: SupportAssist recovery assistant loads on the first startup. Image available in English only.
If all drivers are not loaded and your device is a Dell Pro, Dell Pro Max, Latitude, OptiPlex, or Precision workstation, launch Dell Command Update as an Administrator.
- If Advanced Driver Restore for Windows Re-Installation does not appear, go to Settings > Advanced Driver Restore and click Enable.
- If Advanced Driver Restore for Windows Re-Installation appears, select Click Here to download and install a complete driver library.
Additional Information
For SupportAssist OS Recovery troubleshooting and more, see the SupportAssist OS Recovery User’s Guide.
Frequently asked questions
To enable SupportAssist OS Recovery in the BIOS:
- Turn on or restart the computer.
- At the Dell logo, press the F2 key several times to access the BIOS Setup.
- Go to SupportAssist System Resolution or SupportAssist depending on your BIOS version.
- Go to SupportAssist OS Recovery.
- Click the checkbox to enable SupportAssist OS Recovery or SupportAssist depending on your BIOS version.
- Save and exit the BIOS.
- The computer restarts.
By default, your computer is configured to launch SupportAssist OS Recovery after two consecutive failed boot attempts. To change this setting in the BIOS:
- Turn on or restart the computer.
- At the Dell logo, press the F2 key several times to access the BIOS Setup.
- Go to SupportAssist System Resolution or SupportAssist depending on your BIOS version.
- Go to SupportAssist OS Recovery or SupportAssist depending on your BIOS version.
- Under the Dell Auto OS Recovery Threshold option, select the number of failed boot attempts to automatically launch SupportAssist OS Recovery.
- Save and exit the BIOS.
- The computer restarts.
SupportAssist OS Recovery version 4.0 supports cloud recovery using a USB recovery media.
To restore your Dell computer using the SupportAssist OS Recovery Cloud option, you must create a USB recovery media using the Dell OS Recovery tool. Follow the steps below to create the USB recovery media.
Step 1
Download and install the latest Dell OS Recovery tool.
- Go to https://www.dell.com/support/osrecovery.
- Click Download OS Recovery Tool and save the file to the computer.
- Browse to the location where the downloaded file is saved.
- Double-click the downloaded Dell OS Recovery Tool installation file.
- Follow the on-screen instructions to complete the installation process.
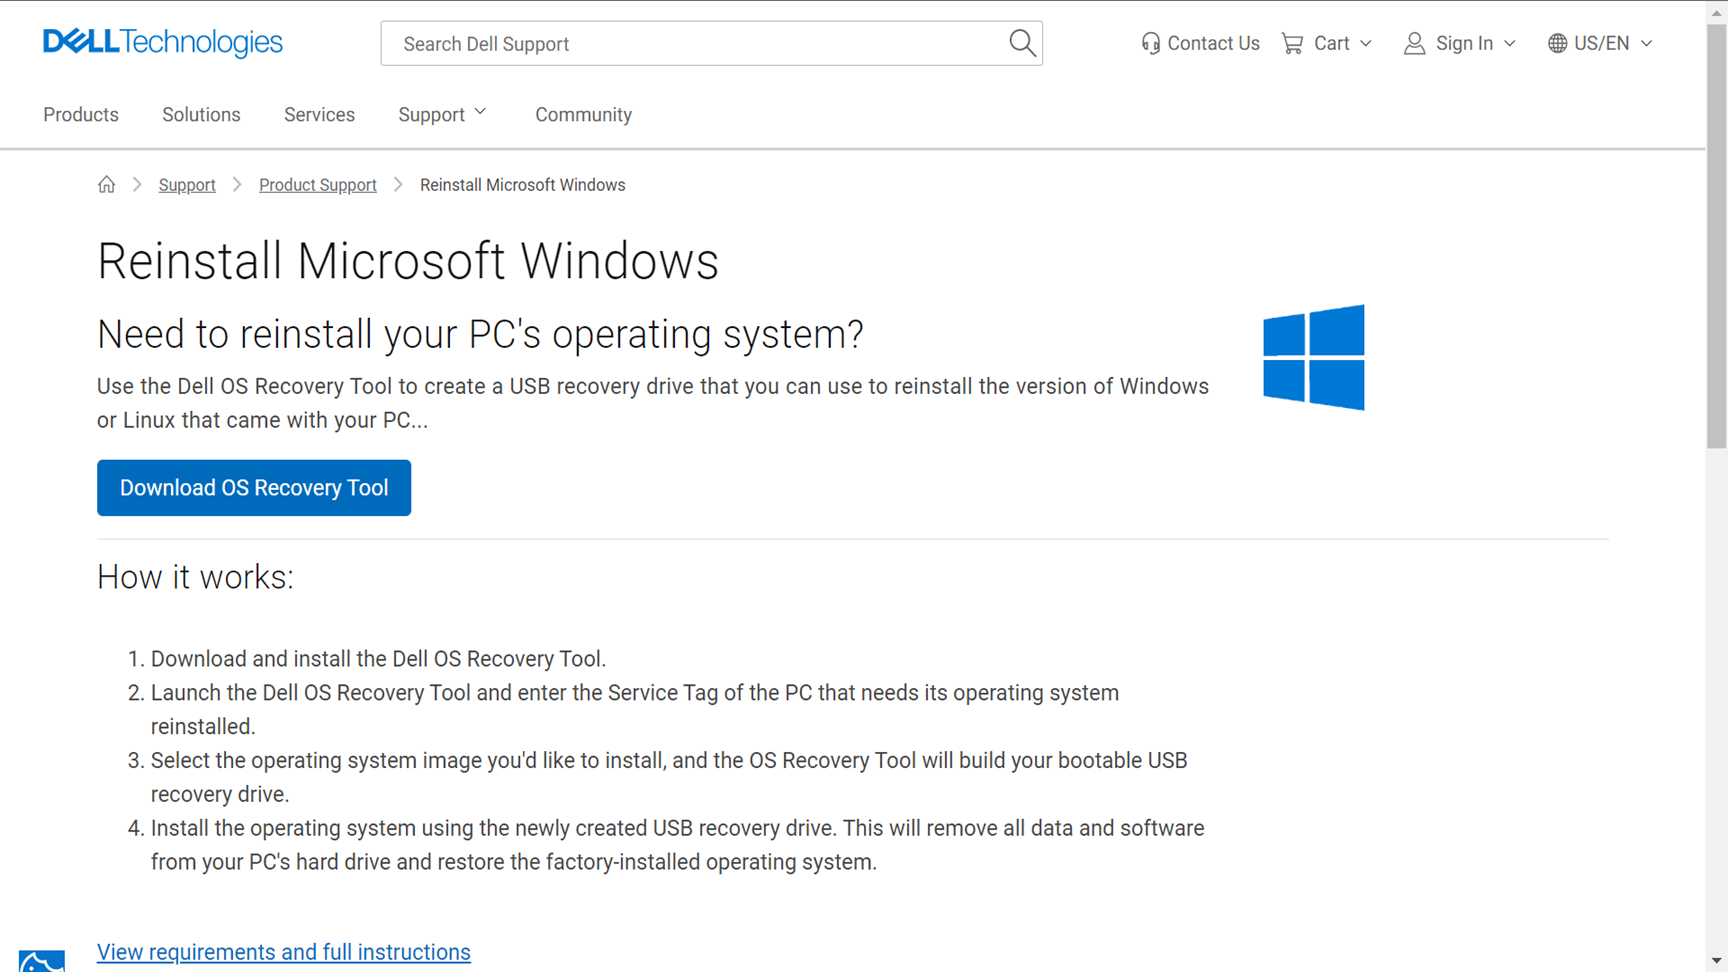
Figure 15: Dell OS Recovery Tool download page. Image available in English only.
Step 2
Identify the Dell computer using the Service Tag or Express Service Code in the Dell OS Recovery Tool.
NOTE: The Dell OS Recovery Tool allows you to download either Microsoft Windows or Ubuntu recovery image that was preinstalled on your Dell computer.
- Are you downloading the recovery image using the same Dell computer? Select This computer.
- Are you using another working computer? Enter the Service Tag or Express Service Code of the Dell computer and click the search (magnifying glass) icon.
- After identifying the Dell computer, click Next.

Figure 16: Identify the Dell computer in the Dell OS Recovery Tool. Image available in English only.
NOTE: If the Service Tag of your Dell computer is not recognized, contact Dell Technical Support.
Step 3
WARNING: Dell Technologies recommends that you back up any important data from the USB flash drive. The Dell OS Recovery Tool formats the USB flash drive and all the data on the USB drive is erased permanently.
- Insert a USB flash drive with at least 16 GB of available space.
- Select the inserted drive from the USB Drive dropdown menu.
- Check the box next to I understand that the selected drive will be reformatted and existing data will be deleted.
- Click Download.

Figure 17: Select the USB drive in the Dell OS Recovery Tool. Image available in English only.
Step 4
The Dell OS Recovery Tool downloads the required files and copies it to the USB drive.
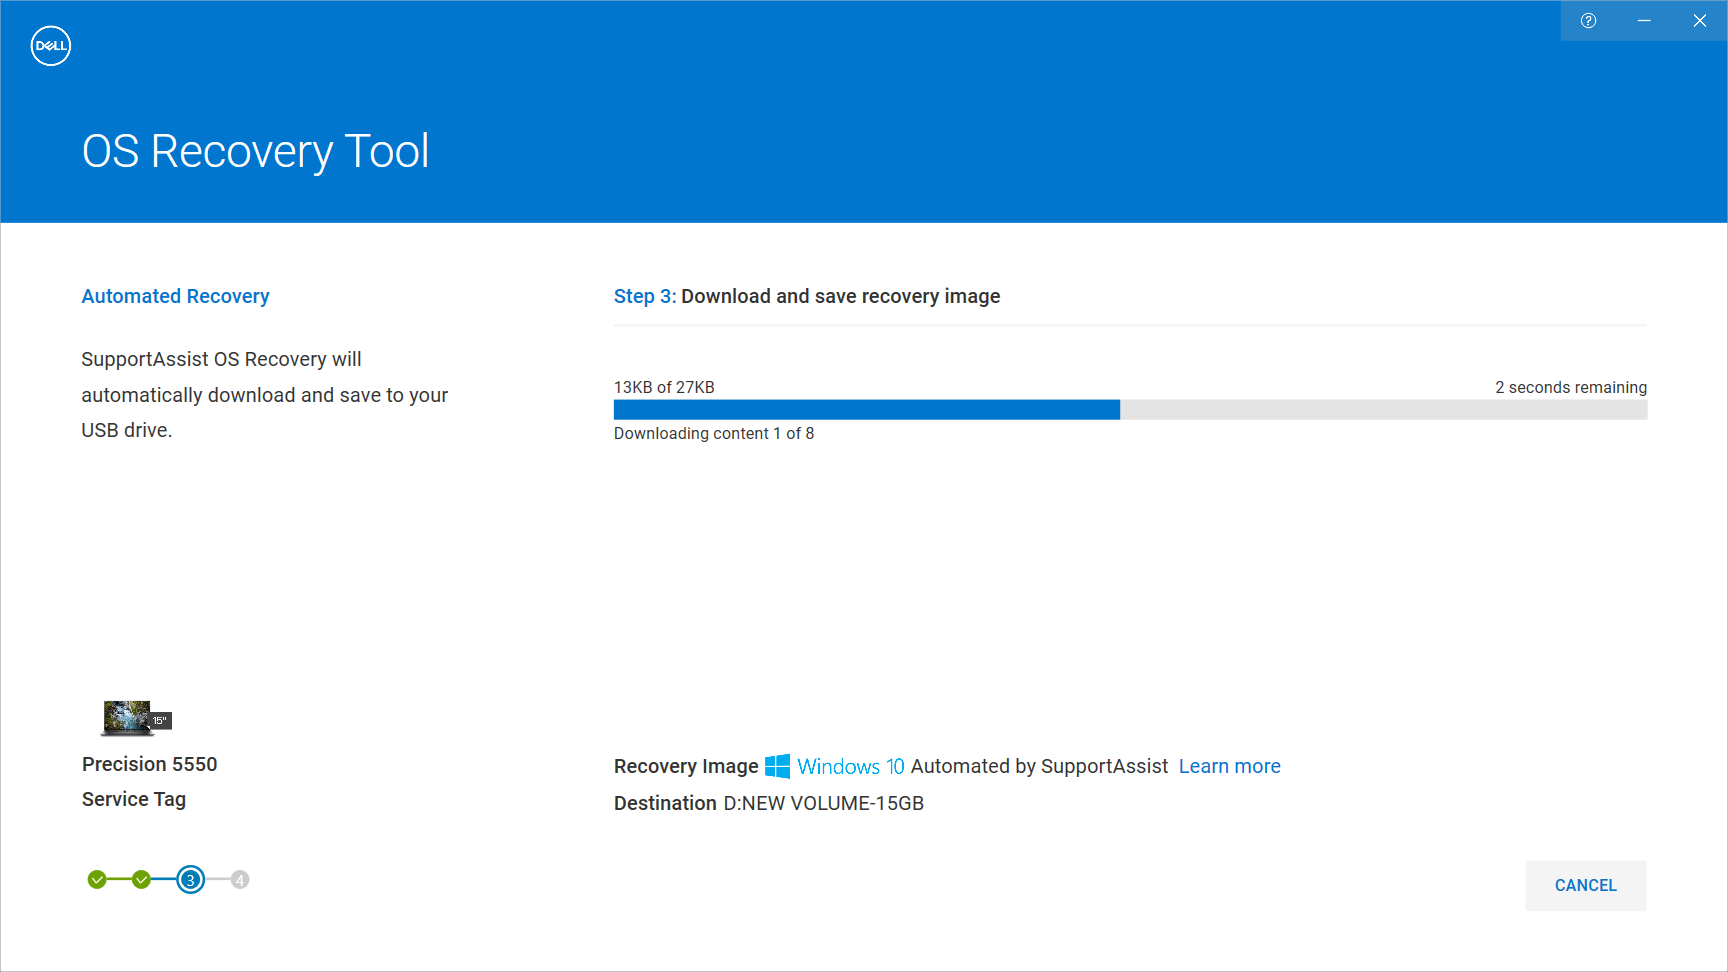
Figure 18: Download progress in Dell OS Recovery Tool. Image available in English only.
Step 5
At the Recovery process guide screen, disconnect the USB drive and click Close.
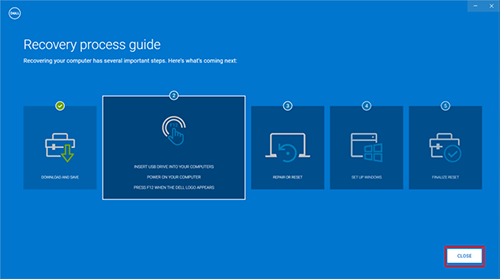
Figure 19: Recovery process guide screen on the Dell OS Recovery Tool. Image available in English only.
Step 6
Boot to the USB recovery media.
- Connect the USB recovery media to the computer.
- Turn on or restart the computer.
- At the Dell logo screen, press the F12 several times until you see the One Time Boot Menu.
- In the boot menu, select the USB drive from the list.
- Press the Enter key and to boot into the USB drive.
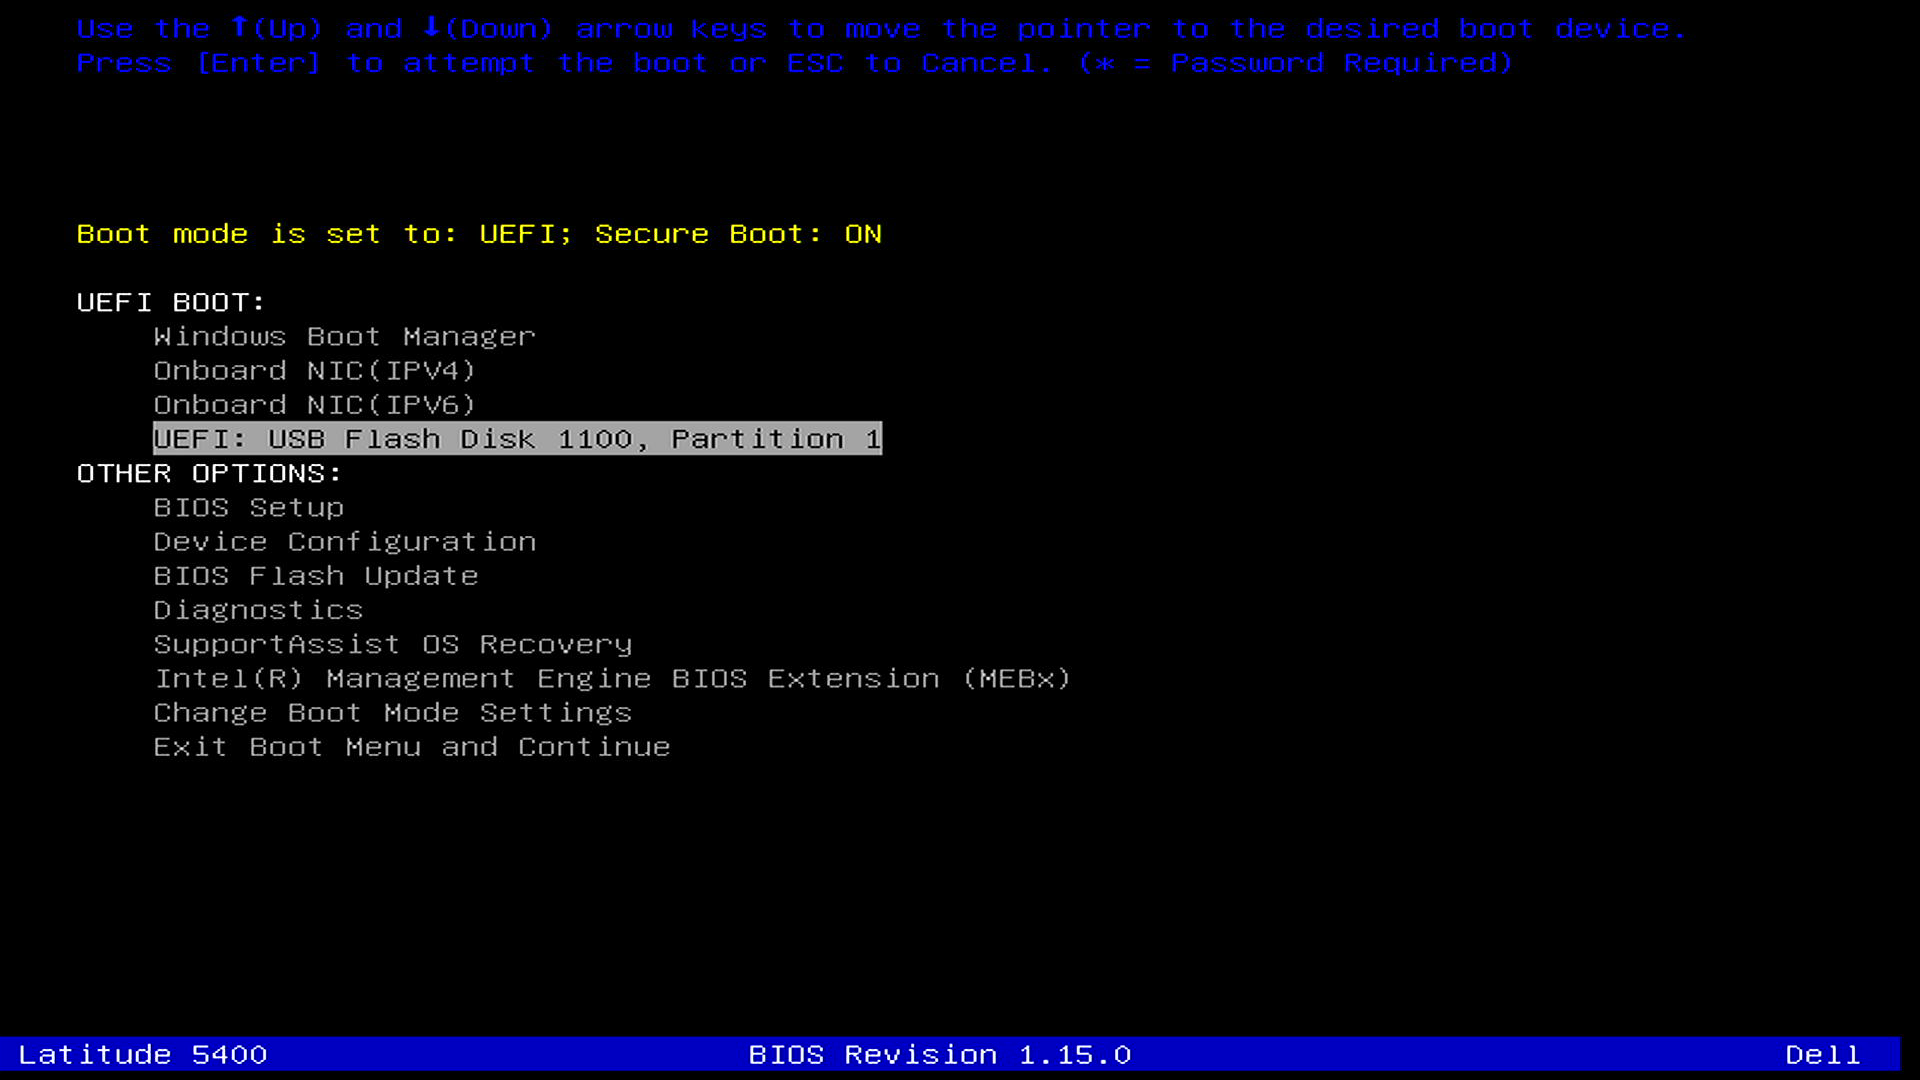
Figure 20: USB boot option in the One Time Boot menu. Image available in English only. - The computer boots into the SupportAssist OS Recovery environment.
- In the Reset panel, select Start Reset.

Figure 21: Main menu in the SupportAssist OS Recovery environment. Image available in English only.
Step 7
SupportAssist OS Recovery loads and by default recommends the best recovery option that is based on your computer's status.
Reset to Factory Settings: This option restores the original factory-installed operating system and software that was shipped with the computer. The local recovery image is available only on consumer platforms such as Alienware, Inspiron, Vostro, and XPS products.
Reset and update: This option uses Cloud Restore. It downloads and installs the most recent operating system and requires an active Internet connection.
NOTE: The Cloud Restore option downloads the most recent version of the operating system that was preinstalled on the Dell computer.
- Select a reset option and click Next.

Figure 22: Reset options in SupportAssist OS Recovery version 4.0. Image available in English only.
Step 8
The reset process in SupportAssist OS Recovery provides an option to backup your files.
- To backup your data and personal files before resetting the computer, select Yes, give access and transfer my settings data. Also accept the Microsoft Software License terms and then click Next. Follow the on-screen instructions and complete the data backup process.
- If you do not want to back up your files, select No, do not transfer my settings and data, and click Next.
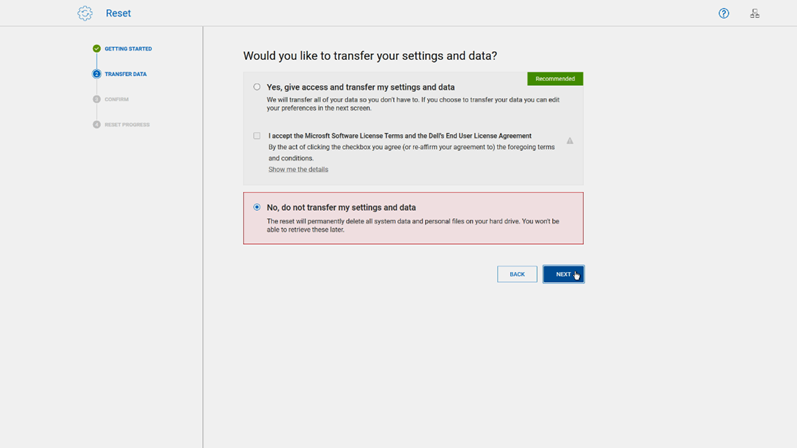
Figure 23: Data backup option during the reset process in SupportAssist OS Recovery. Image available in English only.
Step 9
- If you choose not to perform a data backup, the Confirm your reset page appears with notification that the reset process permanently deletes all data and personal files. Select I understand that the reset will delete all my system data and personal files.
- Select a reason for the reset from the drop-down dialogue box and then click Next.
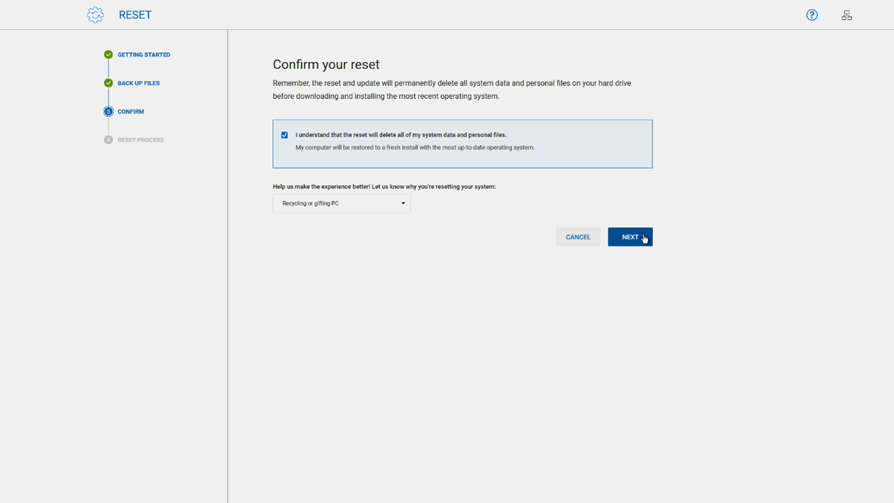
Figure 24: Select a reason for reset in SupportAssist OS Recovery. Image available in English only. - A warning is displayed that all system data and personal files will be deleted. Select Yes, Continue.
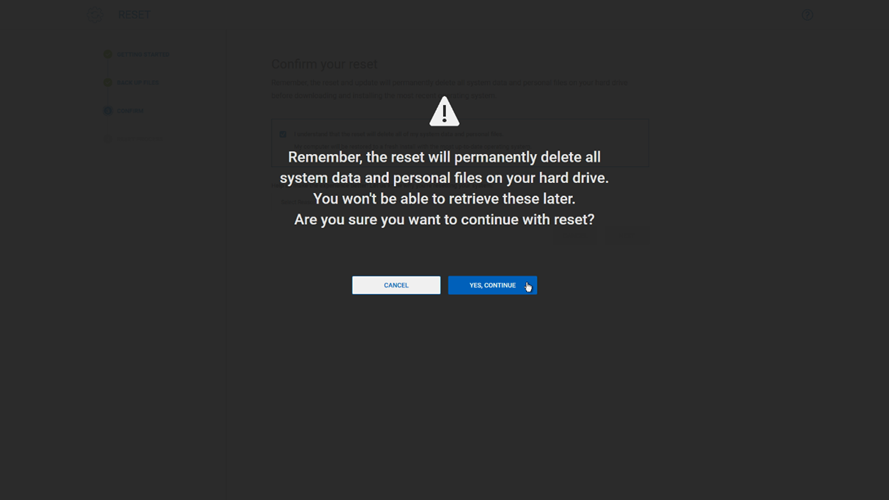
Figure 25: Data loss warning before resetting the computer in SupportAssist OS Recovery. Image available in English only.
Step 10
The recovery process begins, and a progress bar shows the different stages and the remaining time.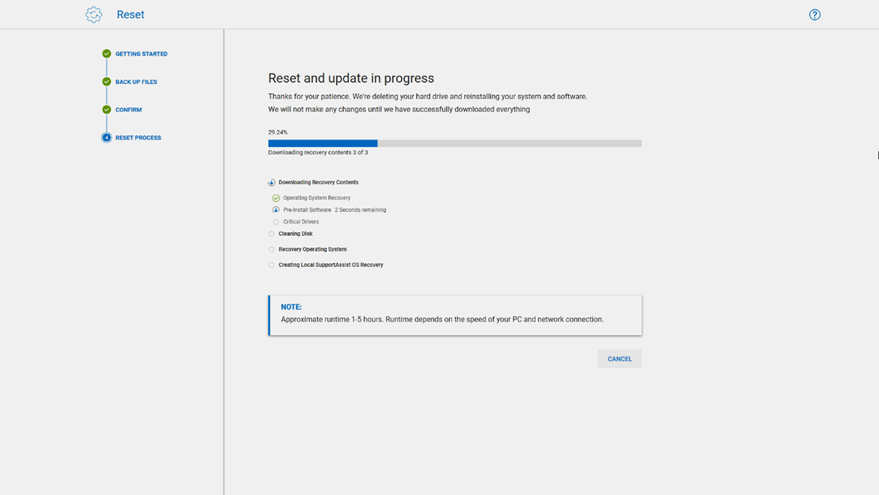
Figure 26: Progress of the reset process in SupportAssist OS Recovery. Image available in English only.
Step 11
- After the recovery process is completed, a message will indicate that the reset was successful, and you will be redirected to the recovery process guide screen.
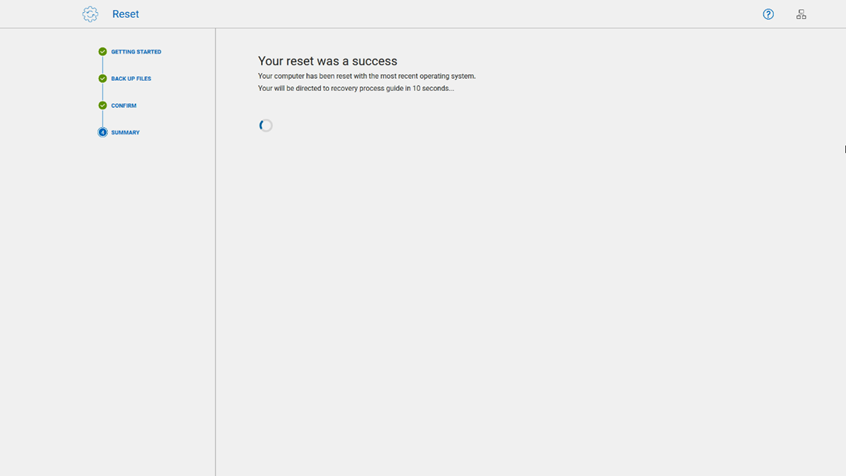
Figure 27: Completion of the reset process in SupportAssist OS Recovery. Image available in English only. - At the Recovery process guide screen, remove the USB drive (if the recovery process was started using a USB recovery media) and click Restart.

Figure 28: Recovery process guide screen in SupportAssist OS Recovery. Image available in English only.
Step 12
- The computer reboots multiple times, and starts the Windows first-time setup procedure. Follow the on-screen instructions to complete the first-time setup procedure.
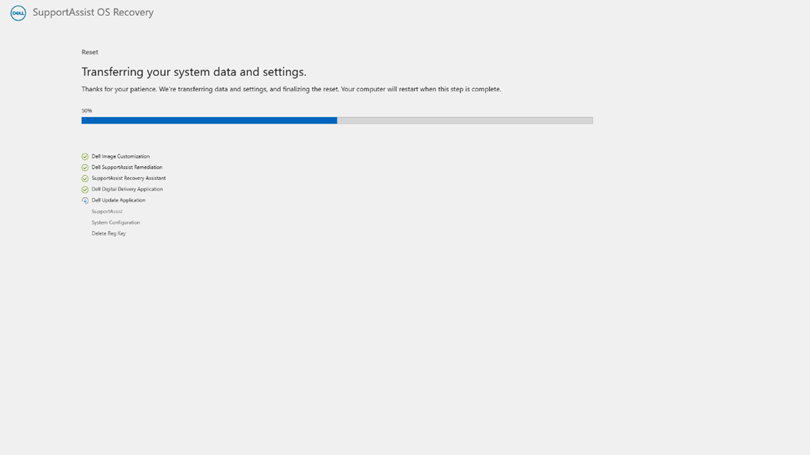
Figure 29: Transferring your system data and settings screen. Image available in English only.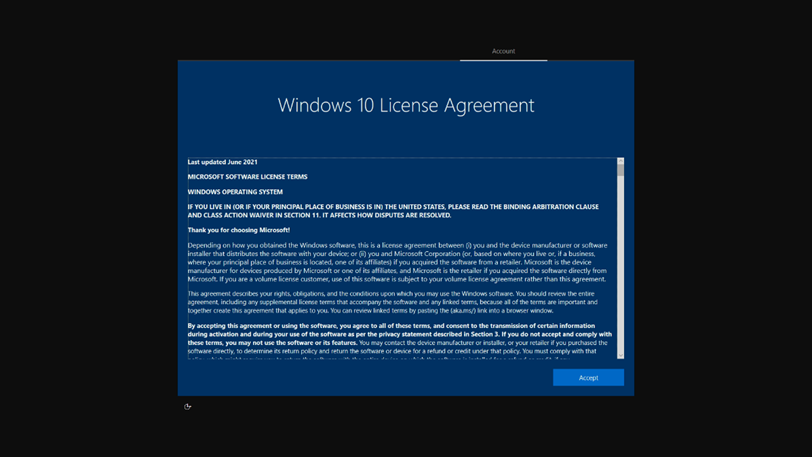
Figure 30: Windows End User License Agreement screen. Image available in English only. - The SupportAssist Recovery Assistant is displayed after login to help you install the latest Windows and Dell updates. It also installs Dell factory-installed software and recovers your backup files if you used the SupportAssist OS Recovery backup feature.
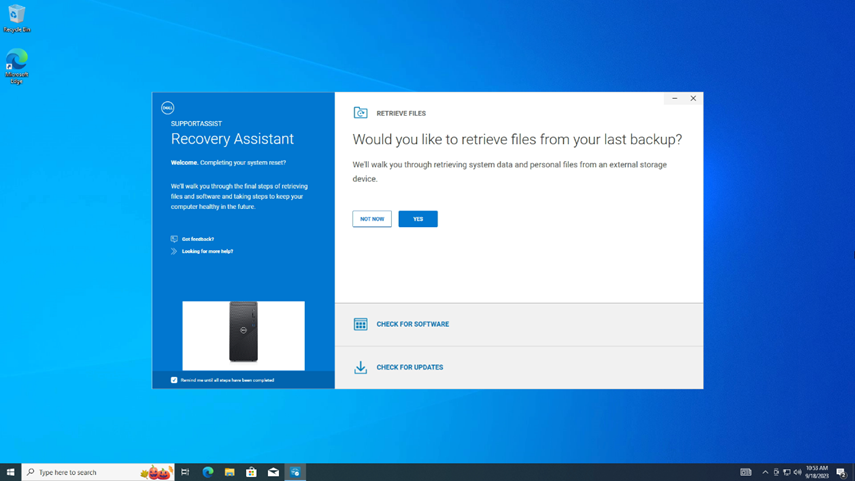
Figure 31: SupportAssist recovery assistant loads on the first startup. Image available in English only.
If all drivers are not loaded and your device is a Dell Pro, Dell Pro Max, Latitude, OptiPlex, or Precision workstation, launch Dell Command Update as an Administrator.
- If Advanced Driver Restore for Windows Re-Installation does not appear, go to Settings > Advanced Driver Restore and click Enable.
- If Advanced Driver Restore for Windows Re-Installation appears, select Click Here to download and install a complete driver library.
For SupportAssist OS Recovery troubleshooting and more, see the SupportAssist OS Recovery User’s Guide.
Affected Products
Alienware, Dell All-in-One, Dell Pro All-in-One, Dell Pro Max Micro, Dell Pro Max Slim, Dell Pro Max Tower, Dell Pro Micro, Dell Pro Slim, Dell Pro Tower, Dell Slim, Dell Tower, Inspiron, OptiPlex, Vostro, XPS, G Series, G Series, Alienware
, Dell Laptops, Dell Plus, Dell Pro, Dell Pro Max, Dell Pro Plus, Dell Pro Premium, Inspiron, Latitude, Dell Pro Rugged, Vostro, XPS, Fixed Workstations, Mobile Workstations, Dell Pro Max Micro XE FCM2250, Dell Pro Max Slim XE FCS1250, Dell Pro Max Tower T2 XE FCT2250, Dell Pro Max 16 XE MC16250, Dell Pro Micro Plus XE QBM1250, Dell Pro Slim Plus XE5 QBS1250, Dell Pro Tower Plus XE5 QBT1250, SupportAssist for Home PCs, SupportAssist OS Recovery
...
Article Properties
Article Number: 000177401
Article Type: How To
Last Modified: 24 Oct 2025
Version: 33
Find answers to your questions from other Dell users
Support Services
Check if your device is covered by Support Services.