PowerEdge: How to Install OpenManage Server Administrator on VMware to Collect Logs
Summary: How to install OpenManage Server Administrator VIB (OMSA) on VMware ESXi 5.x or VMware ESXi 6.x to collect system logs.
This article applies to
This article does not apply to
This article is not tied to any specific product.
Not all product versions are identified in this article.
Instructions
This article describes the installation process of OpenManage Server Administrator VIB (OMSA) on VMware ESXi 6.x.
Table of Contents
- Download Dell OpenManage Server Administrator vSphere Installation Bundle (VIB).
- Upload VIB to Datastore
- Rebooting the Host
- OMSA Download and Installation for Windows
- Collecting logs with SupportAssist Enterprise
Download Dell OpenManage Server Administrator vSphere Installation Bundle (VIB)
To download Dell OpenManage Server Administrator vSphere Installation Bundle (VIB) according to your ESXi version and your server model.
- Go to Dell Support > Driver and Downloads page and enter your server model, or enter service tag.
- Click Drivers & Downloads Tab.
- Select your Operating System.
- Keyword OMSA
- Download the Dell OpenManage Server Administrator vSphere Installation Bundle (VIB) for your ESXi version.
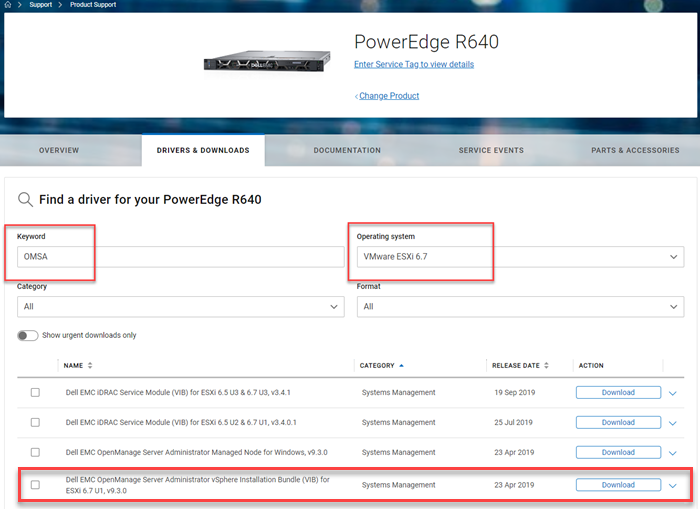
Figure 1: Download OMSA for VMware.
Upload VIB to Datastore
- Extract the ".zip" file that is downloaded from Drivers & Downloads and extract all files.
- Take note of the location of the .vib file
- Select the Host
- Click Storage
- In the Storage panel, select the required Datastore
- Click Data Store Browser
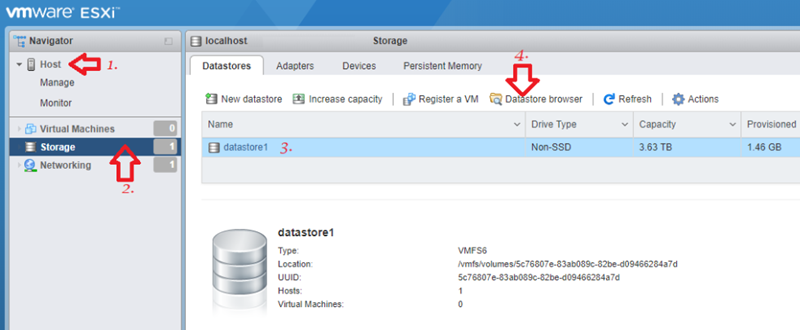
Figure 2: Screenshot of Data Store Browser - On Datastore Browser, click Upload icon and then Upload File.
NOTE: The .vib file name and path as it is required later to complete the install.
NOTE: To install using the UI of VMware ESXi, you must first extract the .vib file from the .zip file that is obtained from Drivers & Downloads.
NOTE: To install using the UI of VMware ESXi, you must first extract the .vib file from the .zip file that is obtained from Drivers & Downloads.
- Extract the ".zip" file that is downloaded from Drivers & Downloads and extract all files.
- Take note of the location of the .vib file
- Click "Manage" on the navigator pane on left.
- Click the "Package" tab and click "Install Update."
- Fill out the file path on the installation window.
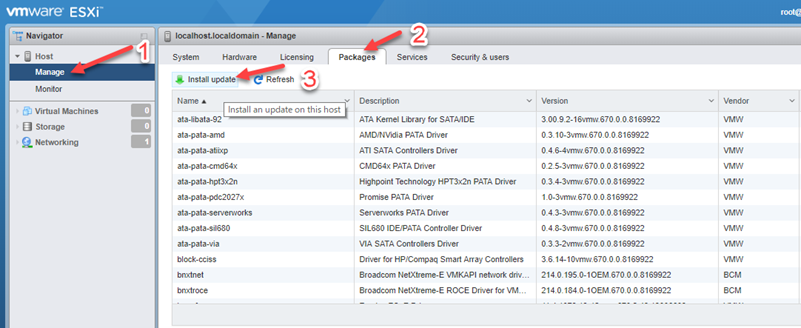 Figure 3: Install and Update the Zip File from Drivers & Downloads
- Go to the ".vib" file, for example, /vmfs/volumes/[datastore_name]/cross_dell-openmanage-esxi_9.3.0.ESXi670-3465.vib
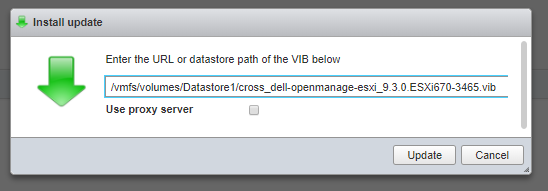
Figure 4: Go to the VIB File.
- Reboot the Host to complete the install
VIB Installation using SSH
- Select the host.
- In Actions drop-down, select Enable SSH
NOTE: Disable SSH after installed.
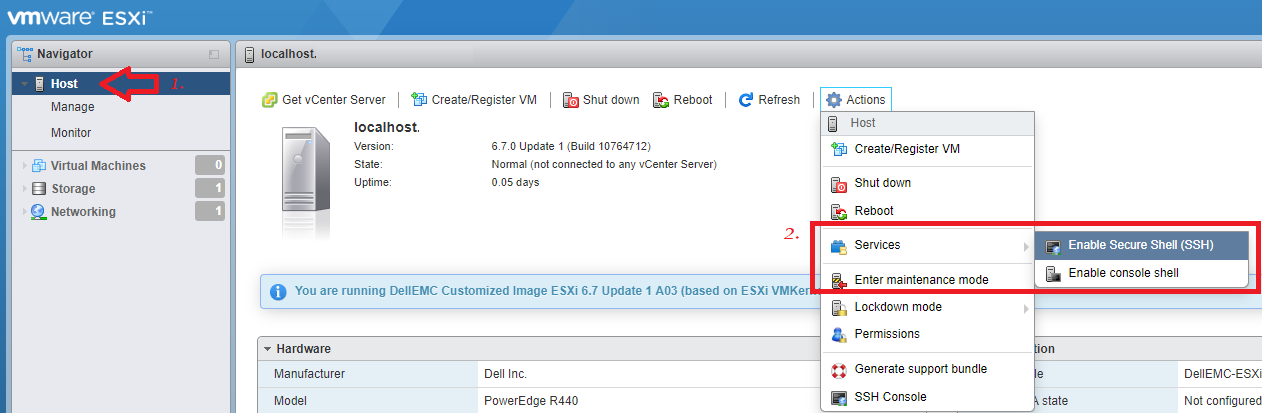
Figure 5: Screenshot of VIB Installation Using SSH
- Access the host with root user using the SSH Console in the actions drop-down or programs like PuTTY (or any SSH client tool).

Figure 6: Screenshot of SSH Console Selection
- Install the VIB with the command line below. Check the correct path according to your installation package.
esxcli software vib install -v /vmfs/volumes/[datastore_name]/cross_dell-openmanage-esxi_9.3.0.ESXi670-3465.vi
If you are using the offline bundle, use below command.
esxcli software vib install -d /vmfs/volumes/[datastore_name]/OM-SrvAdmin-Dell-Web-9.3.0-3465.VIB-ESX67i_A00.zip
On some installations like ESXi 5.1, the ZIP file must be located in /var/log/VMware. This can be uploaded to that patch using FileZilla.
If the installation succeeds, the below screen is displayed:

Figure 7: Screenshot of Successful Installation
NOTE: You can now disable SSH.
NOTE: The host must be rebooted to complete the installation.
Rebooting the Host
CAUTION: Enter Maintenance Mode if required.
- On the Host, right-click and select Reboot.
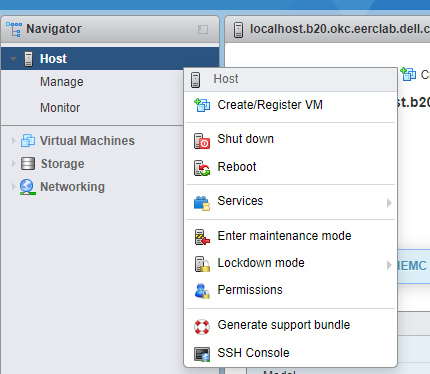
Figure 8: Rebooting the Host
OMSA Download and Installation for Windows
To access the Dell OpenManage web interface from any system on the same network as the host, download and install OpenManage Server Administrator on your management or client system that is used to access the remote OMSA.
- Go to Dell Support > Driver and Downloads page and enter your server model, or enter service tag.
- Click Drivers & Downloads Tab.
- Select your Operating System.
- Keyword OMSA
Once downloaded, extract and install the file from the C:\OpenManage\windows folder.
- After the installation, open the OpenManage Server Administrator shortcut on the desktop

Figure 9: OpenManage Server Administrator Shortcut
- Provide the IP address of the ESXi host, user (root), and password. Ensure the option "Ignore certificate warnings" is checked.
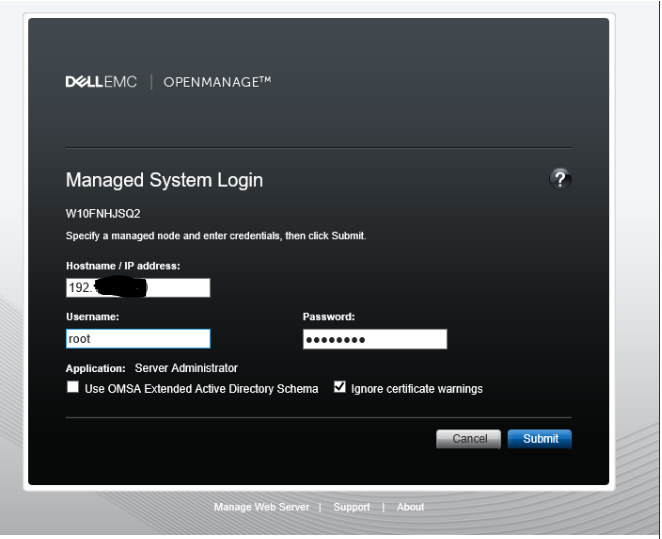
Figure 10: Screenshot of Ignore Certificate Warnings Checkbox.
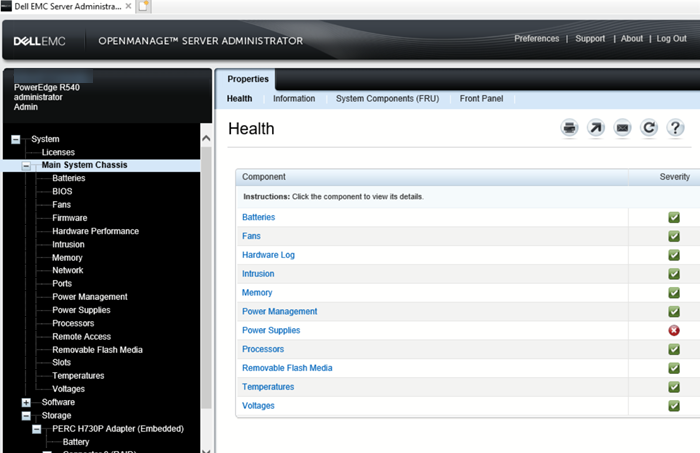
Figure 11: Screenshot of Remote OpenManage Server Administrator
Collect logs with SupportAssist Enterprise.
Once the VIB is installed on the VMware server, the log collection can be started from the SupportAssist Enterprise console.
The console must be installed on a different server. A virtual machine can be used for this.
Once the console is installed, the next step is to discover and add the server in the SAE console. Once this is done, the button "Start SupportAssist Collection" is available for use.
Affected Products
OpenManage Server Administrator, Dell OpenManage Server Administrator Version 10.0.1, Dell OpenManage Server Administrator Version 10.2.0.0, Dell OpenManage Server Administrator Version 9.3, Dell OpenManage Server Administrator Version 9.3.1
, Dell OpenManage Server Administrator Version 9.3.2, Dell OpenManage Server Administrator Version 9.4, VMware ESXi 5.x, VMware ESXi 6.5.X, VMware ESXi 6.7.X, VMware ESXi 6.x, VMware ESXi 7.x, VMware ESXi 8.x
...
Products
PowerEdge FC640, PowerEdge M640, PowerEdge M640 (for PE VRTX), PowerEdge MX740C, PowerEdge MX750c, PowerEdge MX760c, PowerEdge MX840C, PowerEdge R240, PowerEdge R250, PowerEdge R260, PowerEdge R340, PowerEdge R350, PowerEdge R360, PowerEdge R440
, PowerEdge R450, PowerEdge R540, PowerEdge R550, PowerEdge R640, PowerEdge R6415, PowerEdge R650, PowerEdge R650xs, PowerEdge R6515, PowerEdge R6525, PowerEdge R660, PowerEdge R660xs, PowerEdge R6615, PowerEdge R6625, PowerEdge R740, PowerEdge R740XD, PowerEdge R740XD2, PowerEdge R7415, PowerEdge R7425, PowerEdge R750, PowerEdge R750XA, PowerEdge R750xs, PowerEdge R7515, PowerEdge R7525, PowerEdge R760, PowerEdge R760XA, PowerEdge R760xd2, PowerEdge R760xs, PowerEdge R7615, PowerEdge R7625, PowerEdge R840, PowerEdge R860, PowerEdge R940, PowerEdge R940xa, PowerEdge R960, PowerEdge T140, PowerEdge T150, PowerEdge T160, PowerEdge T340, PowerEdge T350, PowerEdge T360, PowerEdge T440, PowerEdge T550, PowerEdge T560, PowerEdge T640
...
Article Properties
Article Number: 000199278
Article Type: How To
Last Modified: 02 Dec 2025
Version: 8
Find answers to your questions from other Dell users
Support Services
Check if your device is covered by Support Services.