NetWorker: How To Backup Linux Cluster Shared Volume
Summary: This article provides a general overview of how to backup files that are shared between two Linux nodes.
This article applies to
This article does not apply to
This article is not tied to any specific product.
Not all product versions are identified in this article.
Instructions
Identify the Cluster Storage and Logical Name:
In this article, the examples that are shown are from two Red Hat nodes using pcs (Pacemaker) High Availability cluster service. Differences in how to obtain details regarding the cluster configuration depending on operating system vendor and clustering service. See vendor-specific documentation regarding cluster configurations and commands. The logic behind the configuration of the NetWorker clients remains the same.
Use the cluster service commands to review the configuration details, in this case:
root@NWrhelNodeC:~# pcs config
Cluster Name: rhel7clus
Corosync Nodes:
 NWrhelNodeC.emclab.local NWrhelNodeD.emclab.local
Pacemaker Nodes:
 NWrhelNodeC.emclab.local NWrhelNodeD.emclab.local

Resources:
 Group: NW_group
  Resource: fs (class=ocf provider=heartbeat type=Filesystem)
   Attributes: device=/dev/sdb1 directory=/nsr_share fstype=ext4
   Operations: monitor interval=20 timeout=300 (fs-monitor-interval-20)
               notify interval=0s timeout=60s (fs-notify-interval-0s)
               start interval=0s timeout=60s (fs-start-interval-0s)
               stop interval=0s timeout=60s (fs-stop-interval-0s)
  Resource: ip (class=ocf provider=heartbeat type=IPaddr)
   Attributes: cidr_netmask=24 ip=192.168.25.40 nic=ens192
   Operations: monitor interval=15 timeout=120 (ip-monitor-interval-15)
               start interval=0s timeout=20s (ip-start-interval-0s)
               stop interval=0s timeout=20s (ip-stop-interval-0s)
  Resource: nws (class=ocf provider=EMC_NetWorker type=Server)
   Meta Attrs: is-managed=true
   Operations: meta-data interval=0 timeout=10 (nws-meta-data-interval-0)
               migrate_from interval=0 timeout=120 (nws-migrate_from-interval-0)
               migrate_to interval=0 timeout=60 (nws-migrate_to-interval-0)
               monitor interval=100 timeout=1000 (nws-monitor-interval-100)
               start interval=0 timeout=300 (nws-start-interval-0)
               stop interval=0 timeout=300 (nws-stop-interval-0)
               validate-all interval=0 timeout=10 (nws-validate-all-interval-0)
From the output, make note of:
- Each of the physical nodes in the cluster
- Which device is the shared disk and what file system that it mounts to.
- The IP address used by the logical resource
In NetWorker 19.11 and later, the lcmap command returns the logical cluster name and shared volumes:
root@NWrhelNodeC:~# lcmap
type: NSR_CLU_TYPE;
clu_type: NSR_LC_TYPE;
interface version: 1.0;

type: NSR_CLU_VIRTHOST;
hostname: NWrhelClusC.emclab.local;
local: TRUE;
owned paths: /nsr_share>
For 19.10 and prior, us the nslookup command to confirm the logical cluster name of the cluster IP resource:
root@NWrhelNodeC:~# nslookup 192.168.25.40
40.25.168.192.in-addr.arpa      name = NWrhelClusC.emclab.local
Only the active node has the shared storage mapped. From the cluster configuration in this example, the /dev/sdb1 device is the shared ISCSI disk and it mounts to /nsr_share.
root@NWrhelNodeC:~# pcs resource
 Resource Group: NW_group
     fs (ocf::heartbeat:Filesystem):    Started NWrhelNodeC.emclab.local
     ip (ocf::heartbeat:IPaddr):        Started NWrhelNodeC.emclab.local
     nws        (ocf::EMC_NetWorker:Server):    Started NWrhelNodeC.emclab.local
root@NWrhelNodeC:~#
root@NWrhelNodeC:~# lsblk | grep sdb1
└─sdb1        8:17   0 46.5G  0 part /nsr_share

root@NWrhelNodeD:~# lsblk | grep sdb1
└─sdb1          8:17   0 46.5G  0 part
root@NWrhelNodeD:~#
If a failover occurs, storage mounts on another cluster node. Shared storage is accessible using the Logical Cluster Name regardless of the active node.
|
Node One Hostname
|
NWrhelNodeC.emclab.local
|
|
Node Two Hostname
|
NWrhelNodeD.emclab.local
|
|
Logical Cluster Name
|
NWrhelClusC.emclab.local
|
Configuring the NetWorker Client for backing up files on the shared storage:
- Ensure that the NetWorker client software is installed on each of the physical nodes in the cluster. See the NetWorker Installation Guide.
- Steps for configuring a NetWorker client resource to be cluster aware are detailed in the NetWorker Cluster Integration Guide.
NOTE: All NetWorker Guides are available through: NetWorker Support Information
- Log in to the NetWorker Management Console (NMC).
- Go to Protection > Clients.
- Click Protection > New Client Wizard.
- Specify the Logical Client Name and select a Protection Group:
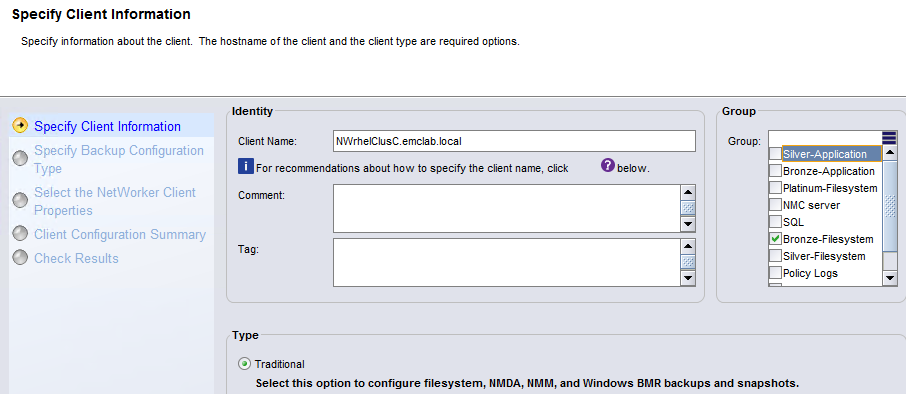
- For the save set, specify save set ALL or select the shared storage mountpoint or subdirectories within the mountpoint:
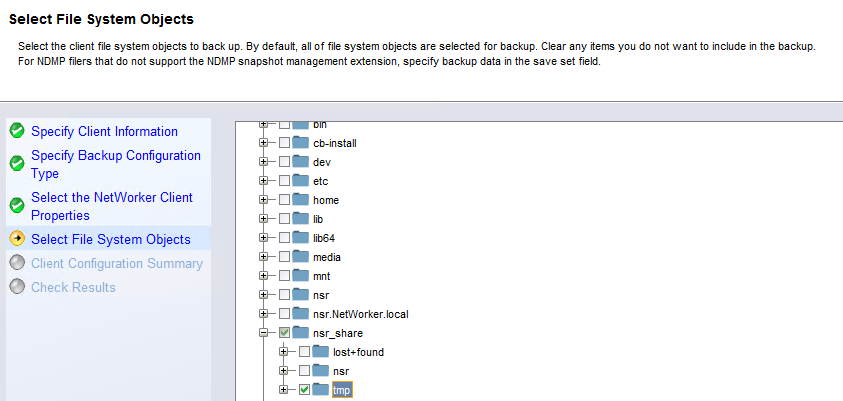
NOTE: When using save set ALL on a cluster shared resource. It ignores the folders/files which belong to the physical node's volumes and backup data within only the shared volume. Do not manually select any "local" files or directories. To backup the files and directories of the physical nodes, NetWorker clients can be created using the physical node names, selecting only local directories/files.
- Finish the client creation.
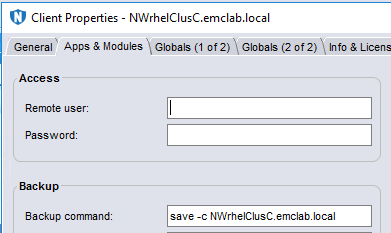
- Open the client properties of the Logical Cluster Resource.
- Go to Apps and Modules.
- In the backup command field, specify:
save -c Logical_Client_Name
Save sets are indexed under the logical cluster client name, regardless of the active node, instead of the current physical node's hostname.
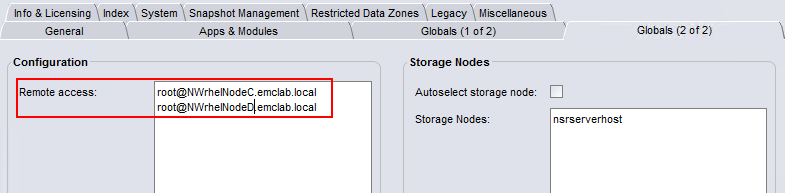
- In the Globals (2 of 2) tab, update the Remote Access field to contain
root@NodeClientNamefor each of the physical nodes in the cluster:
- Perform a backup of the Cluster Client.
- The save set should appear in the NetWorker server's media database:
mminfo -avot -q client=Logical_Client_Name
[root@networker-mc]:~# mminfo -avot -q client=NWrhelClusC.emclab.local -r client,savetime,ssid,nsavetime
 client      date   ssid         save time
NWrhelClusC.emclab.local 12/22/2022 933550847 1671748351
NWrhelClusC.emclab.local 12/22/2022 883219305 1671748457
[root@networker-mc]:~#
[root@networker-mc]:~# nsrinfo -t 1671748457 NWrhelClusC.emclab.local
scanning client `NWrhelClusC.emclab.local' for savetime 1671748457(Thu 22 Dec 2022 05:34:17 PM EST) from the backup namespace
/nsr_share/tmp/somefile
/nsr_share/tmp/
/nsr_share/
/nsr_share//
/
5 objects found
Additional Information
Affected Products
NetWorkerProducts
NetWorker Family, NetWorker SeriesArticle Properties
Article Number: 000206944
Article Type: How To
Last Modified: 16 May 2026
Version: 8
Find answers to your questions from other Dell users
Support Services
Check if your device is covered by Support Services.