Solving Windows 10 ISO Size Issue for FAT32: Split or Extract Install.wim
概要: Learn how to manage Windows 10 ISO files with oversized install.wim for FAT32. Splitting or extracting the install.wim can solve the issue.
この記事は次に適用されます:
この記事は次には適用されません:
この記事は、特定の製品に関連付けられていません。
すべての製品パージョンがこの記事に記載されているわけではありません。
手順
Note: Microsoft will end support for Windows 10 on October 14, 2025. See our Microsoft Windows 10 End of Support Announcement for more information.
Microsoft ISO files for Windows 10 Volume License and maybe others as well are bigger than 4 GB in total but also contain an install.wim with a size of more than 4 GB. This does not allow creating, for example, a USB stick with a FAT32 file system and would require use of NTFS instead.
If you want to boot under UEFI you might fail, as not all systems can boot from external boot media using NTFS.
- Extract the needed index/edition from the original install.wim to get a smaller one
- Split the install.wim file into smaller ones - preserves all editions within the ISO
Extract the needed index/edition from the original install.wim to get a smaller one
Option 1 can be done as follows (DISM commands as available under Windows 10 RS4 - might be adapted to other operating system versions):
-
Extract the required
install.wimout of the ISO file or mount the ISO file -
Open an elevated command prompt to use Microsoft Windows Deployment Image Servicing and Management (DISM) commands
-
Run the following DISM command with the correct path to the install.wim to get the index that represents your needed Windows edition:
dism /Get-WimInfo /WimFile:"c:\temp\install.wim"The output might look like the following:
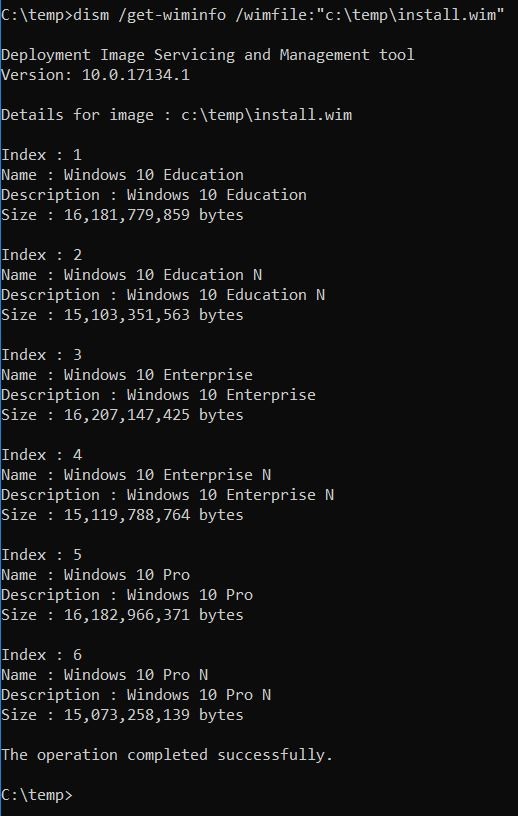
(Figure 01) -
Now extract the right index (3 in this case as I want to install Enterprise edition) into a new WIM file using the DISM command:
dism /Export-Image /SourceImageFile:"c:\temp\install.wim" /SourceIndex: 3 /DestinationImageFile: "c:\temp\install_3.wim"This will then look like the following:

(Figure 02)It reduced the file size from 4.11 GB to only 3.68 GB which now fits within the file size limitation of FAT32. You now have to rename the created file to install.wim
-
Insert the newly created install.wim into the original ISO file or just copy it onto an already prepared USB stick with all the other needed files from the original ISO
Split the install.wim file into smaller ones - preserves all editions within the ISO
Option 2 can be easily done as follows:
-
Extract the required
install.wimout of the ISO file or mount the ISO file -
Open an elevated command prompt to use DISM commands
-
Run the following DISM command with the correct path to the install.wim and the wanted file size in MB:
dism /Split-Image /ImageFile:"c:\temp\install.wim /SWMFile:"c:\temp\install.swm" /FileSize: 4000 -
Now just replace the original install.wim with the created SWM files (install.swm, install2.swm)
対象製品
Alienware, Dell All-in-One, Dell Pro Max Micro, Dell Pro Max Slim, Dell Pro Max Tower, Dell Pro Micro, Dell Pro Slim, Dell Pro Tower, Dell Slim, Dell Tower, Inspiron, Legacy Desktop Models, OptiPlex, Vostro, XPS, G Series, G Series, Alienware
, Dell Plus, Dell Pro, Dell Pro Max, Dell Pro Plus, Dell Pro Premium, Inspiron, Latitude, Dell Pro Rugged, Vostro, XPS, Legacy Laptop Models, Mobile Workstations
...
文書のプロパティ
文書番号: 000127789
文書の種類: How To
最終更新: 17 7月 2025
バージョン: 10
質問に対する他のDellユーザーからの回答を見つける
サポート サービス
お使いのデバイスがサポート サービスの対象かどうかを確認してください。