Using SSH (SSH) to log in to a remote Data Domain without giving a password
Summary: This article lists steps to configure and use a Secure Shell (SSH) client to connect to Data Domain systems by using SSH keys to log in without the need to supply a password.
Instructions
SSH is a network protocol that allows data to be exchanged using a secure channel between two networked devices. SSH was designed to replace the Telnet protocol due to Telnet's inability to protect data against "man in the middle" attacks. The encryption SSH uses provides confidentiality and data integrity over an insecure network, such as the Internet.
For convenience, ease of administration and integration into other products, such as Data Protection Advisor (DPA), a Data Domain may need to be accessed programmatically without an administrator giving a password every time or insecurely storing the password on some text file. That is where SSH key authentication comes into place.
SSH requirements
- A computer with an SSH client installed (such as OpenSSH or PuTTY)
- IP Network connectivity using TCP port 22
- SSH server enabled and listening on TCP port 22 (This is default for the Data Domain system)
- Test to initially connect to the remote DD through SSH by using a username and password:
- Run the SSH client software on the remote system.
- Configure the SSH client to connect using the Data Domain system hostname or IP address.
- If using PuTTY, leave the default port (22) and click Open.
- If connecting for the first time, a message appears looking something like this:
The server's host key is not cached in the registry. You have no guarantee that the server is the computer you think it is. The server's rsa2 key fingerprint is: ssh-rsa 1024 7b:e5:6f:a7:f4:f9:81:62:5c:e3:1f:bf:8b:57:6c:5a If you trust this host, hit Yes to add the key to PuTTY's cache and carry on connecting. If you want to carry on connecting just once, without adding the key to the cache, hit No. If you do not trust this host, hit Cancel to abandon the connection.
Click Yes
- Log in to the system. If connecting to the Data Domain system for the first time, and the
sysadminuser password has not been changed:- Username is
sysadmin - The password is the system serial number.
- Username is
Configuring the system to log in without using a password: On a Linux or UNIX system
"dsa" does NOT work, and only "rsa" type keys work.
-
Generate an SSH key.
The recommended key type is"rsa"and is the only one that works with DDOS 6.0 and later versions:# ssh-keygen -t rsa Generating public/private rsa key pair. Enter file in which to save the key (/root/.ssh/id_rsa): Enter passphrase (empty for no passphrase): Enter same passphrase again: Your identification has been saved in /root/.ssh/id_rsa. Your public key has been saved in /root/.ssh/id_rsa.pub.
"dsa"type keys also work on DDOS 5.7 or earlier versions. However, this key type is no longer recommended:# ssh-keygen -t dsa
Generating public/private dsa key pair. Enter file in which to save the key (/root/.ssh/id_dsa): Enter passphrase (empty for no passphrase): Enter same passphrase again: Your identification has been saved in /root/.ssh/id_dsa.
The DDOS Command Reference says to use the "
d" option instead of "-t dsa." Either one works on DDOS but "d" does not work on many Linux distributions.Use the blank passphrase option to bypass the Data Domain password requirement when running scripts.
Note the location for the new SSH key on the "
ssh-keygen" command output. It is stored under the user's$HOMEdirectory below.ssh/as a file namedid_rsa.pub. -
Add the generated key to the Data Domain systems access list:
# ssh -l sysadmin 168.192.2.3 "adminaccess add ssh-keys" < ~/.ssh/id_rsa.pub
The authenticity of host '168.192.2.3(168.291.2.3)' can't be established. RSA key fingerprint is f6:36:6e:32:e1:2d:d9:77:40:7e:0e:f8:5f:32:8d:0a. Are you sure you want to continue connecting (yes/no)? yes Warning: Permanently added '168.192.2.3' (RSA) to the list of known hosts. Data Domain OS 0.31.0.0-152384 Password: sysadmin_password
-
Test functionality:
# ssh sysadmin@168.192.2.3 "df -h"

Data Domain OS Resource Size GiB Used GiB Avail GiB Use% Cleanable GiB* ------------------ -------- -------- --------- ---- -------------- /backup: pre-comp - 50.0 - - - /backup: post-comp 4922.3 2.7 4919.7 0% 0.0 /ddvar 78.7 0.5 74.2 1% - ------------------ -------- -------- --------- ---- -------------- * Estimated based on last cleaning of 2010/02/02 06:00:59.
You may also pass an entire script of system commands in a file to the device. This is done by running a command to point to the specific file containing the list of commands:
# ssh sysadmin@DDR < FULL_LOCAL_PATH_TO_SCRIPT_TO_RUN_ON_REMOTE_DD
This allows an operator to create a list of commands on a remote host and then run them all at once over SSH.
Configuring the system to log in without using a password: Windows Systems (PuTTY)
-
Install the SSH PuTTY tools (PuTTY, PuTTYgen, and Pageant) on the Windows system.
-
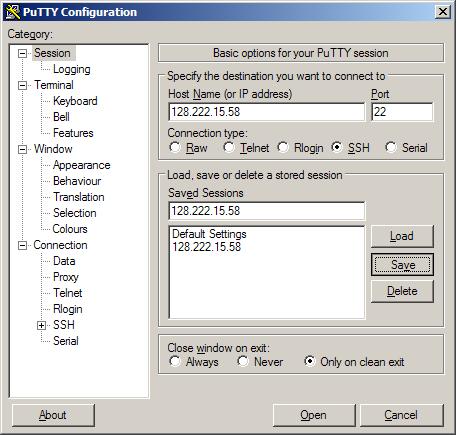
Create a PuTTY session.
- Start PuTTY with the PuTTY configuration tool.
- Save a session with the Data Domain system IP address.
- In the PuTTY Configuration dialog box, select Category > Session.
- Select the SSH button.
- Enter the Data Domain system IP address in the Host Name field and Saved Sessions field. For example: 168.192.2.3
- Click Save.
-
Enter Auto-Login username.
- In the PuTTY Configuration dialog box, select the Category > Connection > Data.
- Enter the administrator username in the Auto-Login username field. For example:
sysadmin - Click Save.
-
Create a PuTTY key.
- Start PuTTYgen, the PuTTY Key Generator tool:
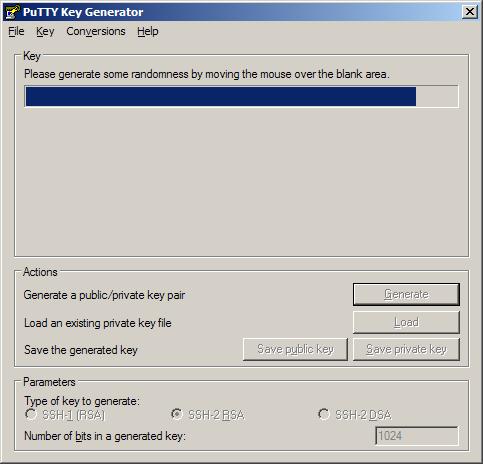
- Generate Public and Private keys using the PuTTY Key Generator tool.
- Generate some randomness by moving the cursor over the blank area in the Key field.
The Public key for pasting into the OpenSSHauthorized_keysfile fills with randomized characters.
The Key fingerprint field fills with reference values. - Create a Key identifier in the Key comment field and type an identifying Key name, for example:
admin_name@company.com - Leave the Key passphrase and Confirm passphrase fields blank.
Use the blank passphrase option to bypass the Data Domain system password requirement when running scripts. - Click Save public key.
- Click Save private key.
Note the path to the saved key file.
Example key filename:DataDomain_private_key.ppk
- Generate some randomness by moving the cursor over the blank area in the Key field.
- Copy the randomly generated PuTTY key.
Select all the text in the Public key field for pasting into the OpenSSHauthorized_keys file.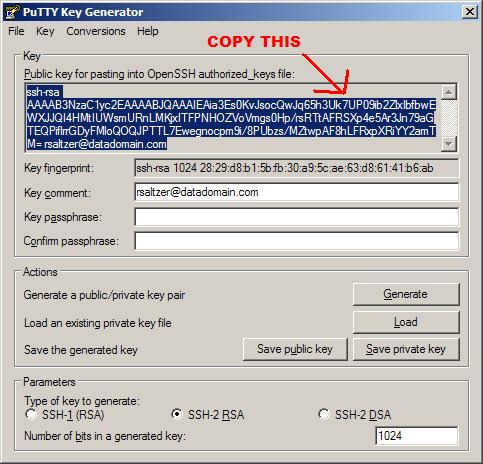
- Start PuTTYgen, the PuTTY Key Generator tool:
-
Add the key in the Data Domain system command line.
- Open a Data Domain system command prompt.
- Add the administrative SSH access key.
At the command line, type:adminaccess add ssh-keys
- Paste the randomly generated key from the PuTTYgen field.
Right-Click > Paste option. - Complete the command; press
CTRL+D.
-
Attach the key to PuTTY.
- From the PuTTY Configuration tool, select Connection > SSH > Auth.
- Check box Attempt authentication using Pageant.
- Check box Attempt keyboard-interactive auth (SSH-2)
- In the Private key file for the authentication field, click Browse.
- Browse to the PuTTY key generated and saved in Step 3. For example:
DataDomain_private_key.ppk - Save settings, click Save.

-
Open the session.
- In the PuTTY Configuration dialog box, select Category > Session.
- Click Open.
A Windows command line opens. The PuTTY session opens.
Using usernamesysadmin Data Domain OS Authenticatingwith public key:admin_name@company.com Last login: Thu Feb 4 10:51:10 EST 2010 from 168.192.2.3 on pts/2 Last login: Thu Feb 4 18:56:14 2010 from 168.192.2.3 Welcome to Data Domain OS 0.31.0.0-152384 ----------------------------------------- #