How to Update the Dell BIOS in the Ubuntu or Linux Environment
Summary: The following article provides information about updating the BIOS on your Dell desktop or laptop running Ubuntu or some other type of Linux?
This article applies to
This article does not apply to
This article is not tied to any specific product.
Not all product versions are identified in this article.
Instructions
Note: This article is applicable for Dell desktops and laptops and does not cover Enterprise devices such as servers and storage solutions.
Table of Contents
- Flashing a Dell BIOS in a Linux Only Environment
- Updating the BIOS on supported United Extensible Firmware Interface (UEFI) platforms (2015 onwards)
- Creating a USB Bootable Storage Device Using FreeDOS (Legacy Products)
- Update the BIOS on Dell products before 2015
- Frequently Asked Questions about Ubuntu Linux
Flashing a Dell BIOS in a Linux Only Environment
As Linux and Ubuntu distributions are becoming more popular on Dell desktops and laptops, there are more situations where a Linux only environment is present.
UEFI Capsule updates
If your computer is listed at https://fwupd.org/lvfs/devicelist , then it supports UEFI capsule updates and can be updated natively within the Operating System.
Starting from 16.04 and up to the most recent, Ubuntu natively notifies you of new BIOS updates. When an update is available, a notification is displayed to flash the update.
Note: Other Linux distributions may require having the capsule flashing tools manually installed. Check with your distribution vendor for more information.
If your device or Operating System does not support UEFI capsule updates:
- For newer products (post-2015), see Section 2 below.
- For older products and releases of Linux, such as Ubuntu, the process to create a bootable USB BIOS update is referenced in Section 3 and Section 4 below.
Updating the BIOS on supported UEFI platforms (2015 onwards)
BIOS Boots menu updates.
All Dell desktops and laptops from 2015 and later support flashing an updated BIOS from within the boot menu. Follow the directions below to update the BIOS on these platforms.
-
Format USB storage device.
You must format a USB storage device as FAT32 On Ubuntu, this can be done by following these steps:
-
Plug in a USB storage device such as a Memory Stick.
-
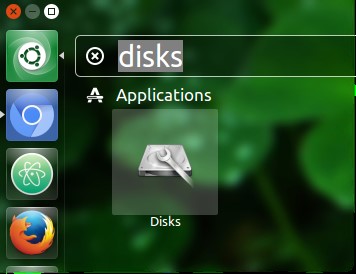
Click or touch the Ubuntu dash icon.
-
Type disks to search for the Disks application.
-
Select Disks.
-
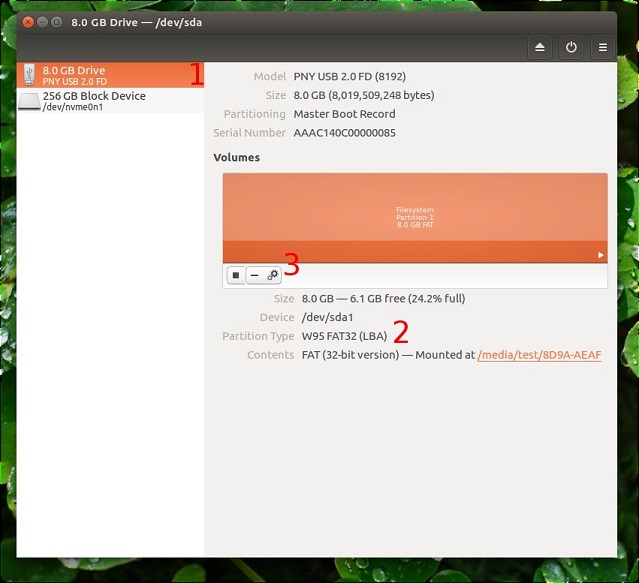
Select the USB flash drive on the left.
 Note: On other Linux distributions, you must check with your distribution vendor for information about how to format the USB storage device.
 -
Look at the Partition Type below.
-
If the partition type contains FAT32 it is already formatted properly.
-
If the partition type is something else, it must be formatted.
-
-
Click the gear icon above Size.
-
Select Format.
-
Ensure that Type is FAT.
-
Click the Format button.
-
-
Download BIOS update:
-
Go to www.dell.com/support/drivers to find your device.
-
Select the BIOS update, and download using your web browser.
-
Navigate to the Downloads folder, and copy the BIOS to your USB disk.
Note: The BIOS flash ends in an.exeextension. Even though Linux cannot open it natively, the BIOS deals with it properly.
-
-
Flash BIOS update
If the device is not already plugged into a power outlet, plug it in now:
-
Reboot the device, and press F12 at the Dell splash screen.
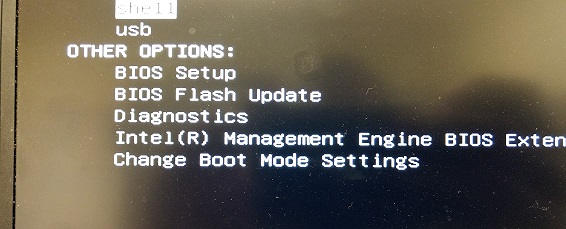
The One-time boot menu appears.
-
Select the option to BIOS Flash Update.
-
Navigate to your USB disk and select the BIOS you downloaded.
-
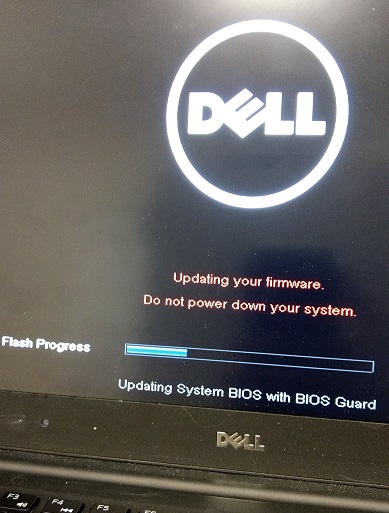
Once the update has been completed, the computer reboots automatically.
-
Creating a USB Bootable Storage Device Using FreeDOS (Legacy Products)
Warning: This procedure does NOT work on USB 3.0 only desktops and laptops. This process is provided as a courtesy and requires the use of third-party utilities to create the bootable USB drive. Dell Technical Support does not support this process. Proceed at your own risk.
For older versions of Linux and Ubuntu and on platforms that are pre-2015, you must update the BIOS using the following method:
Note: This procedure may not work on devices that were not shipped with Linux factory-installed. This process is provided as a courtesy and requires the use of third-party utilities to create the bootable USB drive. Dell Technical Support does not support this process.
You must create a bootable USB storage device with FreeDOS on it to proceed with flashing the BIOS.
Note: This process is unlikely to work on devices that are unable to have FreeDOS or Linux factory-installed on it.
Download the following to the computer before beginning:
- The latest BIOS for your model is found at www.dell.com/support/drivers
- The FreeDOS Base ISO 1.0, found at www.freedos.org/download
- UNetbootin, which can be installed by going to the Software Center in Linux, and searching for UNetbootin and then installing it.
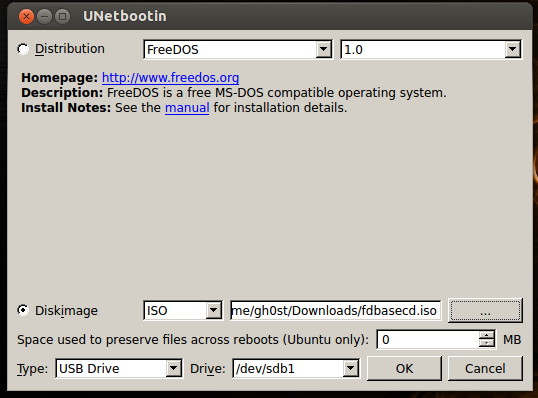
After UNetbootin is installed, run the program and select the Diskimage option. Set to ISO and then select the FreeDOS Base ISO file that was downloaded earlier.
Select the Type as USB Drive and the drive as /dev/sdb1 and click OK.
Use the image below as a sample of what the UNetbootin screen should look like.
After this operation is complete, copy the BIOS .exe file to the USB storage device.
Now move on to Section 4
Update the BIOS on Dell products before 2015
-
After the BIOS flash file has been copied, reboot the device, and press F12 at the Dell logo to bring up the
One-time boot menu
. -
Select USB Storage Device to boot from the USB stick.
-
Once the device reaches the boot menu, choose the
fdosoption, then choose safe mode.
Caution: Do not choose to Load FreeDOS to the hard drive, as it damages the operating system.
-
Once the boot sequence finishes, it displays an
A:prompt. -
Switch the drive letter to
B:orC:(The drive letter that is assigned to the USB memory stick.) -
Type in the filename of the BIOS flash file to begin the update process. (For example:
O9010A12.exeand press Enter.) -
Once you complete the update, the device should reboot automatically.
See these Dell Knowledge Base articles for related information:
Additional Information
Frequently Asked Questions about Ubuntu Linux
For further information about Ubuntu Linux on your computer, see the following link:
Affected Products
Chromebox, Alienware, Dell All-in-One, Dell Pro All-in-One, Dell Pro Max Micro, Dell Pro Max Slim, Dell Pro Max Tower, Dell Pro Micro, Dell Pro Slim, Dell Pro Tower, Dell Slim, Dell Tower, Inspiron, OptiPlex, Vostro, XPS, G Series, Chromebook
, G Series, Alienware, Dell Laptops, Dell Plus, Dell Pro, Dell Pro Max, Dell Pro Plus, Dell Pro Premium, Inspiron, Latitude, Dell Pro Rugged, Vostro, XPS, Fixed Workstations, Mobile Workstations, Dell Pro Max Micro XE FCM2250
...
Article Properties
Article Number: 000131486
Article Type: How To
Last Modified: 22 Jul 2025
Version: 14
Find answers to your questions from other Dell users
Support Services
Check if your device is covered by Support Services.