How to Collect Logs for Dell Endpoint Security Suite Enterprise
Summary: Learn about how to collect logs for Dell Endpoint Security Suite Enterprise by using these instructions.
This article applies to
This article does not apply to
This article is not tied to any specific product.
Not all product versions are identified in this article.
Instructions
Note:
- As of May 2022, Dell Endpoint Security Suite Enterprise has reached End of Maintenance. This product and its articles are no longer updated by Dell. For more information, reference Product Life Cycle (End of Support and End of Life) Policy for Dell Data Security. If you have any questions on alternative articles, either reach out to your sales team or contact endpointsecurity@dell.com.
- Reference Endpoint Security for additional information about current products.
This article covers how to collect logs for Dell Endpoint Security Suite Enterprise. It is highly recommended to collect logs before troubleshooting or contacting Dell Data Protection ProSupport.
Affected Products:
- Dell Endpoint Security Suite Enterprise
Affected Operating Systems:
- Windows
- Mac
- Linux
The log collection process for Dell Endpoint Security Suite Enterprise depends on whether you are using Windows, Mac, or Linux. Click the appropriate operating system for more information.
Windows
To gather logs in Windows, you must Enable Verbosity, reproduce the issue, and then Capture Logs. Click the appropriate step for more information.
Caution: Verbosity should only be enabled to troubleshoot an issue. Dell Technologies recommends disabling verbosity after the issue is resolved. Endpoints may experience performance degradation while verbosity is enabled.
- Right-click the Windows start menu and then click Run.

- In the Run UI, type
regeditand then press CTRL+SHIFT+ENTER. This runs the Registry Editor as admin.
- In the Registry Editor, go to
HKEY_LOCAL_MACHINE\Software\Dell\Dell Data Protection\. - Right-click the Dell Data Protection folder, select New, and then click DWORD (32-bit) Value.
 Note: If a DWORD named LogVerbosity exists, go to Step 6.
 - Name the DWORD
LogVerbosity.
- Double-click
LogVerbosity. - Populate Value data with
fand then press OK.
Note: Once verbosity is enabled on an endpoint, reproduce the issue before capturing logs.
Run DiagnosticInfo to capture the logs. For more information, reference How to Collect Logs for Dell Data Security Using DiagnosticInfo.
Mac
To gather logs in Mac, you must Enable Verbosity, reproduce the issue, and then Capture Logs. Click the appropriate step for more information.
Caution: Verbosity should only be enabled to troubleshoot an issue. Dell Technologies recommends disabling verbosity after the issue is resolved. Endpoints may experience performance degradation while verbosity is enabled.
- From the Apple menu, click Go and then select Utilities.

- In the Utilities menu, double-click Terminal.

- In Terminal, type
sudo nano /Library/Application\ Support/com.dell.csfagent/LocalMachine/software/dell/dell\ data\ protection/values.xmland then press Enter. Note: The path is case-sensitive.
 - Enter the credentials for an account with
sudorights and then press Enter.
- Press the I key to edit.

- Below the
SupportUrlvalue string, type<value name="LogVerbosity" type="int">15</value>.
- Press CTRL+X to exit.

- Press the Y key to save.

- Press Enter to save the name without changes.

- Locate the Endpoint Security Suite Enterprise [VERSION].dmg.
- In Terminal, type
hdiutil attach –owners on /Users/test/Desktop/Endpoint\ Security\ Suite\ Enterprise-1.5.0.5-Release.dmg –shadowand then press Enter. Note: The example path may differ in your environment.
 - In Terminal, type
cd /Volumes/Endpoint\ Security\ Suite\ Enterprise\ for\ Mac/Utilities/and then press Enter.
- In Terminal, type
sudo ./DellCSFConfig.app/Contents/MacOS/DellCSFConfig –logverbosity 15and then press Enter. Note: The example path may differ in your environment.
 - Enter the credentials for an account with sudo rights and then press Enter.

Note: Once verbosity is enabled on an endpoint, reproduce the issue before capturing logs.
- From the Apple menu, click Go and then select Utilities.

- In the Utilities menu, double-click Terminal.

- Type
sudo sh. Do not press Enter.
- Locate and then double-click the Endpoint Security Suite Enterprise [VERSION].dmg to extract the installer.
- Double-click the Utilities folder.

- Locate GetLogs.sh and go to Step 7. Getlogs.sh is a shell script that Dell Data Protection uses to gather Mac logging.
 Note: Use the version of getlogs.sh that is included with the product. Older versions of getlogs.sh may not gather all the required information.
 - Drag GetLogs.sh to the terminal window after
sudo sh(Step 3) and then press Enter. This populates the location path for GetLogs.sh.
- Enter the credentials for an account with
sudorights and then press Enter to run getlogs.sh.Note: It is common for Terminal to displayResource busyfor several minutes as it gathers all the required information. If the encryption agent is not installed, you also seeno Agent installed on system. - Once the shell script has completed, log output (DellLogs.zip) can be collected from Go and then Home.

Linux
To gather logs in Linux, you must Enable Verbosity, reproduce the issue, Capture Logs, and then Collect Logs. Click the appropriate step for more information.
Caution: Verbosity should only be enabled to troubleshoot an issue. Dell Technologies recommends disabling verbosity after the issue is resolved. Endpoints may experience performance degradation while verbosity is enabled.
- Open Terminal.

- In Terminal, type
cd /usr/lib/dell/esse/and then press Enter. Note:
Note:- The path is only present if Dell Endpoint Security Suite Enterprise for Linux is installed in the environment.
- Commands are case-sensitive.
- Type
sudo ./CsfConfig -logverbosity 15and then press Enter.
- Enter the credentials for an account with
sudorights and then press Enter.
Note: Once verbosity is enabled on an endpoint, reproduce the issue before capturing logs.
- Open Terminal.

- In Terminal, type
sudo '/usr/lib/dell/esse/getlogs.sh'and then press Enter. Note:
Note:- The path is only present if Dell Endpoint Security Suite Enterprise for Linux is installed in the environment.
- Commands are case-sensitive.
- The example path may differ in your environment.
- Enter the credentials for an account with
sudorights and then press Enter to run getlogs.sh. Note: In the example image,
adminis an example account. The account will differ in your environment. - Once the log collection is complete, type
sudo cp /root/DellLogs.tar.gz /home/admin/Desktop/DellLogs.tar.gzand then press Enter. Note: The example path may differ in your environment.
To successfully offload logs, Dell Endpoint Security Suite Enterprise for Linux requires:
- A third-party FTP (file transfer protocol) client
- Examples of an FTP client include (but are not limited to):
- Filezilla
- WinSCP
- CuteFTP
- Examples of an FTP client include (but are not limited to):
- A storage device
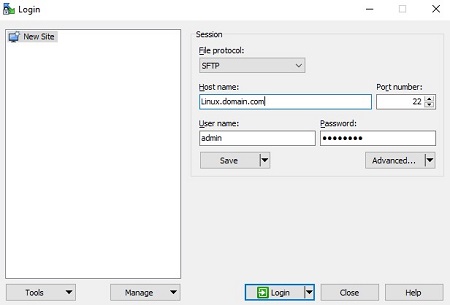
- In the FTP client, log in with an FTP user to the endpoint with Dell Endpoint Security Suite Enterprise for Linux.
 Note:
Note:- Dell does not endorse or support any listed third-party product. The listed clients are meant to be examples of potential products a customer can use. Contact the product’s manufacturer for information about setup, configuration, and management.
- Your FTP Client UI may differ from the screenshot examples.
- The default port for the SFTP is 22. If the connection fails, ensure that firewalls are not blocking port 22.
- Go to the captured log (
/home/admin/Desktop/DellLogs.tar.gz) and then save the bundle locally. Note: File archival programs (such as WinZip, WinRAR, and 7Zip) can read the .tar log bundle.
To contact support, reference Dell Data Security International Support Phone Numbers.
Go to TechDirect to generate a technical support request online.
For additional insights and resources, join the Dell Security Community Forum.
Affected Products
Dell Endpoint Security Suite EnterpriseArticle Properties
Article Number: 000128555
Article Type: How To
Last Modified: 12 Mar 2025
Version: 16
Find answers to your questions from other Dell users
Support Services
Check if your device is covered by Support Services.