PowerEdge: Enabling the Lifecycle Controller when it is in Recovery Mode
Summary: This article describes how to reenable the Lifecycle Controller (LCC) when it goes into recovery mode.
This article applies to
This article does not apply to
This article is not tied to any specific product.
Not all product versions are identified in this article.
Instructions
Firmware (FW) does not get updated when pushing a firmware update using the iDRAC web UI.
F10 option to boot the LCC does not appear.Lifecycle Controller in Recovery Mode message appears when the server is Power-on Self-Testing (POST).
Table of Contents
- Issue
- Solution
- Reenable the LCC from the iDRAC setting in the F2 system setup.
- Reenable the LCC by running a
RACADMCLI command.
- Follow up maintenance.
- Update the LCC using the operating system.
- Updating the LCC using the WS-MAN.
- Update the LCC using the iDRAC UI.
- Additional Information
Issue
- When the server fails and then powers back on, the LCC may go into a recovery mode and is no longer accessible using the F10 option.
- Pushing updates using the iDRAC web UI is not possible.
During bootup, where you should see the F10 option, you see the message Lifecycle Controller in Recovery Mode.

Recovering the Lifecycle Controller
-
Go in to the iDRAC settings from the F2 system setup and reenable the LCC is all that is needed.
-
If reenabling the LCC fails to work, then do a power drain and try to reenable after power-up.
- If the above options fail, then replace the motherboard (MB).
Reenable the LCC from the iDRAC setting in the F2 system setup.
- Press F2 when you see the menu to enter the System Setup Menu.

- Once in the System Setup Menu, click iDRAC Settings.
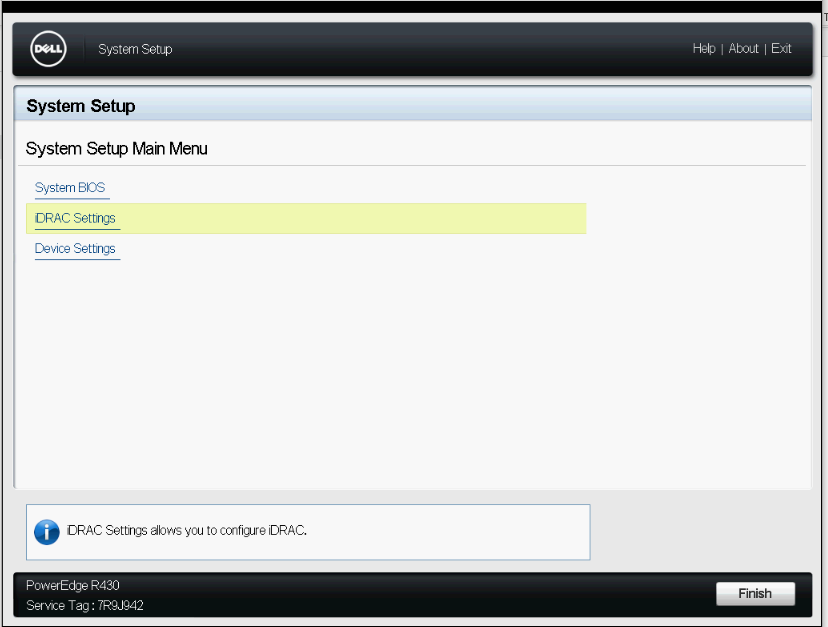
- Look for Lifecycle Controller and click it.

- In the Lifecycle Controller menu, you see that the first "Lifecycle Controller" option is set to Recovery Mode.
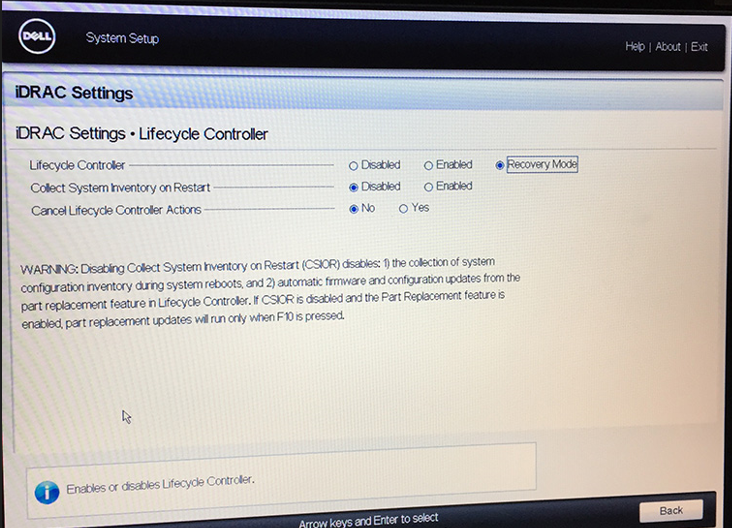
- Click Enabled.

- Click the back button at the bottom right corner of the iDRAC Setting page.
- Click the finish button at the bottom right corner of the System Setup page.
- Click Exit at the upper right corner of the page, and click Yes to Saving Changes.
The system reboots, and the Lifecycle Controller changes to a normal state.
Enabling the LCC using a RACADM CLI command
You can reenable the LCC by connecting to the iDRAC using SSH and running some commands to:
- Check the state
racadm get LifecycleController.LCAttributes.LifecycleControllerState
- Enable the LCC
racadm set LifecycleController.LCAttributes.LifecycleControllerState 1
- Disable the LCC
racadm set LifecycleController.LCAttributes.LifecycleControllerState 0
The digits at the end of each set command are what "enables" or "disables" the LCC.
- "
1" means to enable the LCC. - "
0" means to disable the LCC.
The default value is always " 1 "
The command runs even if the server is off, but its outcome takes effect after powering on and starting to POST.
Updating the LCC using operating system
Use the operating system to install an LCC Dell Update Package (DUP) by running the executable file for the operating system that is installed. You can find the LCC DUP on the Dell Support page in the Drivers & Downloads section of your system.
Updating the LCC using WS-MAN
Use WS-MAN scripting to update the Lifecycle Controller FW remotely as explained in the whitepaper-entitled Scripting WS-MAN Firmware Updates.
Updating LCC using the iDRAC UI
Updating the LCC FW from the iDRAC UI is the same as updating any component FW. The below article explains how to update FW using the iDRAC UI.
Additional Information
Further Information
-
NORMAL BOOT - Upon restart of a server, the Collect System Inventory On Reboot (CSIOR) runs. This part of the boot process displays the screen message Lifecycle Controller: Collecting System Inventory, and by a white progress bar moving left to right at the bottom of the screen.
-
Collect System Inventory On Reboot takes about 20 s at the end of a two-minute boot sequence for a moderately configured T620, followed by the operating system boot process. A system with more components takes longer to inventory and longer to boot.
-
ENTERING USC - If you press F10, CSIOR is also run and the white progress bar is shown, then the system enters the Unified Server Configurator (USC) program on the Lifecycle Controller. The message on the screen is: Entering Lifecycle Controller.
-
Do NOT force a warm reset Ctrl + Alt + Del during either the CSIOR process or while USC is running. Doing so may put the Lifecycle Controller into Recovery Mode. If the user interrupts this process three times in a row, it puts the Lifecycle Controller in Recovery Mode.
-
Unified Server Configurator should be exited gracefully by clicking Exit in the upper right corner.
-
RECOVERY MODE - If there is an issue with the Lifecycle Controller and the Lifecycle Controller is in Recovery Mode, this message Lifecycle Controller Updates Required is displayed on reboot. The system continues a normal boot, but you cannot enter the USC.
Affected Products
C Series, Modular Infrastructure, Rack Servers, Tower ServersArticle Properties
Article Number: 000136186
Article Type: How To
Last Modified: 05 Feb 2025
Version: 10
Find answers to your questions from other Dell users
Support Services
Check if your device is covered by Support Services.