How to Use and Troubleshoot Dell Thunderbolt Docking Station WD19TB or WD19TBS
概要: This article provides information about how to set up, use, and troubleshoot Dell Thunderbolt Docking Station WD19TB or WD19TBS. Learn how to download and install drivers, set up multiple monitors, and find troubleshooting steps to resolve common issues. ...
この記事は次に適用されます:
この記事は次には適用されません:
この記事は、特定の製品に関連付けられていません。
すべての製品パージョンがこの記事に記載されているわけではありません。
手順
Dell Thunderbolt Docking Station WD19TB and WD19TBS link all your electronic devices to your laptop using a single Thunderbolt 3 (USB-C) cable. Supported laptops connected to the Dell WD19TB or WD19TBS dock give you access to all your peripherals without having to plug each device into the laptop. (For example: The mouse, keyboard, stereo speakers, external hard drive, and large-screen monitors.)
NOTE: Dell Thunderbolt Docking Station WD19TB and WD19TBS are compatible with Dell laptops that has a USB-C port that supports Frequently Asked Questions (FAQs) About the Thunderbolt Port on a Dell Computer. Learn how to identify if the USB-C port on your laptop supports Thunderbolt 3. Dell laptops that have a USB-C port that supports DisplayPort over USB-C alternate mode limits the WD19TB and WD19TBS to work as a WD19 docking station.
For help with specifications, setup, connecting an external monitor, troubleshooting common issues, and so on, see an expanding section below.
| Laptop Connectivity | Frequently Asked Questions (FAQs) About the Thunderbolt Port on a Dell Computer (USB-C) |
|---|---|
| Video ports |
|
| Audio ports (WD19TB only) |
|
| Network ports |
|
| USB ports |
|
| Power or DC-in |
|
| Power Delivery | Dell laptops
|
The Dell Thunderbolt Docking Station WD19TB and WD19TBS are designed for laptops with USB-C ports that support Frequently Asked Questions (FAQs) About the Thunderbolt Port on a Dell Computer. Before using the docking station, ensure that your laptop has a USB-C port that supports Frequently Asked Questions (FAQs) About the Thunderbolt Port on a Dell Computer.
NOTE: The Dell Thunderbolt Docking Station WD19TB and WD19TBS will function on a device with a USB-C port that supports DisplayPort over USB-C or Frequently Asked Questions (FAQs) About the Thunderbolt Port on a Dell Computer. When connected to a DisplayPort over USB-C, the WD19TB and WD19TBS docking station functions as a WD19 docking station. Verify that your laptop supports DisplayPort over USB-C or Frequently Asked Questions (FAQs) About the Thunderbolt Port on a Dell Computer.
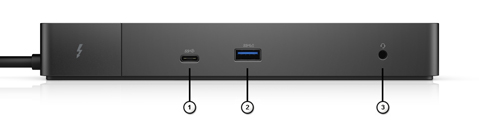
Figure 1: Front ports on a WD19TB or WD19TBS docking station
| 1. | USB-C 3.1 Gen1 |
|---|---|
| 2. | USB 3.1 Gen1 |
| 3. | Headphone/Microphone Combo (WD19TB only) |
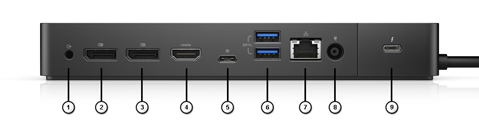
Figure 2: Rear ports on a WD19TB or WD19TBS docking station
| 1. | Audio line-out (WD19TB only) |
|---|---|
| 2. | DisplayPort 1.4 |
| 3. | DisplayPort 1.4 |
| 4. | HDMI 2.0 |
| 5. | USB-C 3.1 Gen1 with DP 1.4 |
| 6. | 2 x USB 3.1 Gen1 |
| 7. | Gigabit Ethernet |
| 8. | AC power |
| 9. | USB-C with Thunderbolt 3 |
NOTE: The power button on the docking station is designed to replicate your laptop's power button. Connecting the Dell Thunderbolt Docking Station WD19TB and WD19TBS to supported Dell laptops, you gain a second power button. It works like your laptop's power button and you can use it to turn on, sleep or force shut down the laptop. The power button is not functional if connected to unsupported Dell laptops or non-Dell laptops.
NOTE: Best practice is to update your laptop’s BIOS and the Dell Docking Station drivers to the latest versions available before using the docking station. Dell has the latest revisions on the Dell Drivers & Downloads website. Older BIOS versions and drivers could result in performance issues with the docking station.
Dell highly recommends the following applications to automate the installation of BIOS, firmware, driver, and critical updates specific to your laptop and docking station:
- Dell | Update - for Dell XPS laptops only
- Dell Command | Update - for Dell Latitude, Dell Precision, or XPS laptops
NOTE: Dell WD19TB and WD19TBS docking station must be connected to the laptop for Dell Update to start software updates on the host computer.
Download and install drivers for Dell WD19TB and WD19TBS docking station
- Browse to the Dell Drivers & Downloads page.
- Click Detect laptop to auto-detect your product, or enter your computer’s Service Tag in the Enter a Service Tag or Express Service Code field, or click Browse all products to browse to your computer model.
- Select the Operating System.
- Download and install the latest Basic Input/Output System (BIOS) for the computer. This is available in the "BIOS" section.
NOTE: Learn more about BIOS Update Guide.
- Download and install the latest Intel Thunderbolt Controller Driver for the computer. This is available in the "Chipset" section.
- Download and install the latest Intel Thunderbolt 3 Firmware Update for the computer. This is available in the "Chipset" section.
- Download and install the latest Intel or NVIDIA or AMD graphics driver for the computer. This is available in the "Video" section.
- Download and install the latest ASMedia USB eXtensible Host Controller Driver for the docking station. This is available in the "Docks/Stands" section.
- Download and install the latest Realtek USB Audio Driver for the docking station (WD19TB only). This is available in the "Docks/Stands" section.
- Download and install the latest Realtek USB GBE Ethernet Controller Driver for the docking station. This is available in the "Docks/Stands" section.
- Restart the computer.
- After the driver update process completes, connect the AC adapter to the docking station first, and then connect the Thunderbolt 3 (USB-C) cable to the computer before using the docking station.
NOTE: Learn How to Download and Install Dell Drivers.
To learn more about installing drivers for Dell Thunderbolt Docking Station WD19TB and WD19TBS docking station, see: Driver Installation Guide for Dell Thunderbolt Docking Station WD19TB/WD19TBS
Thunderbolt driver setting
- Connect the Thunderbolt Device to the computer. The Thunderbolt icon appears in the system tray.
- An Authentication window appears for the user to select the connection setting.
- Right-click the Thunderbolt icon to View Attached Thunderbolt Devices.
- Right-click the Thunderbolt Icon to view Thunderbolt Settings.
- Click Details to view (Thunderbolt driver or firmware) version details.
Figure 3: Thunderbolt settings in Windows
Thunderbolt Configuration
If Dell BIOS is used in your computer, you may find the below Control options on the Thunderbolt Configuration page in your BIOS Setup:
- Enable Thunderbolt Technology Support (Enabled by default)
- When enabled, the Thunderbolt Technology feature and associated ports and adapters are enabled.
- When disabled, the Thunderbolt Technology feature is disabled, and any connected Thunderbolt adapter devices are not available in preboot or within the operating system.
- Enable Thunderbolt Boot Support (Disabled by default)
- When enabled, the following Thunderbolt adapter features are enabled during Preboot: Adapter boot support for Thunderbolt and the USB device on Thunderbolt adapter support. (Includes USB boot support.) This allows Thunderbolt adapter peripheral devices and USB devices that are connected to the Thunderbolt adapter to be used during BIOS preboot. However, setting this to "Enabled" overrides the Security Levels used within the operating system. When this setting is enabled, any Thunderbolt adapter peripherals and USB devices that are connected to the Thunderbolt adapter port before booting the computer can be used in preboot. As long as the device remains connected, it continues to function within the operating system, regardless of the Security Level set in the BIOS.
- Enable Thunderbolt Adapter Preboot Modules (Disabled by default)
- When enabled, this setting allows PCIe devices that are connected through a Thunderbolt adapter (that is PCIe devices behind the Thunderbolt adapter) to perform the PCIe device’s UEFI Option ROMs (if present) during preboot.
- When disabled, this setting prevents PCIe device Option ROMs from running during preboot for PCIe devices that are connected behind the Thunderbolt adapter.
NOTE: The following options may allow devices that are connected to the Thunderbolt adapter during preboot to function in the operating system. (Enabling the "Enable Thunderbolt Adapter Boot Support" or "Enable Thunderbolt Adapter Preboot Modules.") This is regardless of the Security Level selected in BIOS Setup. The device continues to operate in the operating system until it is disconnected. When reconnected while within the operating system, the device connects according to the Security Level and previous operating system authorizations.
Thunderbolt Security
The settings below configure the Thunderbolt adapter security settings within the operating system. Security Levels are not applicable or enforced in the Preboot environment.
- No Security: Automatically connect to devices plugged into the Thunderbolt port.
- User Authorization: Approval is required for any new devices that are connected to the Thunderbolt port.
- Secure Connect: The Thunderbolt adapter port allows connection to devices that have been configured with a shared key.
- DisplayPort Only: Automatically connect to DisplayPort devices only. No Thunderbolt adapter or PCIe devices are allowed to connect.
In the BIOS of a Dell Thunderbolt-enabled laptop, you can configure the security settings of the Thunderbolt connection. You can find the configuration options in the BIOS path: System Configuration > USB/Thunderbolt Configuration
- No security - Allow legacy Thunderbolt devices to autoconnect - the CM auto connects a new device plugged in.
- User Authorization - Allow User Notification devices at a minimum - the CM requests connection approval from the host SW and autoapproval may be given based on the Unique ID of the connecting device.
- Secure Connect - Allow one-time saved key devices at a minimum - the CM requests connection approval from the host SW and autoapproval is only given if the host challenge to the device is acceptable.
- DisplayPort Only - Allow DisplayPort sinks to be connected (re-driver or DP tunnel, no PCIe tunneling)
Microsoft Windows operating system includes the VGA graphics drivers only. For optimum graphics performance, install the latest Dell graphics drivers for your laptop from the Dell Drivers & Downloads website under the "Video" section.
NOTES:
- For NVIDIA Discrete Graphics solutions on the Latitude E-Family and Mobile Dell Precision laptops:
- First, install the Intel Media Adapter Graphics Driver applicable to your laptop.
- Second, install the NVIDIA Discrete Graphics Driver applicable to your laptop.
- For AMD Discrete Graphics solutions on the Latitude E-Family and Mobile Dell Precision laptops:
- First, install the Intel Media Adapter Graphics driver applicable to your laptop.
- Second, install the AMD Discrete Graphics driver applicable to your laptop.
Before connecting the docking station to your laptop and connecting a monitor and other external devices, ensure to install all the required drivers.
Connect the monitor to the docking station using the DisplayPort, HDMI, or USB-C cable provided with the monitor. The docking station supports up to 6* monitors (available on select Dell laptops only) connected simultaneously. See the Display Resolution Table below for more details about the supported resolution when connecting multiple monitors to the docking station.
For additional help, learn How to Set up Multiple Monitors or How to Troubleshoot Multiple Monitor Issues.
Display resolution table
External monitors require a certain amount of bandwidth to work properly. Monitors with higher resolution require more bandwidth.
- HBR2 is DP 1.2 (5.4 Gbps maximum link rate per lane). With DP overhead, the effective data rate is 4.3 Gbps per lane
- HBR3 is DP 1.4 (8.1 Gbps maximum link rate per lane). With DP overhead, the effective data rate is 6.5 Gbps per lane.
Display Resolution Bandwidth
| Resolution | Minimum bandwidth required |
|---|---|
| 1 x FHD (1920 x 1080) @ 60 Hz | 3.2 Gbps |
| 1 x QHD (2560 x 1440) @ 60 Hz | 5.6 Gbps |
| 1 x 4k (3840 x 2160) @ 30 Hz | 6.2 Gbps |
| 1 x 4k (3840 x 2160) @ 60 Hz | 12.5 Gbps |
Display resolution table
Display resolution table for WD19TB docking station with non-Thunderbolt computers.
| DISPLAY PORT AVAILABLE BANDWIDTH | SINGLE DISPLAY (MAXIMUM RESOLUTION) | DUAL DISPLAY (MAXIMUM RESOLUTION) | TRIPLE DISPLAY (MAXIMUM RESOLUTION) | QUAD DISPLAY (MAXIMUM RESOLUTION) |
|---|---|---|---|---|
| HBR2 (HBR2 x2 lanes - 8.6 Gbps) | DP1.4/HDMI2.0/MFDP Type-C: 4K (3840 x 2160) @30 Hz |
|
|
Not available |
| HBR3 (HBR3 x2 lanes - 12.9 Gbps) | DP1.4/HDMI2.0/MFDP Type-C: 4K (3840 x 2160) @60 Hz |
|
|
Not available |
Display resolution table for WD19TB docking station with thunderbolt computers.
| DISPLAY PORT AVAILABLE BANDWIDTH | SINGLE DISPLAY (MAXIMUM RESOLUTION) | DUAL DISPLAY (MAXIMUM RESOLUTION) | TRIPLE DISPLAY (MAXIMUM RESOLUTION) | QUAD DISPLAY (MAXIMUM RESOLUTION) |
|---|---|---|---|---|
| HBR2 (HBR2 x8 lanes - 34.5 Gbps) | DP1.4/HDMI2.0/MFDP Type-C/USB Type-C TB: 4K (3840 x 2160) @60 Hz |
|
|
Not available |
| HBR3 (HBR3 x4 lanes + HBR3 x1 - 32.4 Gbps) For Precision 7530/7540/7730/7740 with discrete graphics card | DP1.4/HDMI2.0/MFDP Type-C/USB Type-C TB: 8K (7689x4320) @30 Hz |
|
|
|
Display resolution table for WD19TBS docking station with non-Thunderbolt computers.
| DISPLAY PORT AVAILABLE BANDWIDTH | SINGLE DISPLAY (MAXIMUM RESOLUTION) | DUAL DISPLAY (MAXIMUM RESOLUTION) | TRIPLE DISPLAY (MAXIMUM RESOLUTION) | QUAD DISPLAY (MAXIMUM RESOLUTION) |
|---|---|---|---|---|
| HBR2 (HBR2 x2 lanes - 8.6 Gbps) | DP1.4/HDMI2.0/MFDP Type-C: 4K (3840 x 2160) @30 Hz |
|
|
Not available |
| HBR3 (HBR3 x2 lanes - 12.9 Gbps) | DP1.4/HDMI2.0/MFDP Type-C: 4K (3840 x 2160) @60 Hz |
|
|
Not available |
Display resolution table for WD19TBS docking station with Thunderbolt computers.
| DISPLAY PORT AVAILABLE BANDWIDTH | SINGLE DISPLAY (MAXIMUM RESOLUTION) | DUAL DISPLAY (MAXIMUM RESOLUTION) | TRIPLE DISPLAY (MAXIMUM RESOLUTION) | QUAD DISPLAY (MAXIMUM RESOLUTION) |
|---|---|---|---|---|
| HBR2 (HBR2 x8 lanes - 34.5 Gbps) | DP1.4/HDMI2.0/MFDP Type-C/USB Type-C TB: 4K (3840 x 2160) @60 Hz |
|
|
Not available |
| HBR3 (HBR3 x4 lanes + HBR3 x1 - 32.4 Gbps) For Precision 7530/7540/7730/7740 with discrete graphics card | DP1.4/HDMI2.0/MFDP Type-C/USB Type-C TB: 8K (7689x4320) @30 Hz |
|
|
|
NOTES: Linux operating system is unable to physically turn off integrated display. The external display numbers are one less than the display numbers listed in the above tables.
If the Display Port Data Rate is HBR2 then the maximum resolution that Linux supports is 8192 x 8192 (counted with integrated display plus external display).
WD19TB for Thunderbolt computers with HBR2:
If the Display Port Data Rate is HBR2 then the maximum resolution that Linux supports is 8192 x 8192 (counted with integrated display plus external display).
WD19TB for Thunderbolt computers with HBR2:
- If the integrated display resolution is FHD (1920 x 1080 @ 60 Hz), two external displays with QHD (2560 x 1440) @ 60 Hz could be supported.
- If the integrated display resolution is 4K (3840 x 2160 @ 60 Hz), only one external display with QHD (2560 x 1440) @ 60 Hz could be supported.
NOTE: *Configuration that is supported with AMD and NVIDIA in discrete-only mode or special-graphics mode. These modes are listed in the BIOS for the Dell Precision mobile workstations 7000 series. They require disabling switchable graphics for discrete-only mode or enabling special-graphics mode when Switchable is enabled. If the laptop does not have these options in the BIOS, then four monitors are not supported.
NOTE: **HBR3 x2 lanes - 12.9GPS is only applicable to computers that are DP1.4 over Thunderbolt 3, currently this means the Dell Precision 7540 and 7740.
NOTE: HDMI and Multi-Function DisplayPort (MFDP) USB-C ports on the back of all docks in the WD19 family are toggled. HDMI and MFDP USB-C cannot support dual monitors simultaneously. Only one of these ports can be used as a display device at a time.
NOTE: If higher resolution monitors are used, the Graphics driver makes a judgment based on monitor specifications and display configurations. Some resolutions may not be supported and is removed from the Intel Graphics Media Control Panel.
Resolution support is also dependent on the monitor’s Extended Display Identification Data (EDID) resolution.
Resolution support is also dependent on the monitor’s Extended Display Identification Data (EDID) resolution.
NOTE:
5K resolution support is only available in either of these conditions:
5K resolution support is only available in either of these conditions:
- With discrete graphics mode only, or special graphics mode, or
- Using the Thunderbolt 3 Type-C to a dual DisplayPort adapter
NOTE: The XPS 7390 2-in-1, XPS 9300, XPS 9310, and XPS 9310 2-in-1 do not support 4K at 60Hz through the docking station WD19. The solution is to connect the external monitor directly to the computer.
| Symptom | Possible Solution |
|---|---|
| The docking station does not turn on. |
|
| No video on the monitors that are attached to the High Definition Multimedia Interface (HDMI), mini-DisplayPort (mDP) port, or DisplayPort (DP) port on the docking station |
|
| The video on the attached monitor is distorted or flickering. |
|
| The video on the attached monitor is not displaying as an Extended Monitor. |
|
| The audio connector is not functioning or there is a lag in the audio. (WD19TB only) |
|
| The USB ports are not functioning on the docking station. |
|
| The HDCP content is not displayed on the attached monitor. |
NOTE: The monitor or display connected to the docking station must support HDCP 2.2.
|
| The LAN port is not functioning. |
|
| Cable LED is not ON after it is connected to your host. |
|
| USB port has no function in a pre-OS environment. | If your BIOS has a USB Configuration page, ensure that the following options are checked:
|
| PXE boot on docking station does not function. | If your BIOS has an integrated NIC page, select Enabled w/PXE. If your BIOS Setup on your laptop has a USB Configuration page, ensure that the following options are checked:
|
| USB Boot does not function. | If your BIOS has a USB Configuration page, ensure that the following options are checked:
|
| AC Adapter is displayed as "Not Installed" in the Battery Information page of the Dell BIOS Setup when the Thunderbolt 3 (USB-C) cable is connected. |
|
| Peripherals connected to the docking station do not work in a pre-OS environment. | If the BIOS Setup on your laptop has a USB Configuration page, check the following option to enable docking station function in a pre-OS environment:
|
| The alert message "You have attached an undersized power adapter to your laptop" is displayed when the docking station is connected to your laptop. |
|
| Undersized power adapter warning message that is displayed and cable LED are off. |
|
| No external display and the USB or data and cable LED is off. |
|
| When the laptop or docking station is moved, the cable LED turns off. |
|
| Troubleshooting multiple monitor issues |
|
| The error message "Thunderbolt Dock Report Reduced Connectivity" is seen on start-up |
|
To update the firmware on your docking station, perform the following steps.
- Go to the Dell Drivers & Downloads website.
- Identify your dock using its Service Tag, Express Service Code, or Model Number.
- Locate the Dell Dock Firmware Update Utility and click Download.
- Ensure that the docking station is connected to your computer.
- After downloading, run the Firmware Update Tool. Ensure to start the firmware update tool in administrative mode, and follow the prompts.
NOTE: It is recommended to power cycle the docking station after the firmware update is finished. Always ensure that the latest firmware version is installed to resolve issues and enhance performance.
Using Your Dell Thunderbolt Docking Station WD19TB or WD19TBS
Duration: 03:02
Closed captions: English only
その他の情報
Frequently asked questions
Dell Thunderbolt Docking Station WD19TB and WD19TBS are compatible with Dell laptops that have a USB-C port that supports Frequently Asked Questions (FAQs) About the Thunderbolt Port on a Dell Computer. The WD19TB and WD19TBS dock works as a WD19 docking station on Dell laptops that has a USB-C port that supports DisplayPort over USB-C alternate mode.
NOTE: To learn more about what type of USB-C port is available on your laptop, see the User Guide of the laptop.
USB-C, also known as USB Type-C is an industry-standard connector for transmitting both data and power over a single cable. USB-C is a common type of connector. Different protocols can be implemented. (For example: USB 2.0, USB 3.0, alternate modes like USB Power Delivery, DisplayPort over USB-C and Frequently Asked Questions (FAQs) About the Thunderbolt Port on a Dell Computer.) For more information, see: Guide to USB Type-C
Thunderbolt (previously called Light Peak) is a hardware interface that combines data, video, audio, and power in a single connection. Thunderbolt combines PCI Express (PCIe) and DisplayPort (DP) into one serial signal and also provides DC power, all in one cable. While Thunderbolt 1 and Thunderbolt 2 use the same connector as mini-DP (DisplayPort) to connect to peripherals, Frequently Asked Questions (FAQs) About the Thunderbolt Port on a Dell Computer uses a USB-C connector.
To easily identify if the USB-C port supports Frequently Asked Questions (FAQs) About the Thunderbolt Port on a Dell Computer, look for the Thunderbolt icon next to the USB-C port.
Ensure that your laptop has a USB-C port that supports DisplayPort over USB- or Frequently Asked Questions (FAQs) About the Thunderbolt Port on a Dell Computer port before using the docking station.
Dell Thunderbolt Docking Station WD19TB and WD19TBS are tested for specific Dell laptops. See the User Manual of the docking station to find a list of fully tested and supported Dell laptops. On non-Dell laptops, you may notice limited functionality.
Dell Thunderbolt Docking Station WD19TB and WD19TBS provide power to the laptop over a USB-C cable in the following scenarios:
For Dell laptops
- 130 W with Dell laptops and 180 W power supply
For non-Dell laptops
- 90 W with non-Dell laptops and power supply
- Temperature triggers the fan. The docking station fan does not rotate until the docking station is hot enough to trigger a thermal threshold.
- Conversely, if your docking station is not cool enough, the fan does not stop even when you disconnect the docking station from the laptop.
- When you hear a loud fan noise, it is warning you that the docking station is in some kind of hot condition. For example, the vent in the docking station may be blocked or the docking station is working in a high working-temperature environment (> 35C). Eliminate these abnormal conditions from the docking station. If you do not eliminate the abnormal condition, in a worst-case situation, the docking station shuts down through the overtemperature protection mechanism. Once this happens, unplug the USB-C cable from the laptop and remove the docking station’s power adapter. Then, plug in the power adapter to recover the docking station back online.
- This is a normal condition. The first time plugging in the docking station’s AC adapter triggers the fan to rotate, but it turns off soon.
- The docking station fan is designed with two different rotation speeds. The docking station works on low fan speed. If you put the docking station in a heavy loading or a high working-temperature environment, the docking station fan may have a chance to work at a high speed. But, this is normal and the fan works at a low/high speed depending on the work loading.
- The Dell Thunderbolt Docking Station WD19TB and WD19TBS can charge your mobile or power bank even without being connected to the laptop. Ensure that your docking station is connected to external power. The docking station fan rotates automatically if the docking station gets too warm. This is the normal working condition.
- When a new device is plugged in, the USB hub driver notifies the Plug and Play manager that a new device was detected. The plug and play manager queries the hub driver for all the device's hardware IDs and then notifies the Windows operating system that a new device must be installed. In this scenario, the user sees a hardware installation window.
- Step 1: The New Device is Identified
- Identifiers for USB Devices
- Our Dell docking station is designed to operate on AC power only, and the laptop cannot power it. A power loss event makes all devices on the docking station fail to work. Even when you restore the AC power, the docking station may still not function properly because the docking station must still negotiate a proper power contract with the laptop's USB-C port and establish a laptop EC-to-dock-EC connection.
対象製品
Dell Thunderbolt Dock - WD19TB, Dell Thunderbolt Dock – WD19TBS文書のプロパティ
文書番号: 000130291
文書の種類: How To
最終更新: 13 11月 2025
バージョン: 21
質問に対する他のDellユーザーからの回答を見つける
サポート サービス
お使いのデバイスがサポート サービスの対象かどうかを確認してください。