Dell Alienware 320M Wired Gaming Mouse (AW320M) Usage and Troubleshooting Guide
Summary: The following article provides information about the Alienware 320M Wired Gaming Mouse. You can reference each section to learn more about the features of the Alienware 320M Wired Gaming Mouse and how to use it. ...
This article applies to
This article does not apply to
This article is not tied to any specific product.
Not all product versions are identified in this article.
Instructions
Table of Contents:
- What is in the Alienware 320M Wired Gaming Mouse box
- Mouse Features
- Adjustable Dots Per Inch (DPI)
- Setting up your Alienware Wired Gaming Mouse
- Installing the Alienware Command Center (AWCC) and Alienware Gaming Peripheral Driver
- Troubleshooting
- Additional Information

Figure 1: Work faster and smarter with the Alienware 320M Wired Gaming Mouse
What is in the Alienware 320M Wired Gaming Mouse box
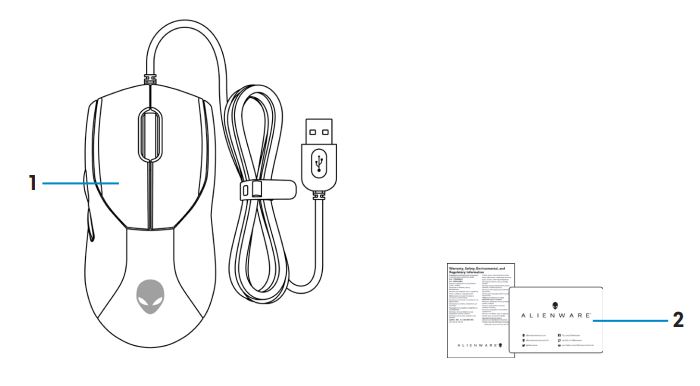
Figure 2: Alienware 320M Wired Gaming Mouse Box Contents
| 1 | Alienware Wired Gaming Mouse |
| 2 | Documents |
Alienware Wired Gaming Mouse Features

Figure 3: Alienware 320M Wired Gaming Mouse top view
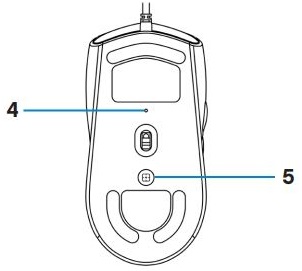
Figure 4: Alienware 320M Wired Gaming Mouse bottom view

Figure 5: Alienware 320M Wired Gaming Mouse side view
| 1 | Left button | 2 | Right Button |
| 3 | Scroll wheel | 4 | DPI indicator |
| 5 | DPI button | 6 | Forward button |
| 7 | Backward button |
Adjustable DPI
Press the DPI adjustment button to instantly change the mouse tracking resolution.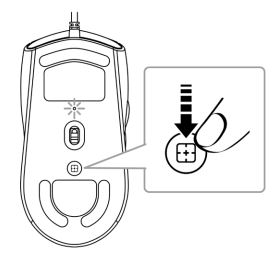
Figure 6: Alienware 320M Wired Gaming Mouse Adjusting DPI
 |
800: Blue |
 |
1200: Green (default) |
 |
1600: Yellow |
 |
2400: Purple |
 |
3200: Red |
Setting up your Alienware 320M Wired Gaming Mouse
Connecting the Alienware 320M Wired Gaming Mouse
- Remove the protective sheet at the bottom of the mouse.
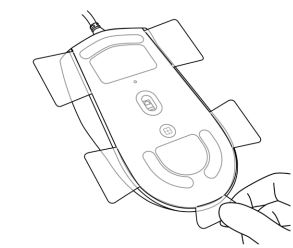
Figure 7: Protective sheet at the bottom of the mouse - Connect the mouse cable to the USB port on your desktop or laptop.
- Desktop
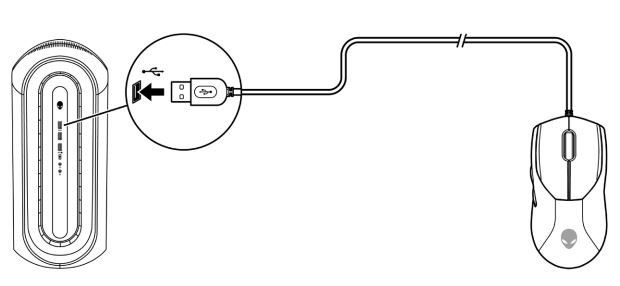
Figure 8: Connect the mouse cable to the USB port - Laptop

Figure 9: Connect the mouse cable to the USB port
- Desktop
Installing the Alienware Command Center (AWCC) and Alienware Gaming Peripheral Driver
To control the features and options, you need the Alienware Command Center (AWCC) and Alienware Gaming Peripheral driver. You can get the latest versions directly from the Dell Support Site. For more information, see the instructions below.
NOTE:
- AWCC requires Windows 10 version 16299 or later.
- It is recommended that you update Windows and the drivers for your computer before installing the Alienware Command Center. For more information, see Microsoft Knowledge Base article Windows Update: FAQ
and Dell Knowledge Base article Drivers and Downloads FAQs.
- When your computer is preinstalled with AWCC 5.2.45.0 or later, you must install the Alienware Gaming Peripheral driver. After that you can configure your Alienware 320M Gaming Mouse. For more information, see Dell Knowledge Base article Alienware Command Center Quick Guide.
- When your computer is not preinstalled with 5.2.45.0 or later, perform the following steps to install the latest AWCC and Alienware Gaming Peripheral driver. AWCC 5.2.42 or later can co-exist with older versions of AWCC on the same computer. You can continue to use the older version to configure your computer.
Installing AWCC through Windows Update
- Connect your Alienware 320M Mouse to your computer through the USB port. The AWCC application is downloaded and installed automatically. AWCC installation may take up to 10 minutes to complete.
- Go to the program folder to ensure that the AWCC installation is complete.
- Launch AWCC and perform the following steps to download the additional software components:
- In the Settings window, click Windows Update, and then click Check for updates to check the Alienware driver update progress.
- If the driver update is not responding in your computer, install AWCC from the Dell Support website.
Installing AWCC from the Dell Support website
- Ensure that the computer is connected to the Internet.
- Go to the Alienware Wired Gaming Mouse AW320M Drivers page.
- Select the Operating System installed on your computer.
- Locate the latest Alienware Command Center Application.
- Click Download and save the file to your computer.
- Open File Explorer and browse to the location where the downloaded file is saved.
- Double-click the Alienware Command Center Application setup file and follow the on-screen instructions to complete the installation process.
Troubleshooting
| Problems | Possible solutions |
|---|---|
| Mouse is not functioning. |
|
| Mouse lights do not turn on |
|
| Mouse is not running based on the configuration selected in the Alienware Command Center (AWCC) application. |
|
| Resolving cursor issues |
|
| Resolving mouse button issues |
|
| Troubleshooting a slow moving cursor |
|
| Troubleshooting lift off distance (LOD) surface calibration issues. |
The LOD surface calibration depends on the surface characteristics and does not work on all surfaces. Using a dark-colored fabric mouse pad improves LOD calibration. |
Additional Information
Dell AW320M Alienware Wired Gaming Mouse Support Site
Learn how to use and troubleshoot problems with the AW320M you use with your computer. You can find information about Troubleshooting steps, How-To guides, and relevant Support Videos for assistance.
For the Dell AW320M Alienware Wired Gaming Mouse User Guide, go to Dell Alienware Wired Gaming Mouse AW320M Online Manual Page. Then click View PDF to the right of AW320M User Guide, located in the Manuals and Documents section.
Affected Products
Alienware Wired Gaming Mouse AW320MArticle Properties
Article Number: 000198048
Article Type: How To
Last Modified: 23 Jul 2025
Version: 3
Find answers to your questions from other Dell users
Support Services
Check if your device is covered by Support Services.