How To Remove Devices Before End Of Lease in the Dell Security Management Server or Dell Security Management Server Virtual
Summary: This article describes how to remove devices from the Dell Security Management Server (formerly Dell Data Protection | Enterprise Edition) or Dell Security Management Server Virtual (formerly Dell Data Protection | Virtual Edition) before the end of lease. ...
This article applies to
This article does not apply to
This article is not tied to any specific product.
Not all product versions are identified in this article.
Symptoms
Affected Products:
- Dell Security Management Server
- Dell Data Protection | Enterprise Edition
- Dell Security Management Server Virtual
- Dell Data Protection | Virtual Edition
- Credant Mobile Guardian Server
Cause
Not Applicable
Resolution
Dell’s Security Management Server (and previous variants, including the Dell Data Protection Server, and Credential Mobile Guardian Server) leverage a pool-based licensing model. Client Access License's (CALs) are consumed based on the number of active devices communicating to the server. When decommissioned devices are using CAL on the server and blocking the ability to add new devices perform the following steps to release the entitlements to the CALs, click the server version below.
Note: Inadvertently removing active devices result in a temporary release of the CAL. If a device that was previously marked as removed checks in to the Dell Security Management Server/ Dell Data Protection Server or Credant Mobile Guardian server, it is automatically un-removed, and claims another CAL for the device.
- Go into Run Remote Management Console and log in as a Dell Encryption Administrator.
- Go to Endpoints and search for the name that you want to remove.
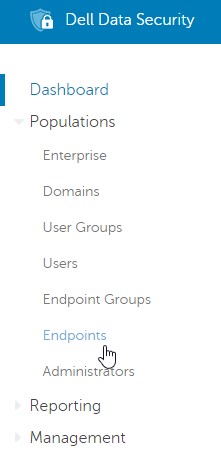
Figure 1: (English Only) Select Endpoints
- See the link below the device name to remove that endpoint.
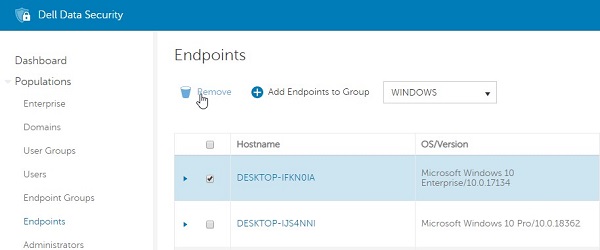
Figure 2: (English Only) Remove the endpoint
- Repeat the process for all the machines that you want to remove.
Note: Multiple devices can be selected at once by selecting the check-boxes next to each endpoint. Once all endpoints are selected, clicking the "Remove" option removes all endpoints that were selected.
- Go into Run Remote Management Console and log in as a Dell Data Protection | Encryption Administrator.
- Go to Endpoints and search for the name that you want to remove.
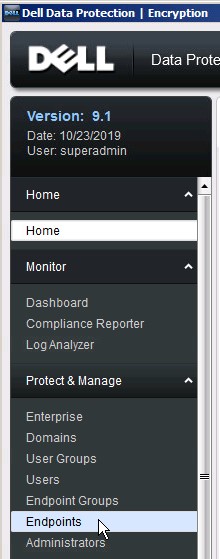
Figure 3: (English Only) Select Endpoints
- Click endpoint details of the device that you want to remove.
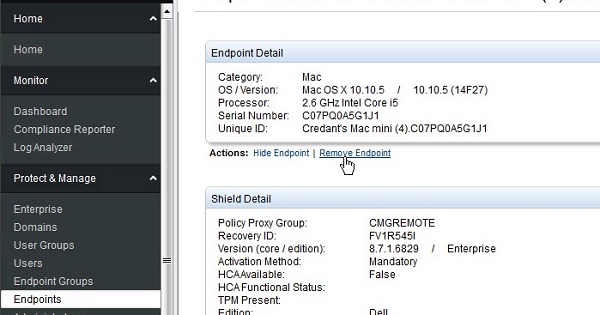
Figure 4: (English Only) Click Endpoint Details
- Click Remove Endpoint of the device you want to remove.
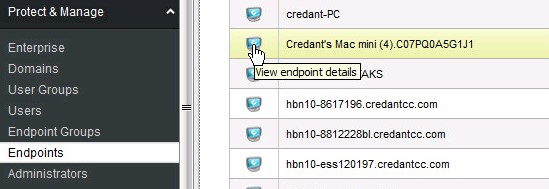
Figure 5: (English Only) Click Remove Endpoint
- Go into Run Remote Management Console and log in as a Dell Data Protection | Encryption Administrator.
- Go to Endpoints and search for the name that you want to remove.

Figure 6: (English Only) Select Endpoints
- Click Endpoint details of the device that you want to remove.
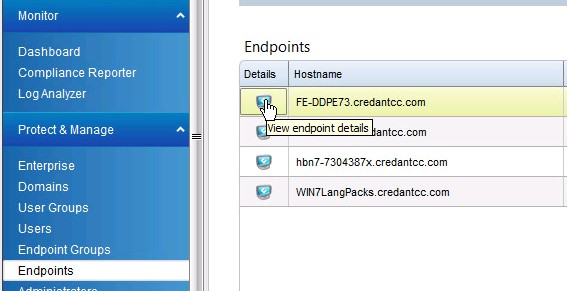
Figure 7: (English Only) Click Endpoint details
- Click Remove Endpoint of the device you want to remove.
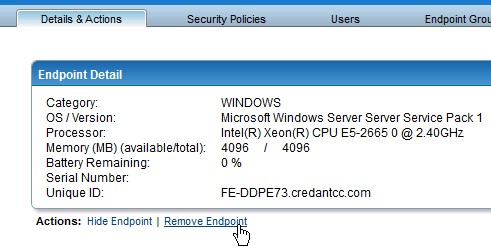
Figure 8: (English Only) Click Remove Endpoint
To contact support, reference Dell Data Security International Support Phone Numbers.
Go to TechDirect to generate a technical support request online.
For additional insights and resources, join the Dell Security Community Forum.
Affected Products
Dell EncryptionArticle Properties
Article Number: 000130489
Article Type: Solution
Last Modified: 03 Oct 2023
Version: 8
Find answers to your questions from other Dell users
Support Services
Check if your device is covered by Support Services.