PowerEdge: Automating Operating System Deployment to Dell BOSS - Techniques for Different Operating Systems
Summary: This article provides information about Dell Boot Optimized Storage Solution (BOSS) PCIe cards. It also provides instructions for installing Windows, Red Hat, SuSE, Ubuntu, and related Linux distributions onto these cards. ...
This article applies to
This article does not apply to
This article is not tied to any specific product.
Not all product versions are identified in this article.
Instructions
The Dell Boot Optimized Storage Solution (BOSS) device is a discrete PCIe card that supports two M.2 SSD drives, defaulting to a RAID 1 configuration. It is designed to be the operating system boot drive, freeing up all other drives for use as either cache or data storage devices. It is a simple way to ensure that the main drive bays can be fully used for more important tasks than operating-system booting.
However, because the BOSS card is subject to normal device enumeration, it is possible that a different boot device shows up as the first device in the BIOS boot order. This can cause problems when deploying the operating system in a programmatic way.
The following information shows how to tag or identify the Dell BOSS card in order to ensure that the operating system is installed on it. Searching for and using the "friendly name" - for example, DELLBOSS VD - is the proper way to ensure that the operating system is installed to the BOSS. Each operating system can find and use the BOSS card with the various methods detailed in this article.
Important: The following examples use DELLBOSS VD as the name of the BOSS card. However, some newer BOSS card versions may use other names, such as Dell BOSS-N1. The card's name should be obvious when performing an interactive installation, but the automated-installation scripts below must be adjusted as needed. It may be necessary to perform the initial steps of an interactive installation to determine the card's name prior to performing an automated installation.
Show all | Hide all
BOSS device identification in Linux operating system
BOSS devices contain the string DELLBOSS in the device’s Model property. This can be used to identify it, as seen in this example:
# cat /proc/scsi/scsi

Attached devices:

Host: scsi0 Channel: 00 Id: 00 Lun: 00

  Vendor: ATA      Model: DELLBOSS VD      Rev: MV.R

  Type:   Direct-Access                    ANSI  SCSI revision: 05

Host: scsi2 Channel: 00 Id: 00 Lun: 00

  Vendor: Marvell  Model: Console          Rev: 1.01

  Type:   Processor                        ANSI  SCSI revision: 05
Linux-based operating systems use udev to create symbolic links in /dev/disk/by-id/ that can be used to locate a BOSS device as shown below:
# ls -l /dev/disk/by-id/

total 0

lrwxrwxrwx. 1 root root  9 Jan 13 15:02 ata-DELLBOSS_VD_6668c813b78a0010 -> ../../sda
This property can be used in automated-installation scripts to detect the presence of a BOSS card and instruct the installer to use it for installation.
Red Hat Enterprise Linux and derivatives (CentOS, Scientific Linux, Fedora) Interactive Install
While performing an interactive installation, the user has the opportunity to choose the BOSS device as the primary install or boot device. The BOSS device shows up as ATA DELLBOSS VD, as shown in the diagram below. Choosing the ATA DELLBOSS VD device ensures that the installer places the operating system files on the BOSS device while leaving the other drives intact.
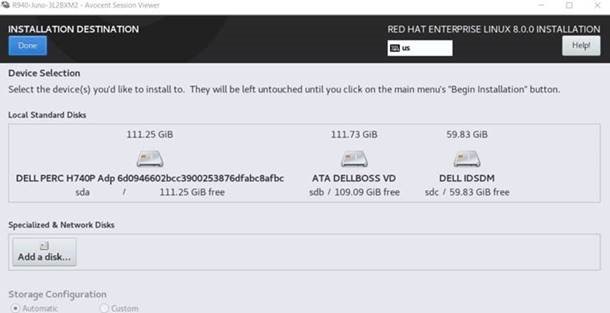
Figure 1: Installation Destination
Red Hat Enterprise Linux and derivatives Automated Install
For automated (kickstart) installation, a preinstall script can be used to ensure that the installer places the operating system on the correct drive. The following script identifies the BOSS device by searching for devices with the model field containing DELLBOSS. It instructs the installer to use the device exclusively, ignoring all other storage devices available to the installer.
ks.cfg:

%include /tmp/bootdisk.cfg

%pre

# Use DELLBOSS device for OS install if present.

BOSS_DEV=$(find /dev -name "*DELLBOSS*" -printf %P"\n" | \

                egrep -v -e part -e scsi| head -1)

if [ -n "$BOSS_DEV" ]; then

        echo ignoredisk --only-use="$BOSS_DEV" > /tmp/bootdisk.cfg

fi

%end
Here is a sample /tmp/bootdisk.cfg that contains the device name of the BOSS device that the installer should use.
# cat /tmp/bootdisk.cfg

ignoredisk --only-use=disk/by-id/ata-DELLBOSS_VD_6668c813b78a0010
SUSE and derivatives Interactive Install
Interactive installs of SUSE-based operating systems do not list the labels of devices, only their device names. As a result, the user must switch to a text console to get the device name of the BOSS device.

Figure 2: Suggested Partition.
In the Suggested Partitioning screen, choose Guided Setup.

Figure 3: Hard Drive Selection
Switch to a console by pressing Ctrl+Alt+F2. At the command prompt, enter the following command to display the SCSI device name of the BOSS device that should be used for installation.
Note: The
chvt 7 command exits the console:
# lsscsi| grep DELLBOSS
# chvt 7
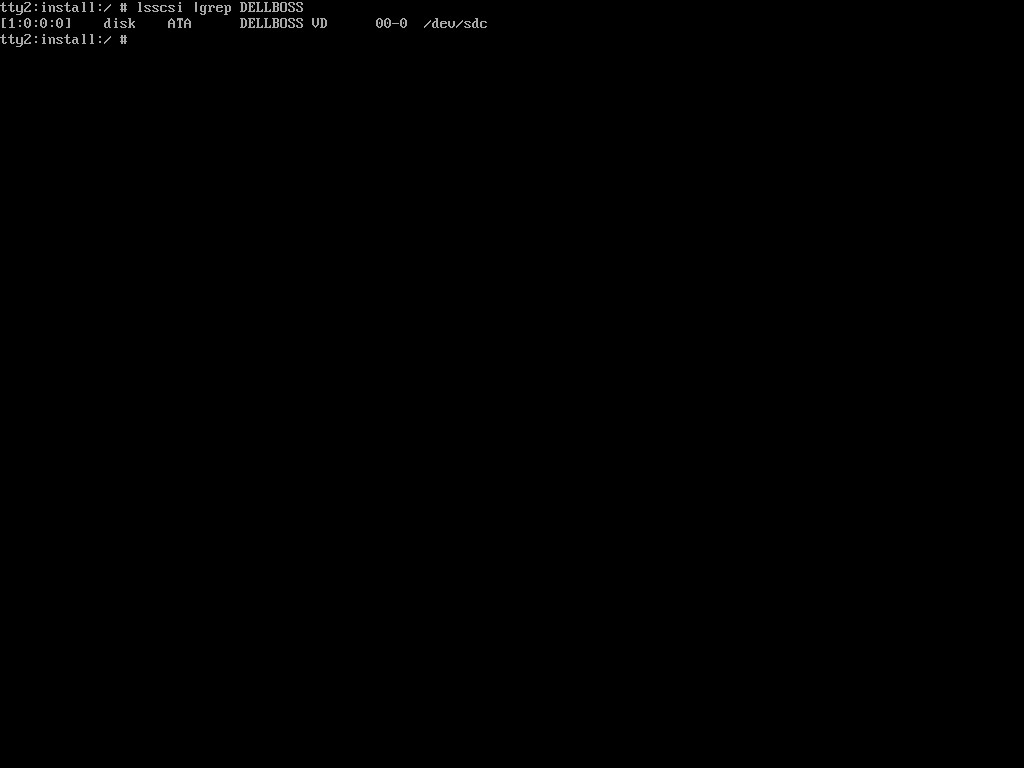
Figure 4: lsscsi output
In the Select Hard Disk screen, select the SCSI device name from the lsscsi command output above, ensuring that all other devices are not selected.
Proceed with the installation. This ensures that the operating system is installed on the BOSS device.
SUSE and derivatives Automated Install
- For automated installs, the following can be added to
autoyast.xml:
##Sample pre-script section in the autoyast file to extract the device name for BOSS device.

<pre-scripts config:type="list">

   <script>

       <feedback config:type="boolean">true</feedback>

       <debug config:type="boolean">false</debug>

       <filename>pre.sh</filename>

       <interpreter>shell</interpreter>

       <source><![CDATA[

# Use DELLBOSS device for OS install if present.

DEV=$(find /dev -name "*DELLBOSS*" | egrep -v -e part -e scsi| head -1)

if [ -n "$DEV" ]; then

                BOSS_DEV=$(basename $(readlink $DEV))

                sed -e "s/@ROOT_DEVICE@/$BOSS_DEV/" /tmp/profile/autoinst.xml >/tmp/profile/modified.xml

                cp /tmp/profile/modified.xml /tmp/profile/autoinst.xml

fi

         ]]> </source>

    </script>

   </pre-scripts>


###Sample autoyast partitioning section with ROOT device variable that needs to be replaced by the BOSS device found in the pre-script section above.

  <partitioning config:type="list">

     <drive>

      <device>/dev/@ROOT_DEVICE@</device>

      <disklabel>gpt</disklabel>

      <enable_snapshots config:type="boolean">true</enable_snapshots>

      <initialize config:type="boolean">true</initialize>

      <partitions config:type="list">

        <partition>

          <create config:type="boolean">true</create>

          <crypt_fs config:type="boolean">false</crypt_fs>

          <filesystem config:type="symbol">vfat</filesystem>

          <format config:type="boolean">true</format>

          <fstopt>umask=0002,utf8=true</fstopt>

          <loop_fs config:type="boolean">false</loop_fs>

          <mount>/boot/efi</mount>

          <mountby config:type="symbol">uuid</mountby>

          <partition_id config:type="integer">259</partition_id>

          <partition_nr config:type="integer">1</partition_nr>

          <resize config:type="boolean">false</resize>

          <size>155352576</size>

        </partition>

      </partitions>

    </drive>

  </partitioning>
Ubuntu Interactive Install
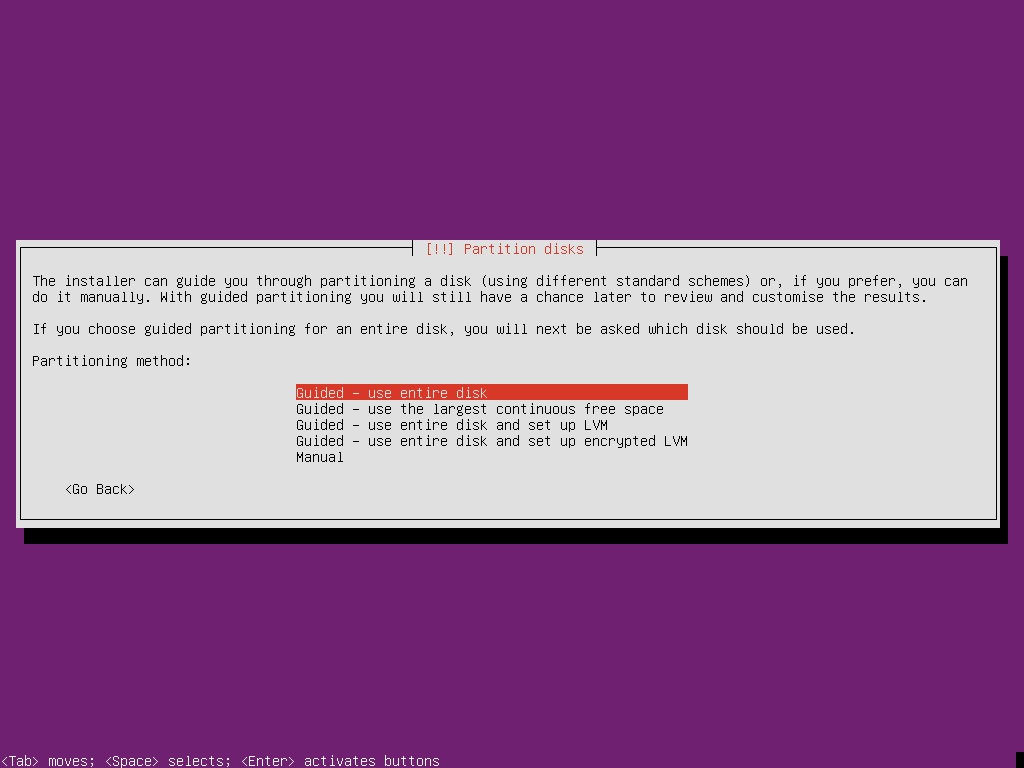
Figure 5: Disk Partition Method
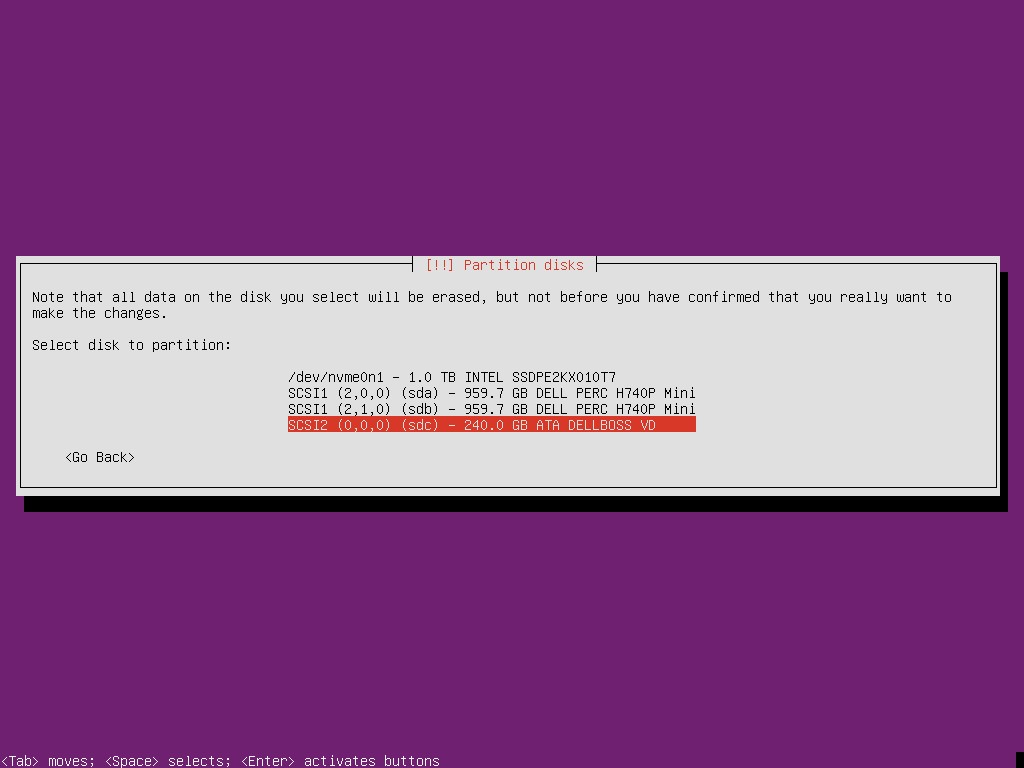
Figure 6: Disk Partition
Ubuntu Automated Install
ks.cfg:

%include /tmp/bootdisk.cfg

%pre

# Use DELLBOSS device for OS install if present.

BOSS_DEV=$(readlink -f $(find /dev -name "*DELLBOSS*" | \

                egrep -v -e part -e scsi| head -1))

if [ -n "$BOSS_DEV" ]; then

        echo ignoredisk --only-use="$BOSS_DEV" > /tmp/bootdisk.cfg

fi

%end
VMware ESXi Interactive Install
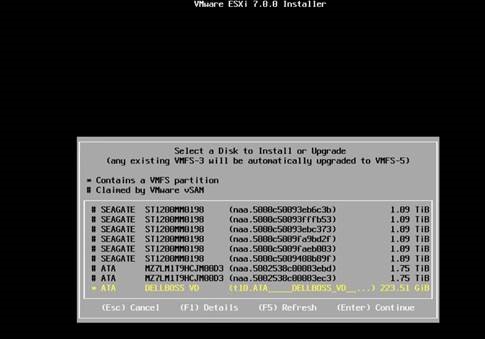
Figure 7: ESXi Installer
VMware ESXi Automated Install
For ESXi, it is a little different; the installer can detect the BOSS drive, so the kickstart script is only one line.
install --overwritevmfs --firstdisk="DELLBOSS VD"
Microsoft Windows Interactive Install
Ensuring the operating system is installed to the BOSS card can be challenging in a server with many disks. In this example, the BOSS card is Disk 6, but this is not immediately apparent in Disk Management. (Note: The operating system has already been fully installed in this screenshot.) The BOSS card is not identified at the top level but can be identified by right-clicking Disk 6 and selecting Properties.
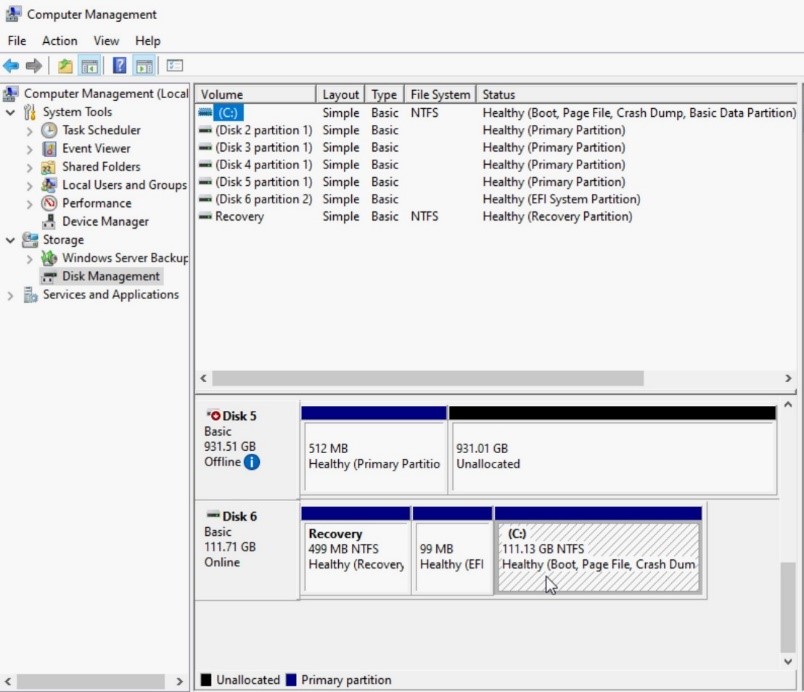
Figure 8: Disk Management
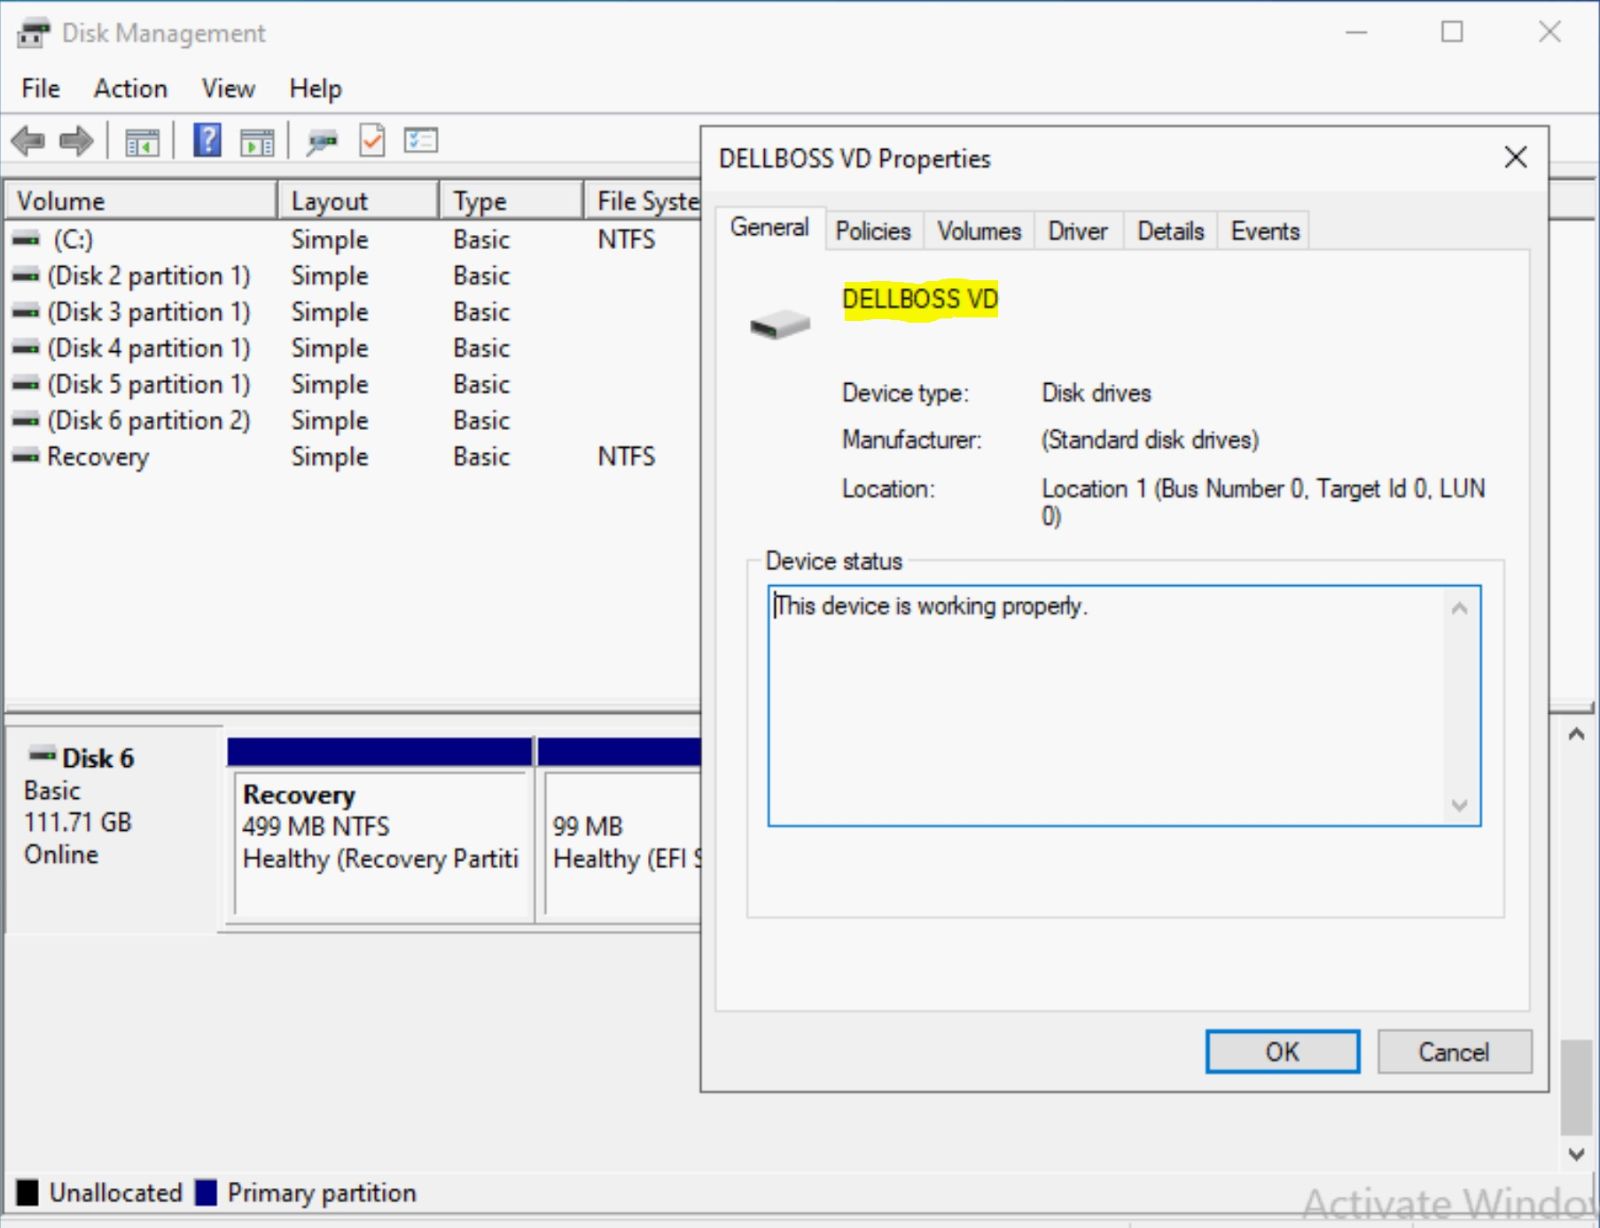
Figure 9: Dell BOSS Properties View
In addition, the standard Windows installation process using WinPE creates some challenges. PowerShell is not available in WinPE by default (though it can be added), and only specific tools are available to use to identify the BOSS card. There is no identifier for the BOSS card in the standard installation screens, as shown in the screenshots below.
Knowing the size of the BOSS card is useful in targeting the installation to the card. To be certain, bring up a command prompt window in WinPE using Shift-F10.
In the following screenshots, Disk 6 cannot be explicitly identified as the BOSS card. This example has six drives, but some servers have many more.
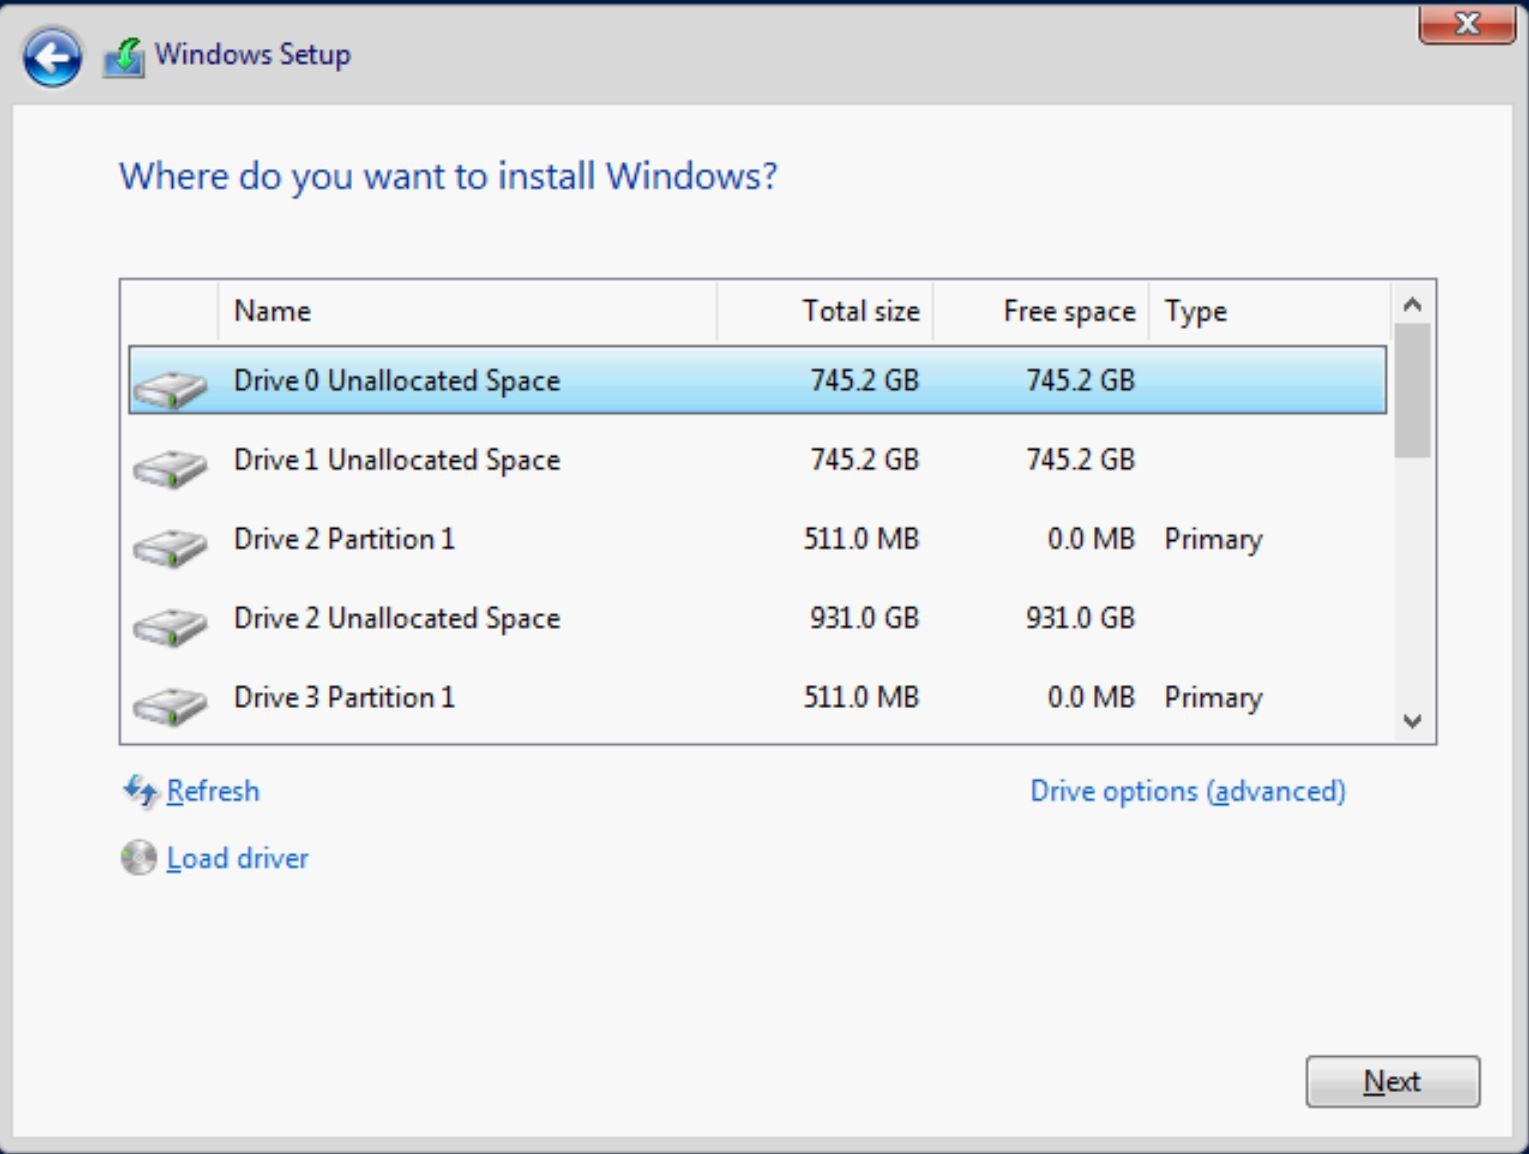
Figure 10: Windows Disk Selection
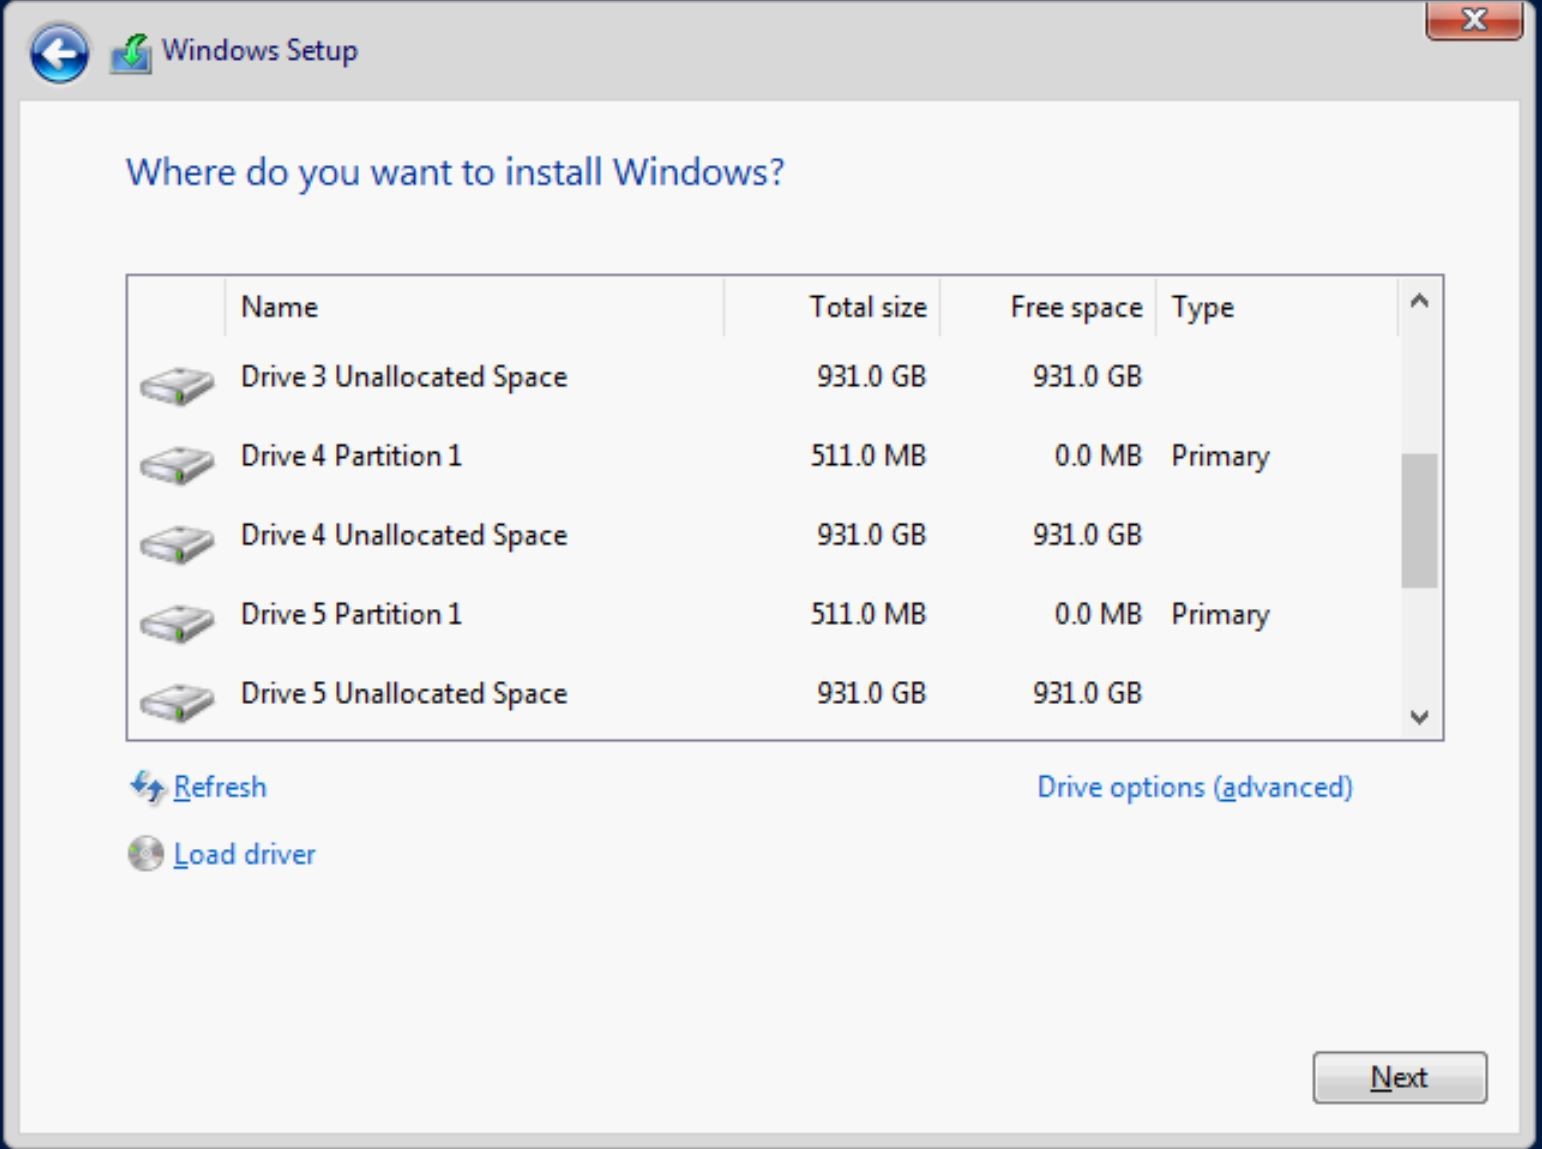
Figure 11: Windows Disk Selection
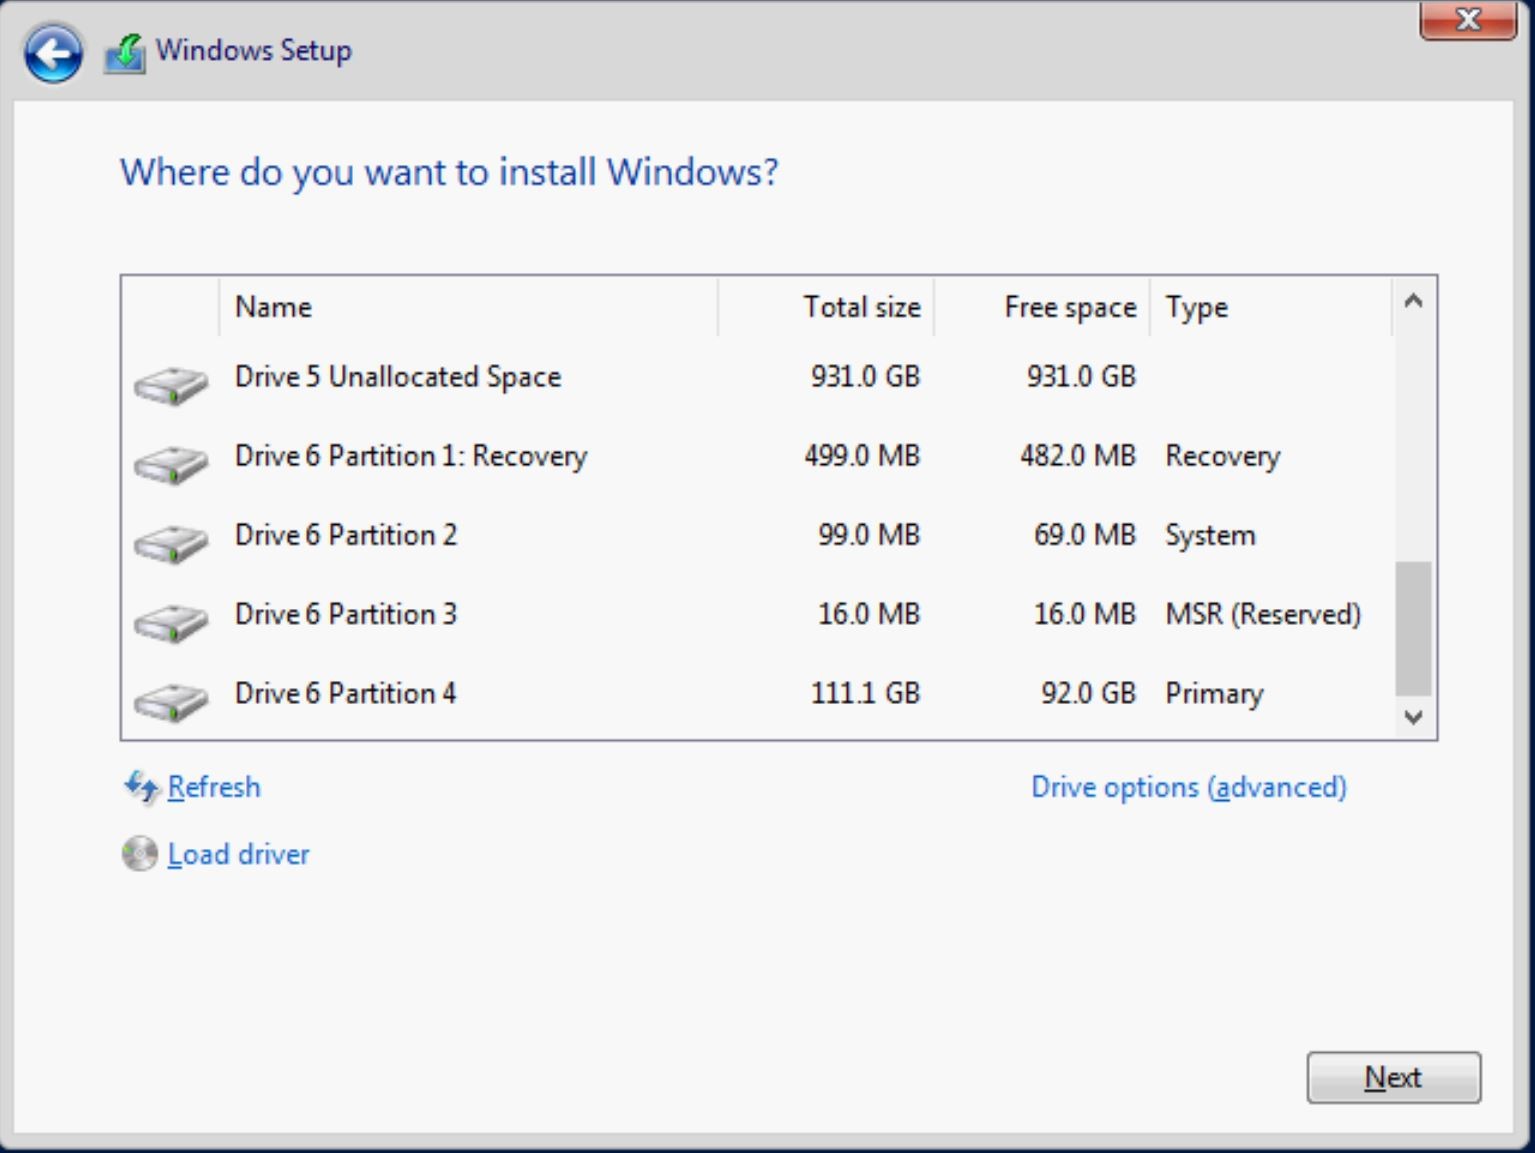
Figure 12: Windows Disk Selection
The command-line interface provides a solution. To open a command prompt, press Shift-F10 in WinPE at any time during the installation of Windows.
1. DiskPart: The only issue with DiskPart is the requirement to select a disk before running detail disk, as shown below. This requires guessing which disk to select. Again, knowing the BOSS M.2 device's size is important. Selecting the right drive presents DELLBOSS VD:
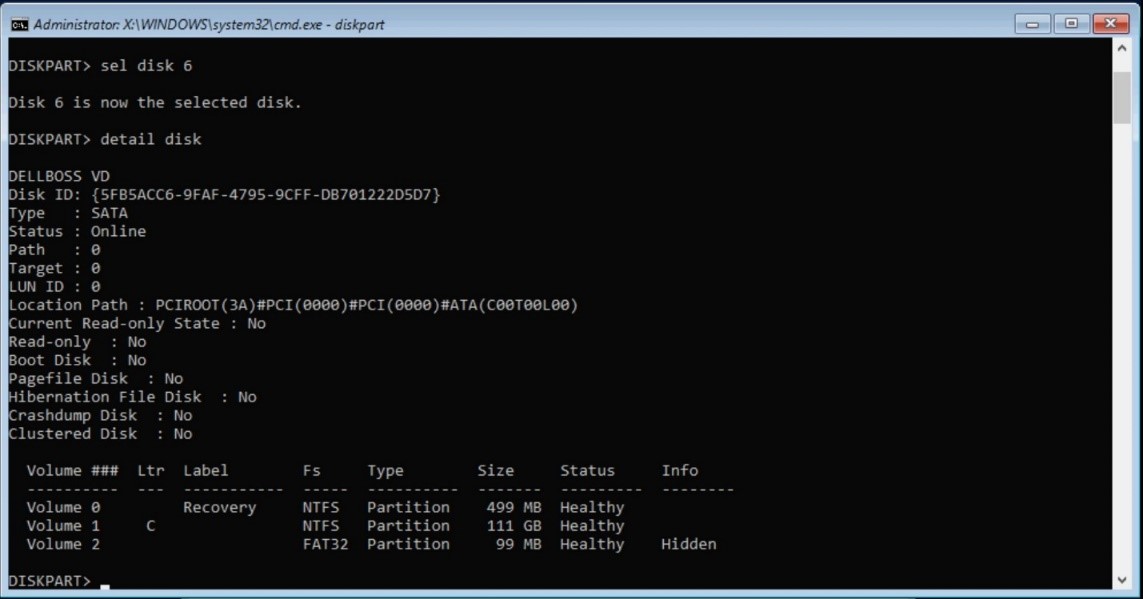
Figure 13: Diskpart
2. There are multiple ways to identify the BOSS card using PowerShell. However, PowerShell is not available in WinPE by default, so is not useful unless it has been added or the operating system has been fully installed.
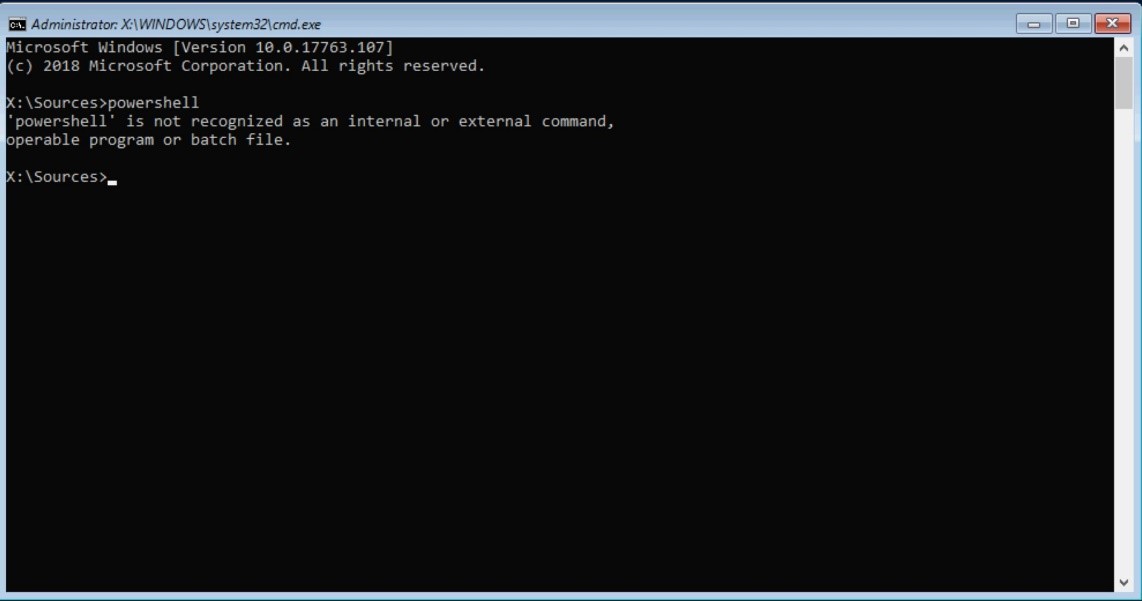
Figure 14: PowerShell Not Available in WinPE
3. The Windows Management Instrumentation command-line interface (WMIC) can help us choose the Dell BOSS device with certainty. WMIC is available in the full operating system and WinPE.
Use the following commands to identify the BOSS card:
WMIC
Diskdrive get model, name
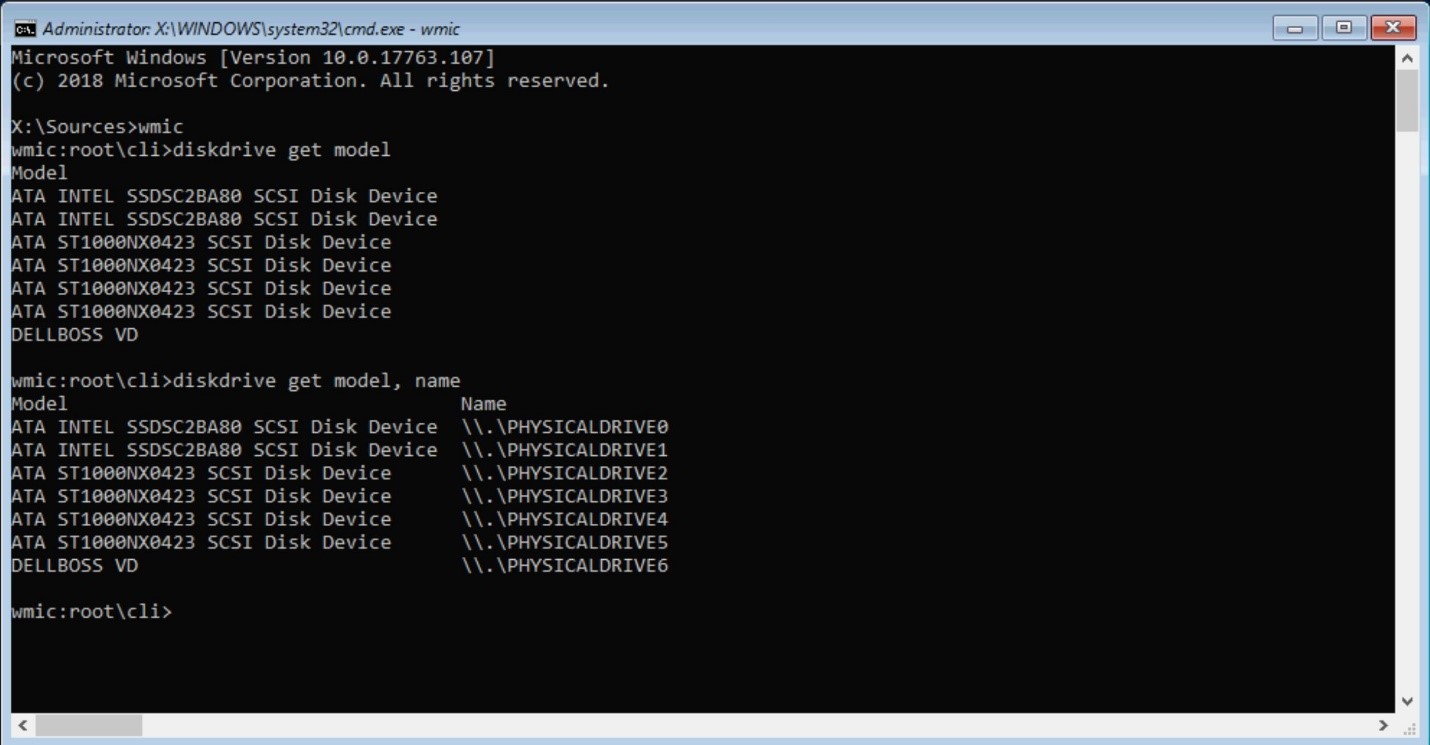
Figure 15: WMIC Output
Using WMIC, you can tie the hard drive location to the name DELLBOSS VD. (See PHYSICALDRIVE6 above.)
Microsoft Windows Automated Install
Once the physical location is known using either of the above methods (DiskPart or WMIC), the following can be used in a script:
Diskpart

SELECT DISK=<disk location path> command to select each drive.
For example:
SELECT DISK=PCIROOT(0)#PCI(0100)#ATA(C00T00L00)
In the server example above, the command would be:
SELECT DISK=PCIROOT(3A)#PCI(0000)#PCI(0000)#ATA(C00T00L00)
Below is a simple example for formatting a drive.
Note: A true operating system installation script is more complicated in order to accommodate all the standard partitions created during Windows installation. See this page for more information.
Create a text file (diskpart.txt), using the path as shown above:
SELECT DISK=PCIROOT(3A)#PCI(0000)#PCI(0000)#ATA(C00T00L00)
CLEAN
CREATE PART PRI
SELECT PART 1
ACTIVE
ASSIGN
FORMAT FS=NTFS QUICK
EXIT
Create the operating system installation script or batch file and add the line below:
DISKPART /s diskpart.txt
Alternative methods: Identifying the BOSS card using Powershell, WMI, and the registry.
PowerShell
In Windows, PowerShell can display the "friendly name" (DELLBOSS VD) using the Get-Disk or Get-PhysicalDisk command, as shown below. This example shows that the BOSS card is not always enumerated as disk 0. It is shown as disk 12 here:

Figure 16: Powershell Get-Disk Output
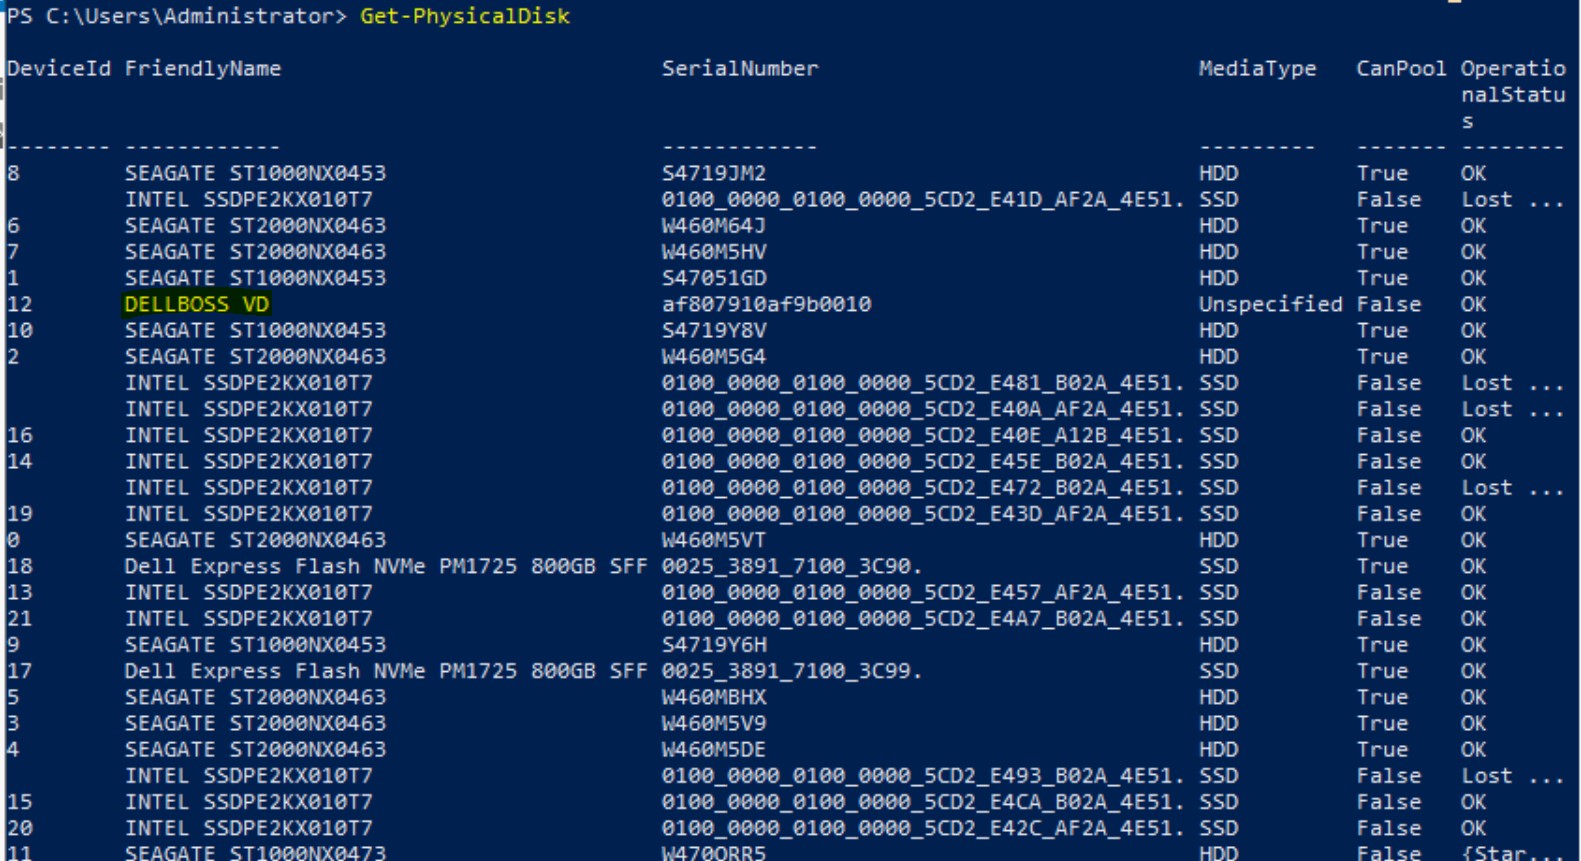
Figure 17: Powershell Get-PhysicalDisk Output

Figure 18: Powershell Get-PhysicalDisk Filtered Output
WMI Hierarchy
This is far from the most straightforward method, but you can use the WbemTest tool to identify the BOSS card by traversing the WMI hierarchy.
- Launch the tool by typing
wbemtestat a command prompt. - Connect to the
root\cimv2namespace. - Click Enum Classes, select Recursive, and click OK to open the list of classes.
- Double-click
Win32_DiskDrive, then click Instances to list all drives in the system - Double-click each listed device in turn and check its Caption property.
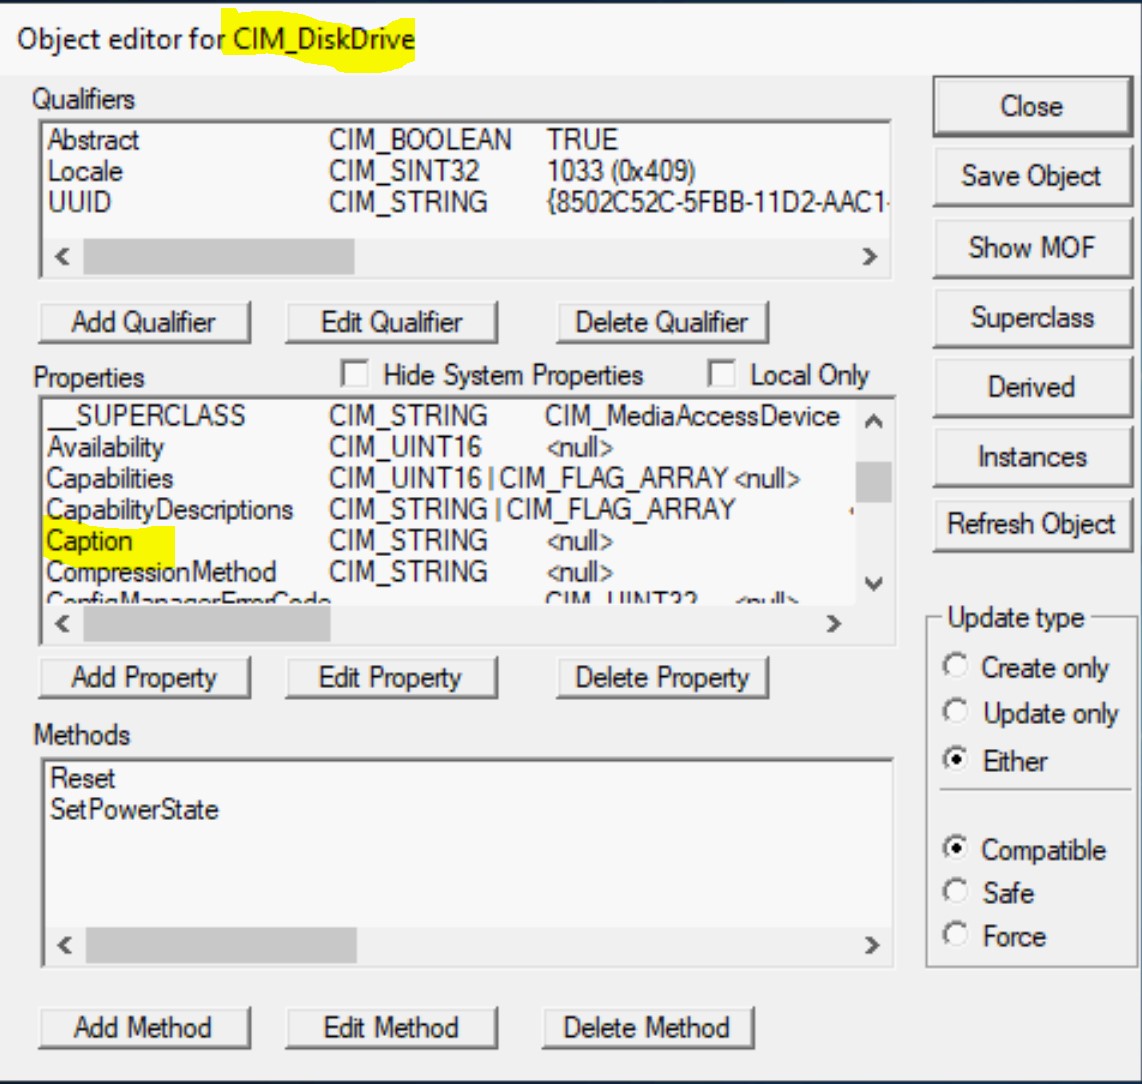
Figure 19: WBEMTEST Application Screen
Powershell
The Get-WmiObject cmdlet provides a simpler way of displaying the same information:
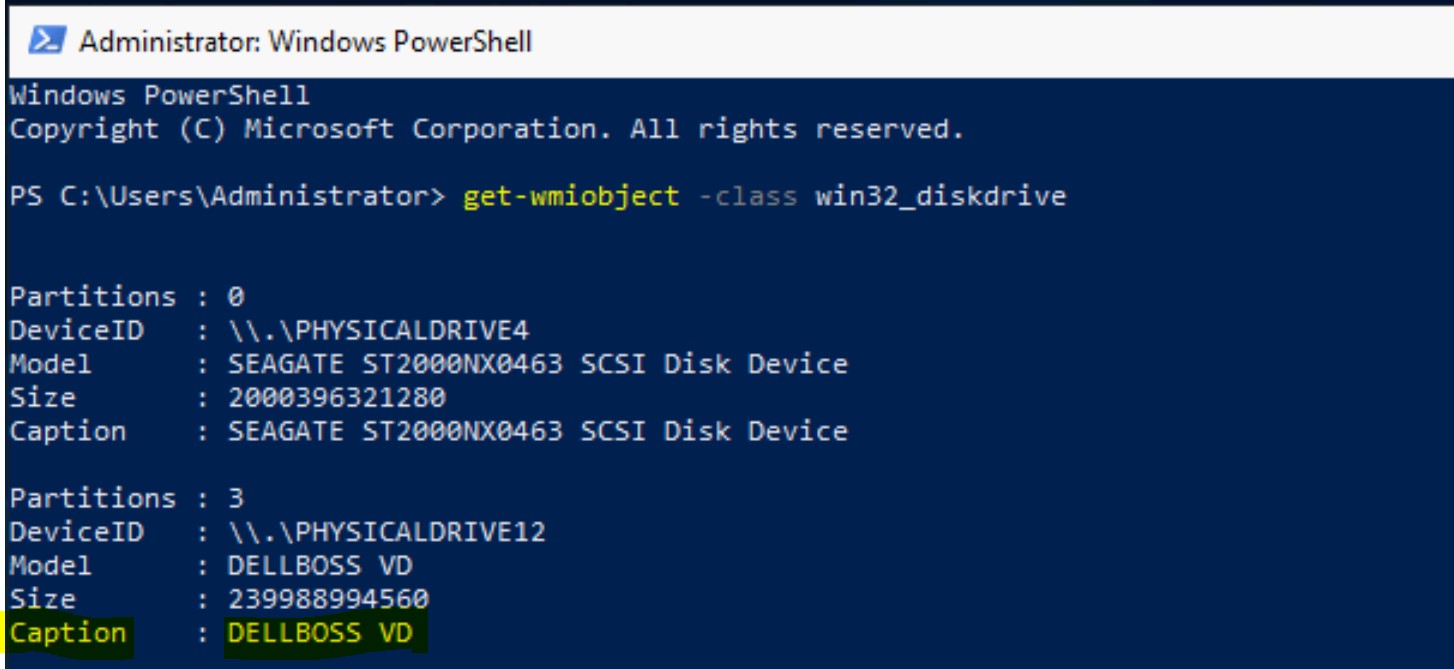
Figure 20: Powershell Get-WmiObject Output
Registry Path
HKEY_LOCAL_MACHINE\HARDWARE\DEVICEMAP\Scsi\Scsi Port #\Scsi Bus #\Target Id #\Logical Unit Id #\Identifier
Important: It is easiest to search for DELLBOSS in Registry Editor to get the proper path (port, bus, and target), especially if the system contains many drives. The path shown below is an example only.
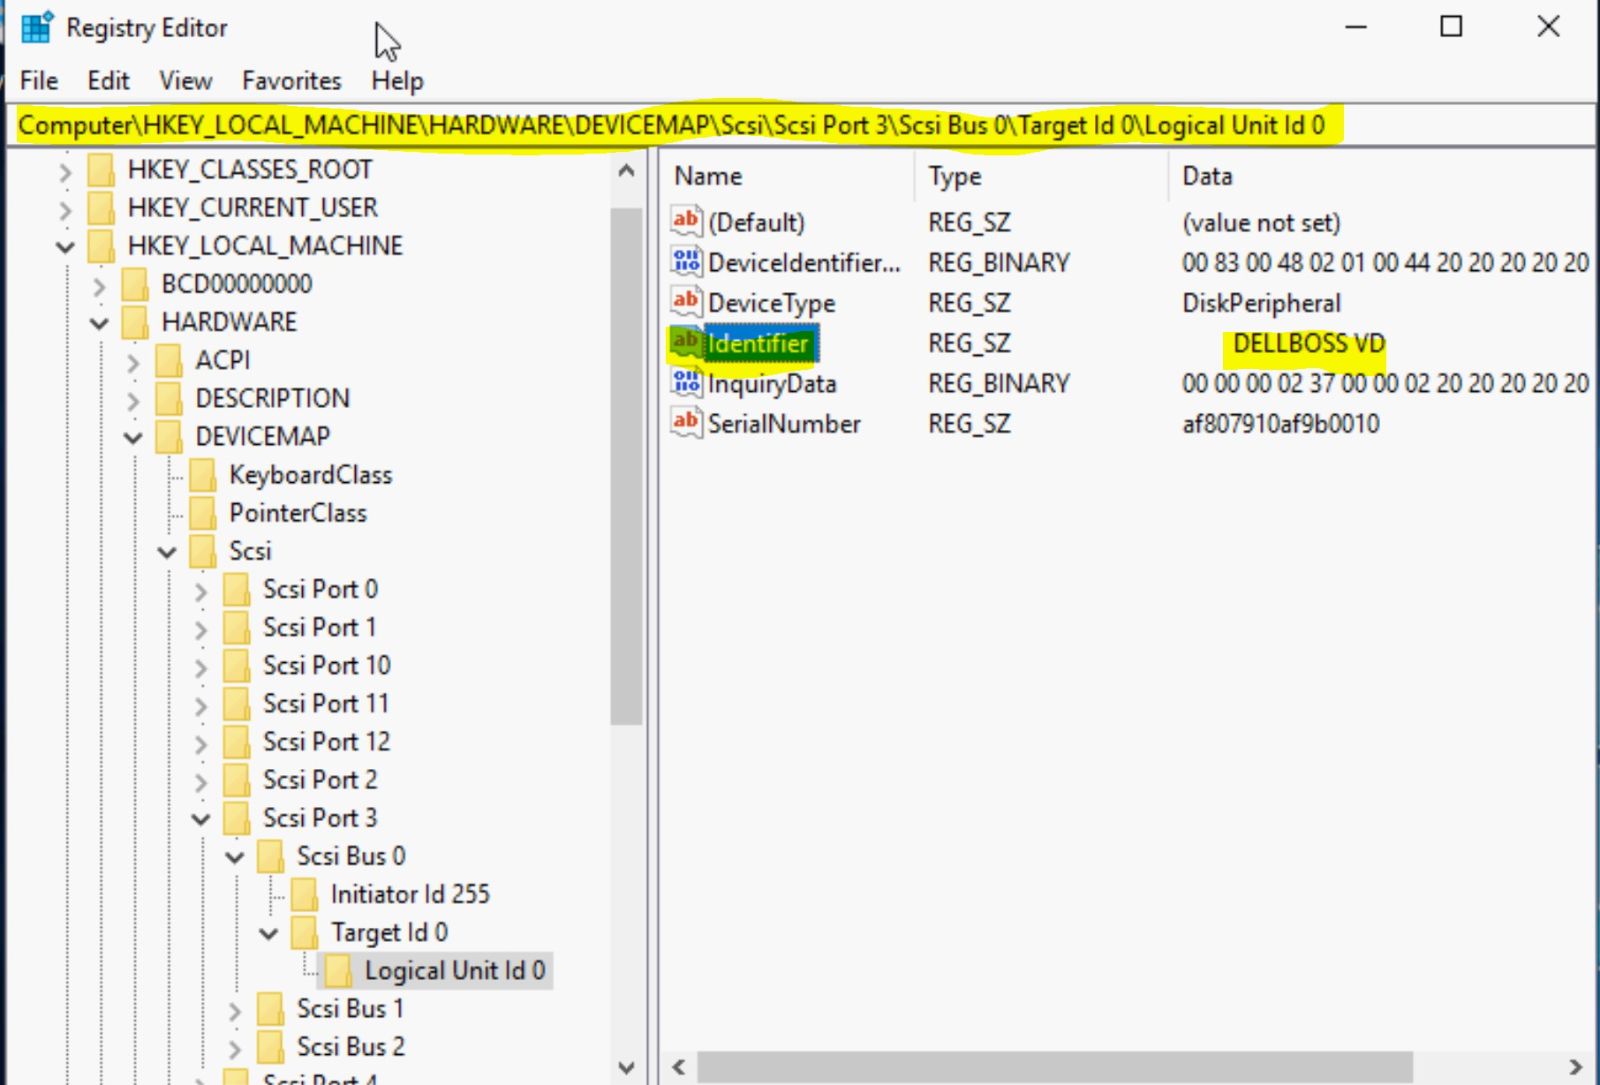
Figure 21: Windows Registry
RACADM Commands for out-of-band identification and installation
Dell Support creates a live ISO image containing racadm and other necessary tools. Customers can use this ISO to boot to Linux and perform the racadm tasks. Click here for more information.
Below are some snippets from a script used to deploy to BOSS using RACADM commands:
# Identify

##Get the list of all AHCI controllers and grab the BOSS controller.

racadm storage get controllers | grep -i ahci > /tmp/all_ctrls.txt

for ctrl in `cat /tmp/all_ctrls.txt`;do if [[ `racadm storage get controllers:$ctrl -p Name | grep -i boss` ]];then boss_ctrl=$ctrl;fi;done


# Configure RAID

##BOSS SSD drives are of form factor M.2. Capture the m.2 for factor physical disks

racadm storage get pdisks > /tmp/all_disks.txt

racadm storage get pdisks:$disk -p FormFactor | grep -i 'm.2'

##Create a VD (raid 1) on the two BOSS PDs

racadm storage createvd:$boss_ctrl -rl r1 -name boss_ssd -pdkey:${boss_disks[0]},${boss_disks[1]}


# Change boot order in bios to boot from.

racadm set BIOS.BootSettings.HddSeq <AHCI controller> && /opt/dell/srvadmin/sbin/racadm set BIOS.BootSettings.HddFailover Enabled
References
Affected Products
Boot Optimized Server Storage (BOSS), Storage Spaces Direct R440 Ready Node, Storage Spaces Direct R640 Ready Node, Storage Spaces Direct R740xd Ready Node, Storage Spaces Direct R740xd2 Ready node, OEMR R240, OEMR R250, OEMR XE R250, OEMR R260
, OEMR XE R260, OEMR R340, OEMR R350, OEMR XE R350, OEMR R360, OEMR XE R360, OEMR R440, PowerEdge XR2, OEMR R450, OEMR R540, OEMR R550, OEMR R5500, OEMR R640, OEMR XL R640, OEMR R6415, OEMR R650, OEMR R650xs, OEMR R6515, OEMR R6525, OEMR R660, OEMR XL R660, OEMR R660xs, OEMR R6615, OEMR R6625, OEMR R740, OEMR XL R740, OEMR R740xd, OEMR XL R740xd, OEMR R740xd2, OEMR R7415, OEMR R7425, OEMR R750, OEMR R750xa, OEMR R750xs, OEMR R7515, OEMR R7525, OEMR R760, OEMR R760xa, OEMR R760XD2, OEMR XL R760, OEMR R760xs, OEMR R7615, OEMR R7625, OEMR R840, OEMR R860, OEMR R940, OEMR R940xa, OEMR R960, OEMR T340, OEMR T350, OEMR T360, OEMR T440, OEMR T550, OEMR T560, OEMR T640, OEMR XL R240, OEMR XL R340, OEMR XL R660xs, OEMR XL R6615, OEMR XL R6625, OEMR XL R760xs, OEMR XL R7615, OEMR XL R7625, OEMR XR11, OEMR XR12, Poweredge C4140, PowerEdge C6420, PowerEdge C6520, PowerEdge C6525, PowerEdge C6615, PowerEdge C6620, PowerEdge HS5610, PowerEdge HS5620, PowerEdge MX740C, PowerEdge MX750c, PowerEdge MX760c, PowerEdge MX840C, PowerEdge R240, PowerEdge R250, PowerEdge R260, PowerEdge R340, PowerEdge R350, PowerEdge R360, PowerEdge R440, PowerEdge R450, PowerEdge R540, PowerEdge R550, PowerEdge R640, PowerEdge R6415, PowerEdge R650, PowerEdge R650xs, PowerEdge R6515, PowerEdge R6525, PowerEdge R660, PowerEdge R660xs, PowerEdge R6615, PowerEdge R6625, PowerEdge R740, PowerEdge R740XD, PowerEdge R740XD2, PowerEdge R7415, PowerEdge R7425, PowerEdge R750, PowerEdge R750XA, PowerEdge R750xs, PowerEdge R7515, PowerEdge R7525, PowerEdge R760, PowerEdge R760XA, PowerEdge R760xd2, PowerEdge R760xs, PowerEdge R7615, PowerEdge R7625, PowerEdge R840, PowerEdge R860, PowerEdge R940, PowerEdge R940xa, PowerEdge R960, PowerEdge T350, PowerEdge T360, PowerEdge T440, PowerEdge T550, PowerEdge T560, PowerEdge T640, PowerEdge XE8545, PowerEdge XE8640, PowerEdge XE9640, PowerEdge XE9680, PowerEdge XE9680L, PowerEdge XR11, PowerEdge XR12, VxFlex Ready Node R640, VxFlex Ready Node R740xd, Dell EMC vSAN C6420 Ready Node, Dell EMC vSAN MX740c Ready Node, Dell EMC vSAN MX750c Ready Node, Dell vSAN Ready Node MX760c, Dell EMC vSAN R440 Ready Node, Dell EMC vSAN R640 Ready Node, Dell EMC vSAN R6415 Ready Node, Dell EMC vSAN R650 Ready Node, Dell EMC vSAN R6515 Ready Node, vSAN Ready Node R660, Dell vSAN R6615 Ready Node, Dell EMC vSAN R740 Ready Node, Dell EMC vSAN R740xd Ready Node, Dell EMC vSAN R750 Ready Node, Dell EMC vSAN R7515 Ready Node, Dell EMC vSAN R760 Ready Node, Dell vSAN R7615 Ready Node, Dell vSAN Ready Node R7625, Dell EMC vSAN R840 Ready Node, Dell EMC vSAN T350 Ready Node, VxFlex Ready Node R840
...
Article Properties
Article Number: 000177584
Article Type: How To
Last Modified: 12 May 2026
Version: 15
Find answers to your questions from other Dell users
Support Services
Check if your device is covered by Support Services.