PowerProtect: How to Configure and Run a File System Centralized Backup
Summary: This article provides step-by-step instructions on how to configure a centralized file system policy for PowerProtect Data Manager (PPDM) file system backups.
This article applies to
This article does not apply to
This article is not tied to any specific product.
Not all product versions are identified in this article.
Instructions
Procedure:
- Connect to PowerProtect Data Manager User Interface (UI) and go to Protection > Protection Policies section. Click the Add button:
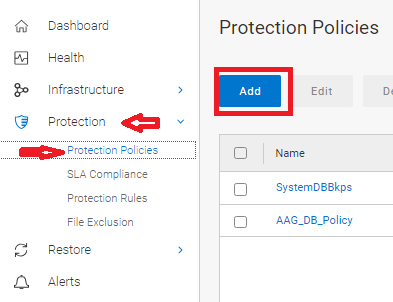
Figure 1: Add Protection Policies
- Define the Policy Name. Optionally, add a Description for the policy, and select File System Type for the backup:
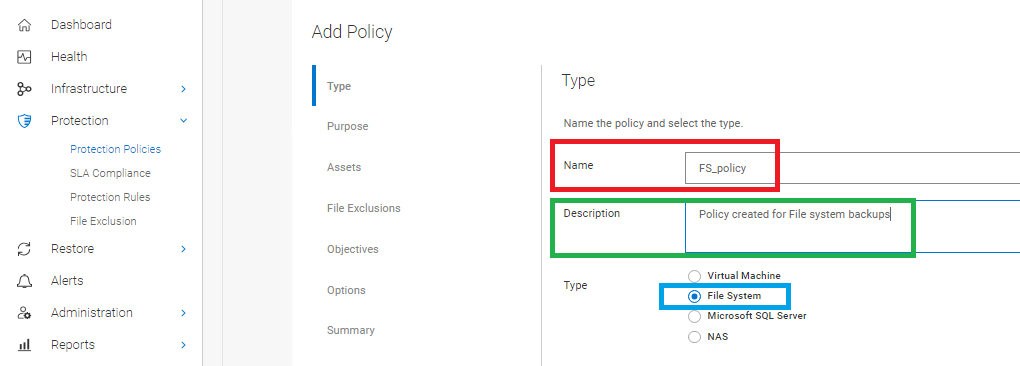
Figure 2: Define the Policy Name with an optional Description and File System Type.
- Select Centralized Backup option:

Figure 3: Select Centralized Backup
- Select Centralized Protection:

Figure 4: Select Centralized Protection
- Select the Assets to be included on the Protection Policy:
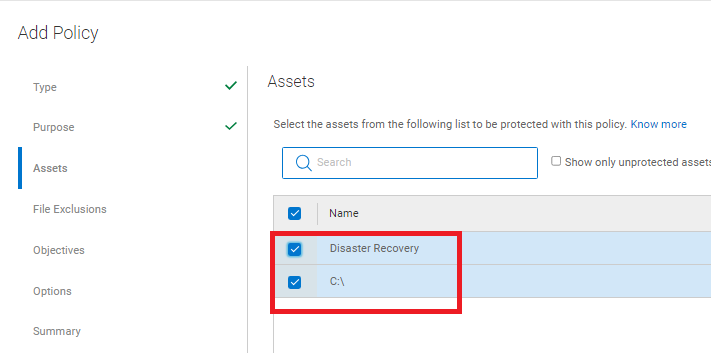
Figure 5: Assets to be included on the protection policy
- If required, enable File Exclusion and add a file exclusion based on file size, file type, modified time, or folder path. If no exclusions are required, disable this option.
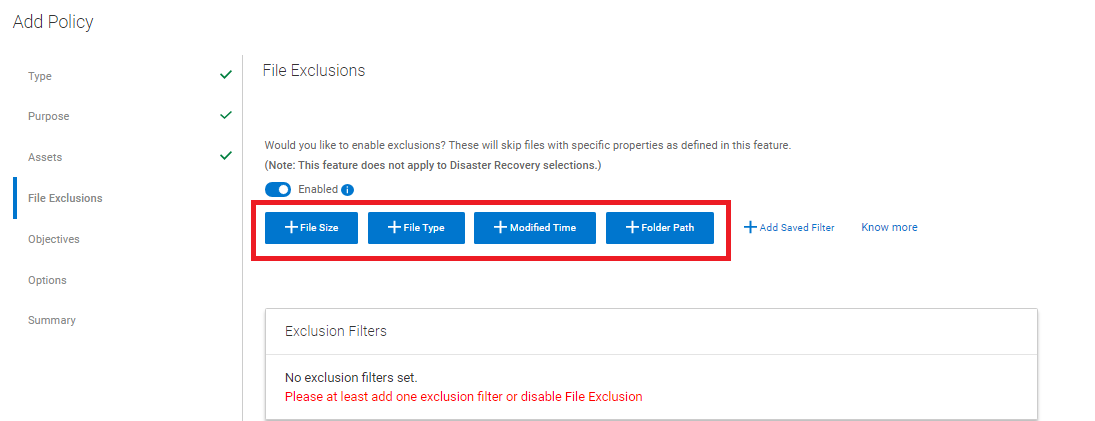
Figure 6: Enable File Exclusion if required.
CAUTION: If an exclusion is added, the backup type is a File-based backup(FBB), instead of a Block Based Backup (BBB).
- In the Objectives section, define Storage Target, Backup Level, Retention, Frequency, and Backup Window:
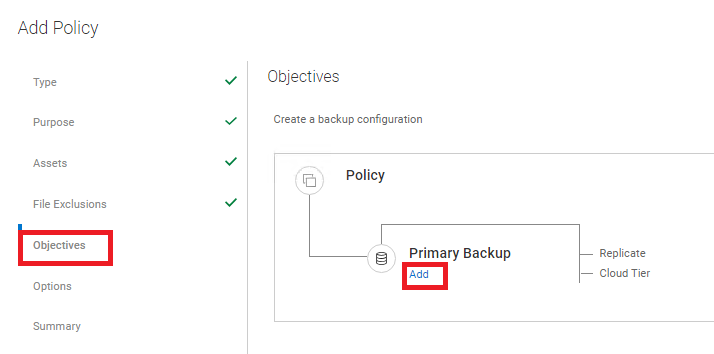
Figure 7: Define Storage Target, Back up Level, Retention, Frequency, and Backup Window in the Objectives section.
- Add Primary Backup information:
- Storage Name: Define the target DD to be used.
- Storage Unit: Select "New" to create a new storage unit on the Data Domain for this backup. You can expand and select an existing storage unit.
- Network Interface: Define if any specific network interface must be used on multi-LAN environments.
- Create a: Select the level of the backup, either full or Synthetic full.
- Back up every: Define the frequency of the backup, either day, week, month, hour, or year.
- Retain for: Specify a retention policy for the backup.
- Start and End: Defines a backup window; when it starts, and when it is forcefully terminated Forceful termination occurs no matter the status of the backup, if it is still running or not.
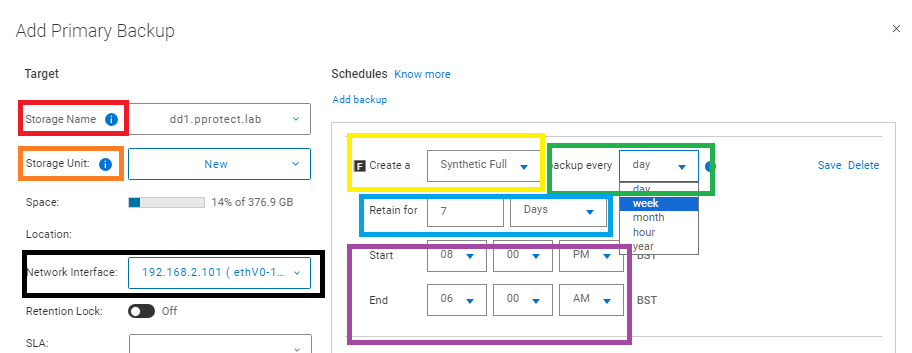
Figure 8: Add Primary Backup
- Define Additional Options for the policy:
- Disaster recovery options:
Back up system state files only: Performs a backup of system state files only. By default, this check box is not selected and bare-metal recovery (BMR) data is backed up.
Ignore missing system state files: Missing Windows system state files are reported as errors, and the backup fails, reporting the files as missing. This option is selected by default.
Exclude noncritical dynamic disks: If any volume of a dynamic disk pack is critical, all volumes in the dynamic disk pack are considered critical. By default, this option is not selected and noncritical dynamic disks are part of the backup data. To avoid the creation of large system state files, select this option to exclude noncritical dynamic disks from the backup data.
Ignore third-party services when identifying critical volumes: When a Windows service or application is installed on an otherwise noncritical disk, that disk is considered critical. By default, this option is not selected and the backup includes the disks on which a Windows service or application is installed. To avoid the creation of large system state files, select this option.
NOTE: If the policy is configured with this option, you can only perform a system-state recovery (SSR), and the backed-up data contains only SSR information. BMR with WinPE is not possible.
Ignore missing system state files: Missing Windows system state files are reported as errors, and the backup fails, reporting the files as missing. This option is selected by default.
Exclude noncritical dynamic disks: If any volume of a dynamic disk pack is critical, all volumes in the dynamic disk pack are considered critical. By default, this option is not selected and noncritical dynamic disks are part of the backup data. To avoid the creation of large system state files, select this option to exclude noncritical dynamic disks from the backup data.
Ignore third-party services when identifying critical volumes: When a Windows service or application is installed on an otherwise noncritical disk, that disk is considered critical. By default, this option is not selected and the backup includes the disks on which a Windows service or application is installed. To avoid the creation of large system state files, select this option.
- Troubleshooting
Enable debug logs for troubleshooting purposes: Enabled debug
- Review Policy Settings under the Summary tab and complete the configuration:
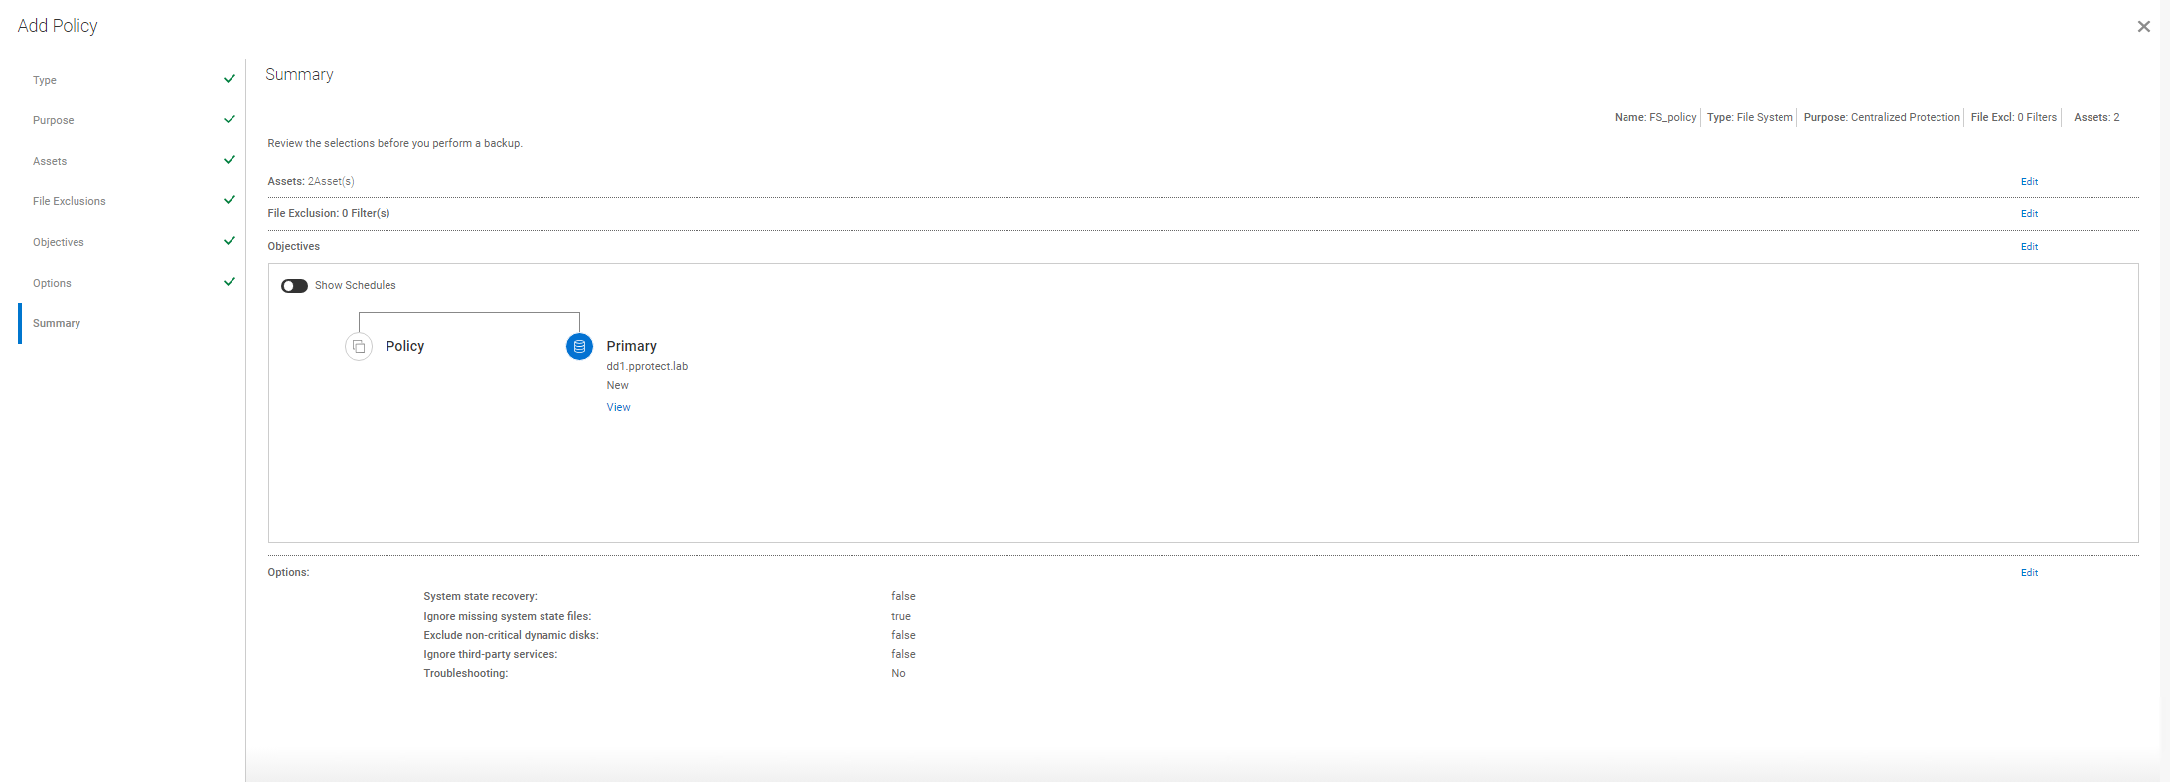
Figure 9: Summary tab; review Policy Settings and complete Configuration.
Running Protection Policy manually
- From PowerProtect Data Manager UI, go to Protection > Protection Policies section. Select the PLC to be run and select Protect Now button:
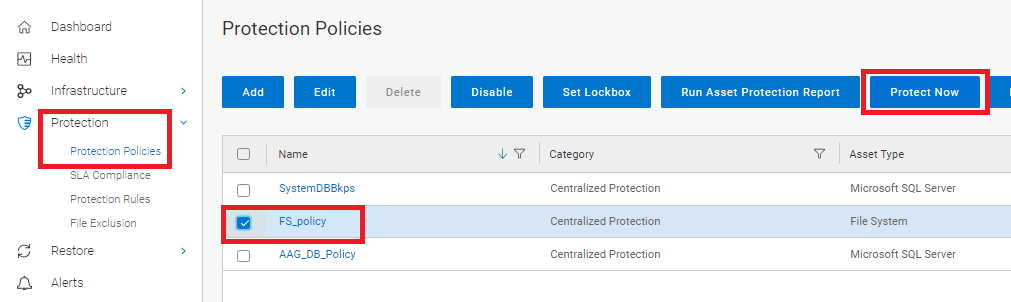
Figure 10: Select the PLC and the Protect Now button.
- Under the Asset section, select the assets to be protected:
- All Assets: Include all selected assets within this policy.
- Customer: Select specific Assets to be protected during the manual run of the PLC.
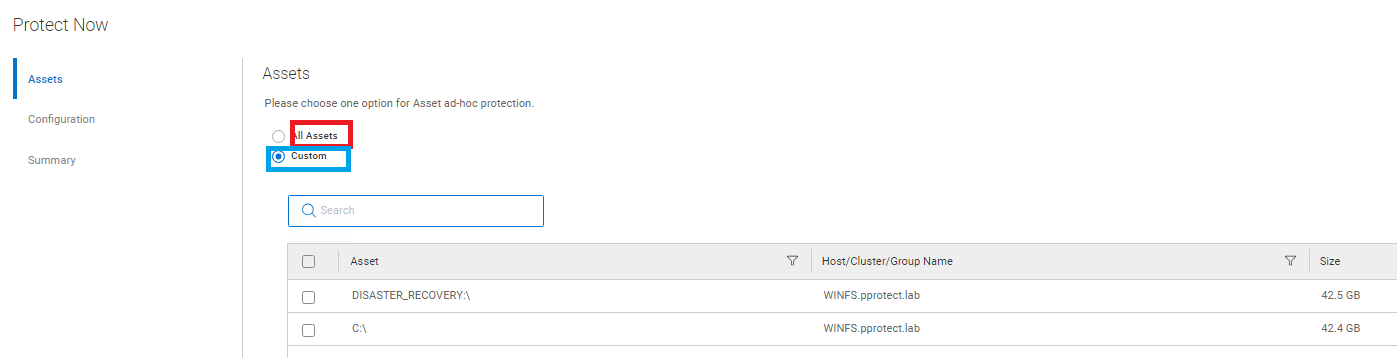
Figure 11: Select the Assets for protection.
- In the Configuration section, select the level of backup and retention policy to be applied:
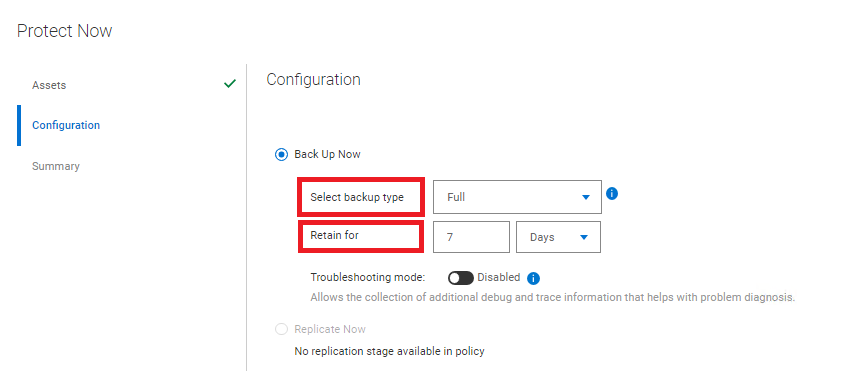
Figure 12: Level of backup and retention policy
- Review and complete the Summary tab.
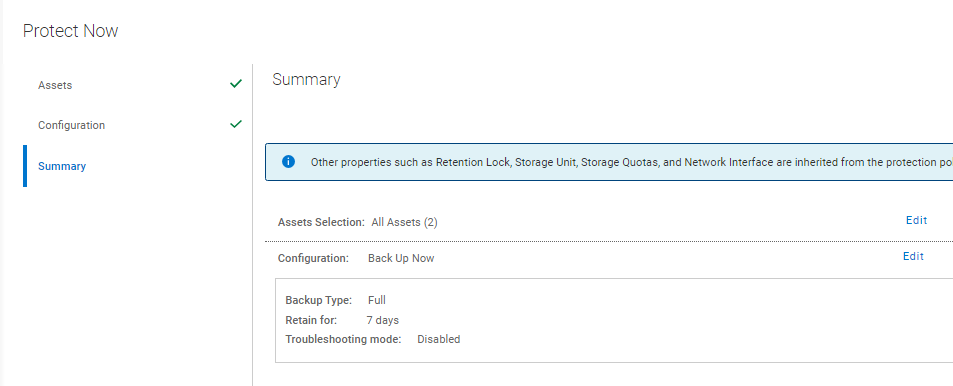
Figure 13: Review and complete the Summary tab.
- In the PowerProtect Data Manager UI Jobs section, monitor the Manual Jobs:

Figure 14: Monitor the manual jobs.
Affected Products
PowerProtect SoftwareArticle Properties
Article Number: 000218382
Article Type: How To
Last Modified: 30 Oct 2023
Version: 3
Find answers to your questions from other Dell users
Support Services
Check if your device is covered by Support Services.