Reinstall Windows using the Dell OS Recovery Image
Summary: Learn how to download a Dell OS recovery image using the OSISO recovery tool and restore your Windows operating system. This is ideal for scenarios like computer crashes, hard drive replacements, or other software issues. ...
This article applies to
This article does not apply to
This article is not tied to any specific product.
Not all product versions are identified in this article.
Instructions
Note:
- Windows 11 only supports the Automated by SupportAssist option.
- Dell Technologies recommends that supported computers use Dell SupportAssist OS Recovery Automated by SupportAssist for a premium restoration experience. See our article, Restore your Computer Using SupportAssist OS Recovery for restoration instructions. For a list of computers that support SupportAssist OS Recovery, see the Dell SupportAssist OS Recovery Support Matrix.
This article Factory Reset, Restore, or Reinstall Microsoft Windows on a Dell computer provides alternate recovery and reinstall options to reset or reinstall Windows 11 or Windows 10 on Your Dell Computer.
If your computer does not support Dell SupportAssist OS Recovery, Dell provides operating system recovery images online. This is for the Windows image that was factory installed on your computer. The Dell OS Recovery Tool provides an interface to quickly download and create a bootable USB drive to reinstall the operating system.
Note: Dell Technologies recommends that you see our article, how to Identify the Processor in a Dell Computer to learn the architecture of your Dell computers processor.
Note: The Dell operating system recovery image is available for the original operating system that was shipped with the Dell computer.
Note: Customers with legacy Windows operating systems require a Windows 11 or Windows 10 device to download and install the Dell OS Recovery Tool. Those operating systems are required to download an image for such products. (For example: Windows 8.1, and Windows 7.)
What you need:
- Service Tag of the Dell computer on which you want to install the operating system
- Download and install the Dell OS Recovery Tool (Supported only for Windows 11 or Windows 10 operating systems)
- Blank USB flash drive with at least 16 GB of free space
- Microsoft .Net Framework 4.8.1 or higher
- Administrator rights and at least 16 GB of available hard drive space to download the Dell operating system recovery image
- A wired network connection for network stability (recommended)
- Disable any antivirus software during the download (recommended)
Dell customization of the operating system recovery image includes the Windows operating system and all the factory-installed device drivers for that specific platform.
Note: The Dell operating system recovery image must be used on Dell computers only. It is not designed or tested for use on non-Dell computers.
Using the Dell OS Recovery Tool to create USB recovery media on a Windows computer:
The Dell OS Recovery Tool helps you download the operating system recovery image that is customized for your Dell computer and create a USB recovery media. The Dell OS Recovery Tool allows you to download the Microsoft Windows operating system recovery image that was preinstalled on your Dell computer.
Download and install the Dell OS Recovery Tool.
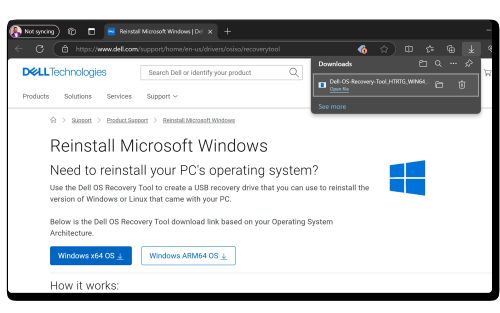
- Go to the Dell OS Recovery Tool page.
- Choose the X64 or ARM64 version based on the architecture of your working computer and save the file to the Downloads folder.
- Double-click the installer and follow the on-screen instructions to install the tool.
Creating the Dell operating system Recovery Media
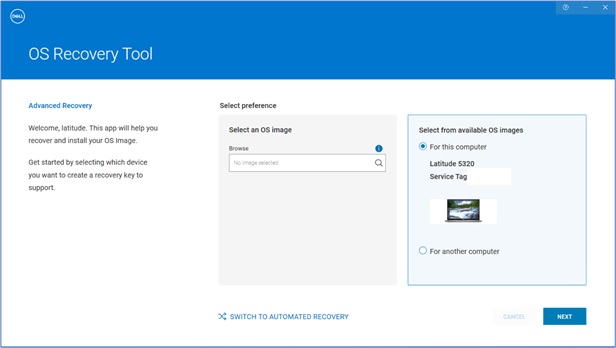
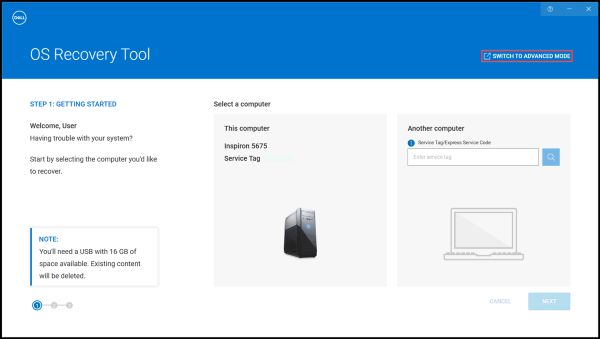
- Launch the Dell OS Recovery Tool application.
- Identify the computer that requires the recovery media using the Service Tag.
- If you are downloading the recovery image using the same Dell computer, select For this computer, and click NEXT and go to step 7 of this section.
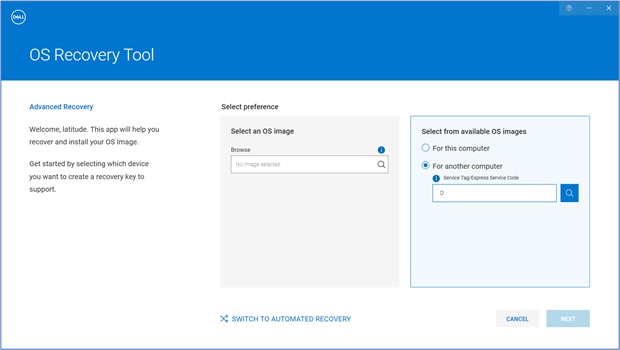
- If you are using another working computer to create the recovery media, choose Select For another computer, enter the Service Tag of the computer you want to create recovery media for, and click the Magnifying Glass icon to search for the computers identity.
Note: If the Service Tag of your Dell computer is not recognized, contact Dell Technical Support.
- After identifying the computer, click NEXT.
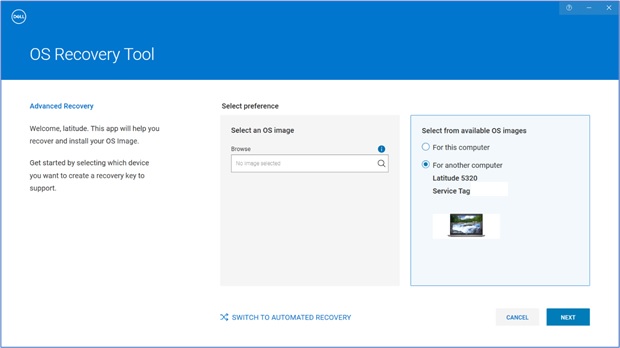
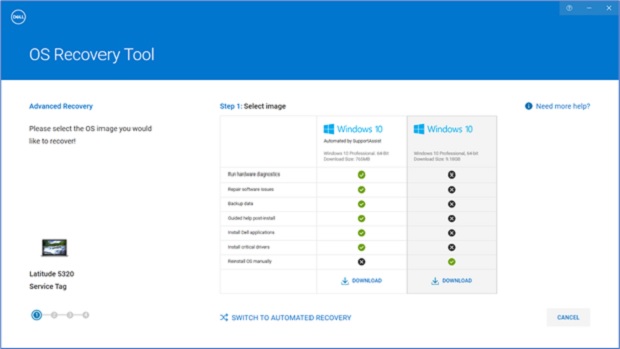
- The recovery images that are available for the computer are displayed.
Note: The Dell OS Recovery Tool identifies the original operating system that was preinstalled on the Dell computer. The Dell OS Recovery Tool does not provide alternate operating systems for download. The Automated by SupportAssist recovery image is selected by default.
- Select the Non-Automated by SupportAssist Image and click DOWNLOAD.
 Warning: Dell Technologies recommends that you back up any important data from the USB drive. The Dell OS Recovery Tool formats the USB drive and all the data on the USB drive is erased permanently.
 - Disconnect any USB drive/s that is connected to the computer.
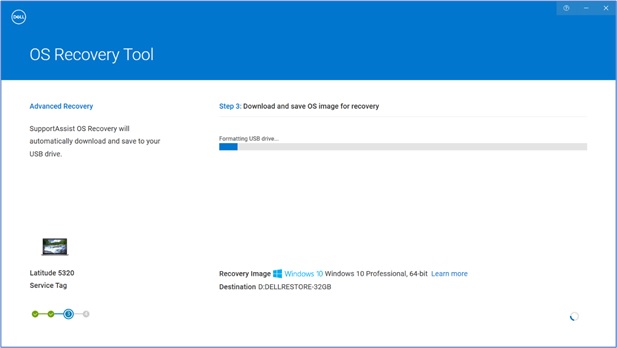
- Connect a USB drive with at least 16 GB of free storage space. This USB drive is formatted to create the USB recovery media.
- Under the USB drive, select the USB drive that you would like to use to create the USB recovery media.
- Check the boxes next to I understand that the selected drive will be reformatted and existing data are deleted.
- Click Download.

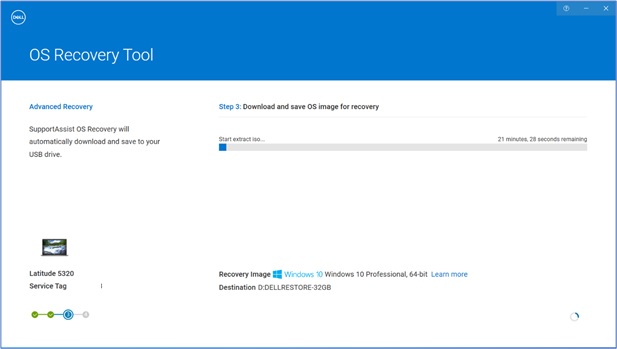
- The operating system recovery image is downloaded and verified.
- The recovery image is mounted to the USB drive.
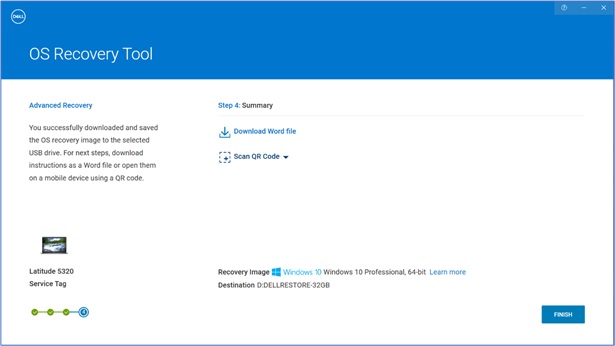
- After the USB recovery media is successfully created, a summary screen is displayed.
- Click Close.
- Recovery media creation is complete.

Using the USB recovery media to install the operating system
Installing Microsoft Windows 11, Windows 10, Windows 8.1 or Windows 7
Note: You must disable Secure Boot in the UEFI firmware setting before initiating OS installation for Win10 S-Mode, Win11 S-Mode, Win11 SE. You must enable Secure Boot once OS installation is complete.
- Connect the USB recovery media to the Dell computer where you want to install Microsoft Windows 8.1 or 7. To install Windows 11 or Windows 10, see our article Restore your Computer Using SupportAssist OS Recovery.
- Restart the computer.
- At the Dell logo screen, press the F12 key repeatedly until you see the Preparing one-time boot menu in the upper right corner of the screen.
- On the boot menu, under UEFI boot, select the USB recovery drive and press the Enter key.
- When Windows Setup appears, select the language and keyboard preferences.
- On the Windows Installation dialog box, click Install Now.
- Review the license agreement and select I accept the license terms to proceed with the installation.
- In the window Which type of installation do you want? Click Custom (advanced).
- In the, Where do you want to install Windows, window, select the largest internal disk as the Primary Partition, and then click Next.
If the Primary Partition shows 0 GB free, select the Unallocated Space and click Next. - Windows Setup automatically creates a partition, formats it, and then begins installing Windows.
- The installation process takes some time and your computer may restart several times.
Additional Information
Frequently asked questions
Can I create operating system Media with an existing ISO file in the Dell operating system Recovery Tool?
Yes, the Advanced Mode in the Dell operating system Recovery Tool allows you to create a USB recovery media. It uses an operating system image file in ISO file format. This is useful if you downloaded the operating system recovery image using a Linux, Mac, or Android device.
How to create a USB recovery media using an ISO image
- Download and install the Dell operating system Recovery Tool on a Windows computer.
- Click Start, then open the Dell operating system Recovery Tool application.
Note: Click Yes in the User Account Control prompt. The Windows user account must have administrator privileges to install the Dell operating system Recovery Tool application.
- Click Search (magnifying glass icon).
- In the open window, browse to the folder location where you have saved the operating system ISO image file.
- Select the .iso file and click Open.
- Click Next.
- Connect a USB flash drive with at least 16 GB of storage space available to the computer. This USB flash drive is formatted to create the USB recovery media.
- Under USB drive, select the USB flash drive that you would like to use to create the USB recovery media and check the button I understand that the selected drive will be reformatted and existing data are deleted.
Warning: Dell Technologies recommends that you back up any important data from the USB flash drive. The Dell operating system Recovery Tool formats the USB flash drive and all the data on the USB flash drive is erased permanently.
- Select the Partition Style:
- GPT: Windows 10 and Windows 11
- MBR: For any other operating system
- To begin creating the USB recovery media, click Burn operating system.
- Once the process is complete, you return to the main Advanced Mode screen.
What is the difference between the recovery images named Windows 10 and Windows 10 Automated by SupportAssist?
Windows 10 or Windows 11 recovery image enables you to format the hard drive and install a clean copy of Windows 10. The file size of this recovery image is considerably higher than the Windows 10 or Windows 11 Automated by SupportAssist.
The Windows 10 and Windows 11 Automated by SupportAssist recovery image can create USB recovery media for Dell computers that support SupportAssist OS Recovery.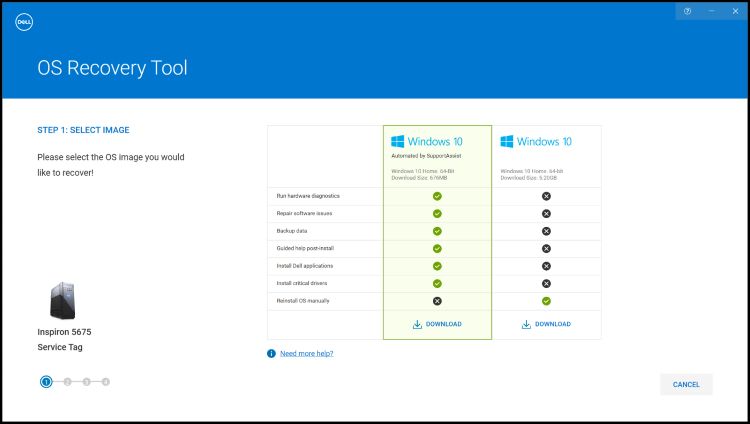
SupportAssist OS Recovery is supported on select Dell computers that run a Dell factory-installed Microsoft Windows 10 or Windows 11 operating system.
Key features of SupportAssist OS Recovery:
- Scan Hardware—Run a diagnostic scan on your computer to detect hardware issues.
- Repair System—Troubleshoot common issues that may occur before your computer boots to the operating system. This option enables you to avoid having to restore your computer to its factory state.
- Back Up Files—Create a copy of your personal files on an external storage device.
- Restore System—Restore the operating system and default applications to the state they were in when your computer was shipped from the Dell factory.
- Cloud Image Restore—Download and install the new operating system on your computer along with the default drivers and applications.
To learn more about SupportAssist OS Recovery, reference the Dell knowledge base article: Repair and Restore your Computer Using SupportAssist OS Recovery.
What is Dell SupportAssist OS Recovery and how do I use it on my Windows 10 or Windows 11 computer?
Dell SupportAssist OS Recovery provides a recovery environment with tools to diagnose and troubleshoot issues that may occur before your computer boots to the operating system. When your computer is unable to boot to the operating system after repeated attempts, it automatically starts SupportAssist OS Recovery. This recovery environment enables you to diagnose hardware issues, repair your computer, back up your files, or restore your computer to its factory state.
SupportAssist OS Recovery is supported on select Dell computers that run a Dell factory-installed Microsoft Windows 10 operating system. For the list of computers where SupportAssist OS Recovery is available, see the Dell SupportAssist OS Recovery Support Matrix under Dell SupportAssist OS Recovery Support Documentation.
Note: If the partitions on the hard drive are altered in any way, the SupportAssist OS Recovery partition may no longer be available. (Such as a clean install of Windows or other operating systems.)
How do I download the operating system recovery image using a non-Dell computer?
The Dell operating system recovery image can be downloaded using a non-Dell computer.
- On a Windows-based computer - Dell Technologies recommends using the Dell operating system Recovery Tool to download the operating system recovery image and create the USB recovery media. See the using the Dell operating system Recovery Tool section of this article.
How do I download the 32-bit version of Windows ISO?
Dell Windows recovery image is available for 64-bit Microsoft Windows operating systems. The 32-bit version of Windows is not available for download.
What do I do if the ISO download fails?
Dell operating system Recovery Tool can pause and resume the download if there is a network connectivity issue. The download resumes when the network connection is restored.
Typical recovery image files for the operating system in an ISO file format are between 5-16 GB in size. (The file size varies between different operating systems.) Once the file is downloaded, the Dell operating system Recovery Tool verifies the integrity of the file before creating the USB recovery media. The time to download and verify that the integrity of the file can vary depending on network speed and file size.
What do I do if I get an error "Not enough space on drive" while trying to download the ISO file?
You may receive a, Not enough space on drive, error. Where you download a large file through a Dell online application such as Dell OS Recovery tool. This is due to a space limitation on the hard drive where the files are being saved to. Some operating system recovery images can be up to 16 GB in file size.
To correct this error, free up additional disk space on the hard drive. For information about freeing up disk space in Microsoft Windows, see the Dell knowledge base article: How to Free up Disk Space in Microsoft Windows.
If you have an external hard drive or secondary hard drive with more disk space, select that drive to save the files.
What do I do if the Recover from a drive" option is missing when installing Windows 10?
You can try to resolve this issue by using a different brand of USB drive. Certain brands of USB drives may cause this issue.
Does the recovery image contain the latest device drivers for my Dell computer?
The operating system recovery image may not contain the latest device drivers for your Dell computer. The latest device drivers are available at Dell.com/support/drivers. After the operating system is installed, Dell Technologies recommends that you download and install the latest device drivers.
To learn more about downloading and installing device drivers, check out our guide on How to Download and Install Dell Drivers.
How do I activate Microsoft Windows after reinstalling the operating system?
- Windows 11, Windows 10, Windows 8.1, or Windows 8: For Dell computers that are shipped with Microsoft Windows 11, Windows 10 or Windows 11, Windows 8.1, or Windows 8, the product key for Microsoft Windows is embedded on the system board (motherboard) of the computer. The activation process automatically retrieves the product key from the system board. For Dell computers shipped with Windows 10, the activation information is linked to your Microsoft Account that you used to set up your computer.
- Windows 7: For Dell computers shipped with Microsoft Windows 7, the product key for Microsoft Windows is on a label on the top of a Dell desktop and the bottom panel of a Dell laptop.
To learn more about Windows activation, see the Dell knowledge base article: Where to find the Windows Product Key for Windows 11 and Windows 10.
Does the recovery image contain the original software that was preinstalled on my Dell computer?
The operating system recovery image does not include the software that was preinstalled on your Dell computer.
To learn more about downloading and installing Dell factory-installed software, check out guide to download and install Dell drivers and apps.
What do I do if the Dell operating system Recovery tool does not launch or the installation does not start?
The Dell operating system Recovery Tool fails to launch after installation, or running the installer does not start the installation process. You can temporarily disable the antivirus or anti-malware software that may be installed on the computer and then run the application or the installer again.
What if I get the error "No image found" when I enter the Service Tag of my Dell computer?
Contact Dell Technical Support for further assistance if the Dell operating system Recovery Tool shows this error or does not recognize your Service Tag.
 Is your computer out of warranty? For Out of Warranty support, browse to the Dell.com/support website and enter your Dell Service Tag to view our offers.
Note: Offers are only available for consumer and commercial computer customers in the US, Canada, UK, France, Germany, and China. Offers are not applicable to Server and Storage systems.
Affected Products
Alienware, Dell All-in-One, Dell Pro All-in-One, Dell Pro Max Micro, Dell Pro Max Slim, Dell Pro Max Tower, Dell Pro Micro, Dell Pro Slim, Dell Pro Tower, Dell Slim, Dell Tower, Inspiron, Legacy Desktop Models, OptiPlex, Vostro, XPS, G Series
, G Series, Alienware, Dell Laptops, Dell Plus, Dell Pro, Dell Pro Max, Dell Pro Plus, Dell Pro Premium, Inspiron, Latitude, Dell Pro Rugged, Vostro, XPS, Legacy Laptop Models, Fixed Workstations, Mobile Workstations, Dell Pro Max Micro XE FCM2250, Dell Pro Max Slim XE FCS1250, Dell Pro Max Tower T2 XE FCT2250, Dell Pro Max 16 XE MC16250, Dell Pro Micro Plus XE QBM1250, Dell Pro Slim Plus XE5 QBS1250, Dell Pro Tower Plus XE5 QBT1250
...
Article Properties
Article Number: 000123667
Article Type: How To
Last Modified: 28 Aug 2025
Version: 48
Find answers to your questions from other Dell users
Support Services
Check if your device is covered by Support Services.