Connectrix: San Navigator: How to Configure Scheduled Backup of Switches Using San Navigator
Summary: This article explains the steps involved in performing a scheduled switch backup on the San Navigator user interface.
This article applies to
This article does not apply to
This article is not tied to any specific product.
Not all product versions are identified in this article.
Instructions
The following steps create two backup schedules:
- A daily backup that includes database and configuration files.
- A weekly backup that includes product, port, and telemetry data, events, and reports.
Steps:
-
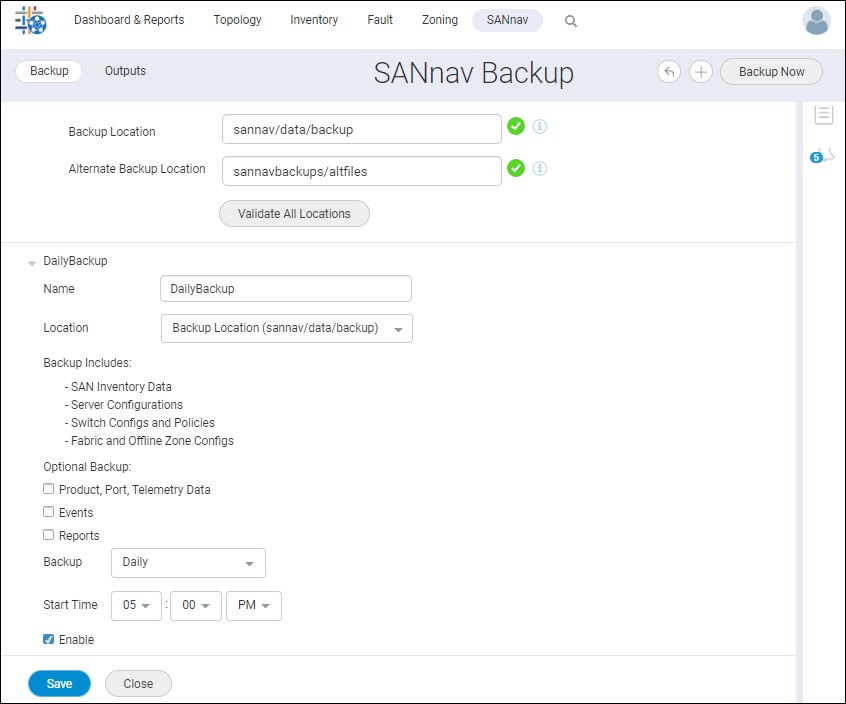
Click SANnav in the navigation bar, and then select Services > SANnav Backup.
-
Select the New Backup drop-down, and enter a name for the backup.
-
Select the backup location from the Location drop-down. This location should be the path of the SANnav server different than the San installation folder.
-
Select Daily from the Backup drop-down, and enter the start time for the daily backup.
-
By default, the backup includes database and configuration files.
-
Select Enable to activate the backup, and click Save.
-
If the Save button is not active, check that you specified a name and selected a location for the backup.
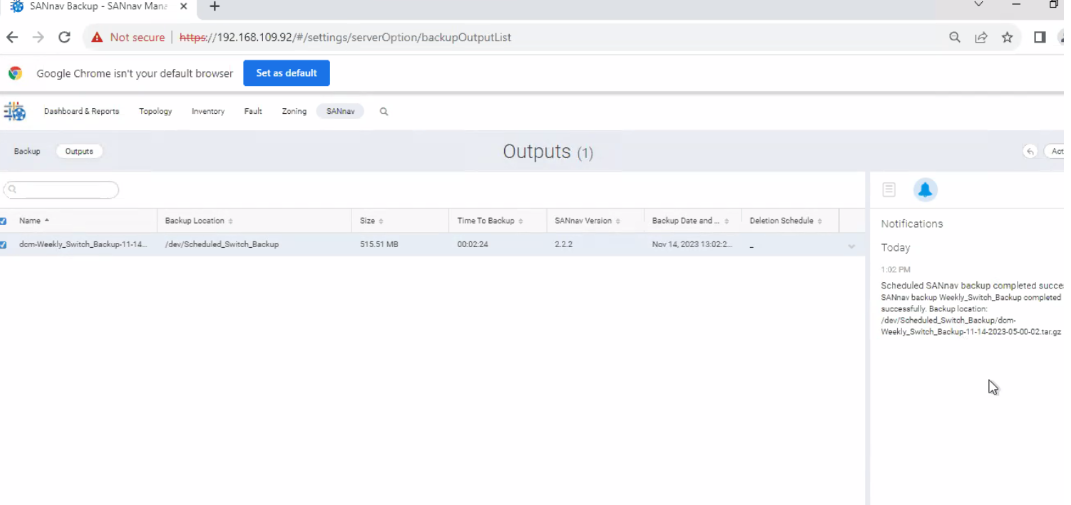
The backup is completed and notified as below in the Notification and Output Tab:
- Click the + icon on the upper right corner of the window to add an additional backup.
- Enter the name for the second backup in the Name field.
-
Select the backup location from the Location drop-down. The location can be different from the location of the first backup.
-
For this example, select the optional backup checkbox.
Select Weekly from the Backup drop-down, and then select the day and start time.
There must be more than three hours difference between the start times of the two backups. For example, if the daily start time is 12:00 AM, the weekly start time must be more than three hours before or after the daily start time. For this example, the set time could be 8:45 PM or 3:15 AM.
If you create two weekly backups, in addition to the three-hour time difference, the weekly backups must start on two different days.
-
Select Enable to activate the second scheduled backup and click Save.
-
If the Save button is not active, check that you specified a name and selected a location for the backup.
NOTE:
- SANnav verifies the storage location and starts the backup as per the schedule. The backup files are saved as a .tar.gz file in the specified location. The Outputs tab lists all the completed backups that are present in the backup and alternate backup locations.
- Notifications are sent when the backup completes or if the backup fails.
- If you want to delete a scheduled backup, click the X that is on the right side of the schedule name. You cannot delete the last backup, but you can clear the Enable checkbox to disable it.
Article Properties
Article Number: 000219599
Article Type: How To
Last Modified: 03 Jun 2025
Version: 3
Find answers to your questions from other Dell users
Support Services
Check if your device is covered by Support Services.