PowerEdge: How To Install a Windows Server
Summary: The article shows how to install Windows Server using different methods.
This article applies to
This article does not apply to
This article is not tied to any specific product.
Not all product versions are identified in this article.
Instructions
Different Methods to install Windows Server
- Deploy Windows Server from the LifeCycle Controller (LCC)
- Booting directly from the Windows Server ISO file
- Creating USB Install Media Integrating Windows Server ISO
- Using the IDRAC to boot the ISO
Deploy Windows Server from the LifeCycle Controller (LCC)
This is the preferred method to install the OS.
- The LCC simplifies the installation of the Operating System (OS) with the "OS Deployment" feature. The drivers are preloaded before the installation process when using this feature.
- The OS installs seamlessly due to its comprehensive compatibility with all hardware components.
Note:
- A wizard is displayed to assist with the initial configuration when accessing the LCC for the first time. If needed, configuration steps are detailed in the manual: Initial Configuration of the Dell Lifecycle Controller
- If installing Windows Server 2022 or newer, additional BIOS configurations must be made. For more information, reference Trusted Platform Module (TPM) Support for Windows Server 2022 or newer OS.
Steps to follow:
- Press F10 during boot to enter the Lifecycle Controller.
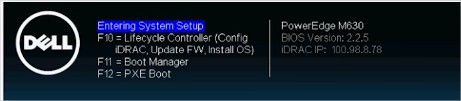
Figure 2: Lifecycle Controller - Select OS Deployment in the left side menu.
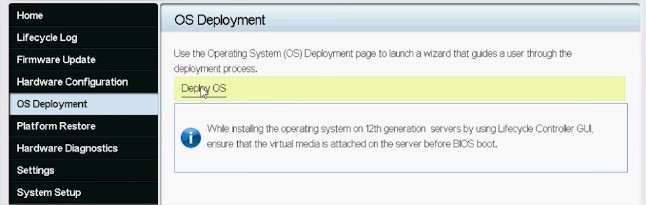
Figure 3: OS Deployment and Deploy OS - Click Deploy OS.
- Select Configure RAID First or Go Directly to OS Deployment depending on if a RAID is set up already or not.
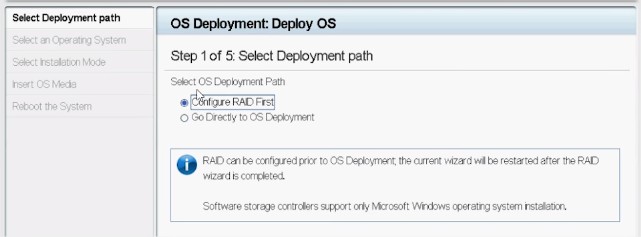
Figure 4: Configuring a deployment path - If applicable, follow the wizard to set up the RAID disk.
- Select the Operating System. The boot mode can be set in BIOS or UEFI. The matching boot mode must be configured properly in the "System Services" settings (F2).
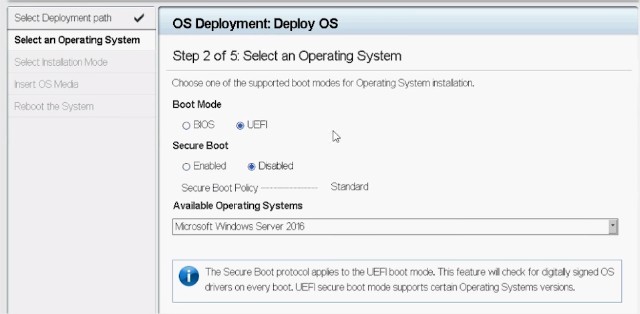
Figure 5: Selecting an operating system - Either select Manual or select Unattended/Automatic install as needed.
- Insert the OS installation media (DVD Drive or Virtual Media of iDRAC).
- Follow the OS installation wizard (If Manual install has been selected).
Note: The provided list of Dell-supported operating systems changes based on the driver packs updated on the server. To update drivers, download the latest OS Driver pack that is associated with your server.
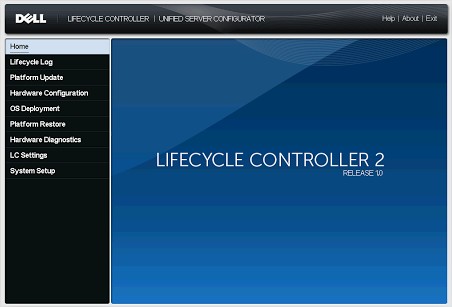
Figure 6: PowerEdge 12G Lifecycle Controller UI
Booting directly from the Windows Server ISO file
- Creating USB Install Media Integrating Windows Server ISO
Most OS images are over 4GB now so use a utility to setup the USB to be recognized by the LCC.
NTFS partitions will work for files over 4GB, but set up the partition scheme on the USB using Rufus a third party utility.
Follow this article on how to use it PowerEdge: How to create a bootable USB drive for OS Installation
- Using the IDRAC to boot the ISO
- Provided remote access is available to the server's IDRAC Web UI that the ISO can be mapped from your local server to the iDRAC virtual console to boot the ISO remotely.
- For details on this process for your specific iDRAC review the article: PowerEdge: How to use the Virtual Media Function on iDRAC6, iDRAC7, iDRAC8, and iDRAC9
- Once the ISO has been mapped to the virtual console, boot to the Virtual CD/DVD drive.
- To boot the mapped ISO, select the boot option from the virtual console and select the Virtual CD/DVD drive, or press F11 to boot to the boot menu and make the selection there.
Installing Windows Server
Note: Ensure to have the Windows Server operating system media handy.
Note: Windows Server installation by using operating system media is supported in BIOS and UEFI modes.
- Connect a keyboard, monitor, mouse, and other required peripherals to your server.
- Turn on your server and the connected peripherals.
- Press F2 to go to the System Setup page.
Figure 1. System Setup. System Setup

- On the System Setup page, click System BIOS, and then click Boot Settings.
Figure 2. System Setup Main Menu System Setup Main Menu

- Ensure that UEFI is selected as the Booted Mode.
Figure 3. Boot Settings. Boot settings
 Note: For yx4x PowerEdge servers and later, UEFI is the default boot modeNote: The PowerEdge servers are represented using the generic naming convention. To identify the range of server models, see Identifying the series of your PowerEdge servers
 - Click UEFI Boot Settings, and then click UEFI Boot Sequence.
Figure 4. System BIOS UEFI boot settings

- In the Change Order window, ensure that Virtual Optical Drive: Virtual CD is selected as your boot device, and then click OK.
Figure 5. Change Order. Change order

- Click Back.
- Click Finish, and then click Yes.
The updates are saved.
- Click Finish to exit the System Setup page, and then click Yes to reboot the system.
- Insert the Windows Server 2019 media into the DVD drive.
When the system starts to read the media, the following message is displayed:
Loading files
Note: If a Windows operating system is already installed on your system, the following message is displayed: Press any key to boot from the CD/DVD - After the files are loaded, select the language in which you want to install the OS.
NOTE: This screen is not displayed for the Simplified or Traditional Chinese operating system.Figure 6. Select a language. Boot settings

- Select the language, time and currency format, keyboard or input method, and then click Next.
Figure 7. Select language, time and currency format, and keyboard or input method. Select language, time and currency format, and keyboard or input method.

- Click Install now.
Figure 8. Windows Setup Click Install now.

- Select the required OS, and then click Next.
Figure 9. Select the operating system that you want to install. Select the operating system.

- Read the license agreement information. Select the I accept the license terms checkbox if you agree to the license terms, and then click Next.
Note: If the license agreement is not accepted, the OS installation will not continueFigure 10. Applicable notices and license terms Notices and license terms

- In the Which, type of installation do you want? Window, select Custom: Install Windows only (advanced).
Figure 11. Types of installation Select the type of installation.

- In the Where, do you want to install Windows? Window, select the unallocated space where you want to install the OS. To create a partition:
- Click New.
Figure 12. Select the location to install. Select the location to install.

- In the Size box, enter or select the size of the partition in MB, and then click Apply.
Figure 13. Select the size of the partition. Enter or select the size of the partition in MB.
 The following message is displayed:
To ensure that all Windows features work correctly, Windows might create an additional partition for system files
- Click OK.
NOTE: The recommended minimum partition size of the primary partition for Standard and Datacenter Edition is 40 GB and for the Essentials Edition is 60 GB. If you are installing an additional memory module on your system, you may require extra primary partition space to accommodate the page file and the hibernation file. During installation, a recommended partition size is displayed on the screen based on the memory size of your system. Follow the instructions on the screen. If you select Core installation, you may require less disk space for the primary partition. For information about drive partitioning, see Drive partitioning.Figure 14. Windows might create additional partitions for system files. Displays Windows might create additional partitions for system files
- Click New.
- Select the newly created operating system partition, and then click Next.
Figure 15. Select the newly created operating system partition. Select the newly created operating system partition.
 The system reboots after the operating system is installed.
 - Enter administrator password, and reenter to confirm the password, and then click Finish.
Figure 16. Customize the settings. Enter or select the size of the partition in MB.

- After the system reboots, press Ctrl+Alt+Delete to log in to the system.
- Type the administrator password, and then press Enter.
Note: Windows Server 2019 Essentials do not include the Essentials Experience role. Windows Server 2019 Essentials can be configured as a domain controller by installing the Active Directory Domain Services role from Server Manager. See Get Started with Windows Server 2019.
The OS is successfully installed.
Note: After you log in to the system, you can use the Server Manager Dashboard to configure and manage different roles and features in the OS.
It is recommended that you install the latest hotfixes and security updates from Microsoft after installing Windows Server 2019. You can install these hotfixes and security updates by downloading them or by using the Windows updates available for your system.
Dell recommends that you install hotfixes and security update "1D" or newer form Microsoft on your system by using Windows update, or by downloading the latest updates after installing the operating system.
Affected Products
Microsoft Windows Server 2016, Microsoft Windows Server 2019, Microsoft Windows Server 2022, Microsoft Windows Server 2025Article Properties
Article Number: 000334563
Article Type: How To
Last Modified: 18 Mar 2026
Version: 4
Find answers to your questions from other Dell users
Support Services
Check if your device is covered by Support Services.