Dell P2725HE Monitor Usage and Troubleshooting Guide
Summary: Learn how to setup and use Dell P2725HE monitor. Find troubleshooting instructions for common video or display issues.
This article applies to
This article does not apply to
This article is not tied to any specific product.
Not all product versions are identified in this article.
Instructions

For help with video or display issues such as: No video or no display, blank or black screen, flickering, resolution or color issues, horizontal or vertical lines, and so on reference the expanding sections below.
The key features of the Dell P2725HE monitor are:
- 686 mm (27 in.) viewable area display (Measured Diagonally)
- 1920 x 1080 (16:9) resolution, plus full-screen support for lower resolutions.
- A wide viewing angle to allow viewing from a sitting or standing position.
- Color gamut of 99% sRGB (typical).
- Equipped with one SuperSpeed USB Type-C upstream port (video and data; DP1.4 with Alternate mode, PD up to 90 W), one SuperSpeed USB 5 Gbps (USB 3.2 Gen1) Type-C downstream ports, and Three SuperSpeed USB 5 Gbps (USB 3.2 Gen1) Type-A downstream ports.
- USB-C and RJ45 ports enable a single-cable, network-connected experience.
- Digital connectivity with DisplayPort, HDMI, and USB Type-C (with DP Alternate Mode)
- Power button and OSD menu lock.
- Plug-and-play capability if supported by your computer.
- On-Screen Display (OSD) adjustments for ease of setup and screen optimization
- Tilt, swivel, rotate, and height adjustment capabilities.
- Security-lock slot.
- Stand lock.
WARNING: The possible long-term effects of blue light emission from the monitor may damage your eyes, including eye fatigue or digital eye strain. The ComfortView feature is designed to reduce the amount of blue light that is emitted from the monitor to optimize eye comfort.
This section provides some specifications of the Dell P2725HE monitor. To learn more about the specifications of the Dell P2725HE monitor, reference the User's Guide at the Dell Manuals website.
| Panel technology |
|
|---|---|
| Aspect ratio |
|
| Viewing angle |
|
| Contrast ratio |
|
| Response time |
|
| Color gamut |
|
| Color depth |
|
| Ports and connectors |
|
1Supports up to FHD 1920 x 1080 100 Hz TMDS as per specified in HDMI 1.4.
2DisplayPort and USB Type-C (Alternate mode with DisplayPort 1.4): HBR3/ DisplayPort 1.4 is supported.
Ensuring that your Dell monitor is set up properly. Assembling the monitor stand and setting up the monitor ergonomically. Connecting the cables and organizing them. These only help to make the viewing experience the best it can possibly be.
Attaching the stand
NOTE: The stand assembly is not pre-installed when the monitor is shipped from the factory.
NOTE: The following instructions are applicable only for the stand that was shipped with your monitor. If you are attaching a stand that you purchased from any other source, follow the setup instructions that were included with the stand.
To attach the monitor stand:
- Remove the stand riser and stand base from the packaging cushion.
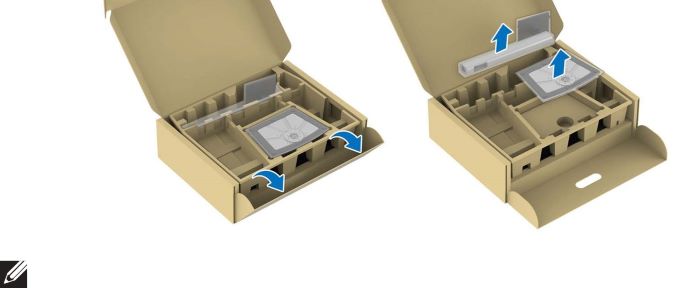
Figure 1: Remove the stand riser and stand base from packaging cushion
NOTE: The images are for illustration only. The placement and appearance of the package cushion may vary by model.
- Insert the stand base blocks fully into the stand slot.
- Lift the screw handle and turn the screw clockwise.
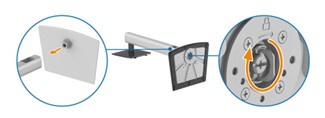
Figure 2: Insert the stand base into the Stand slot
- After fully tightening the screw, fold the screw handle flat within the recess.

Figure 3: After tightening the screw, fold the screw handle flat
- Lift the protective cover, as shown, to access the VESA area for stand assembly.
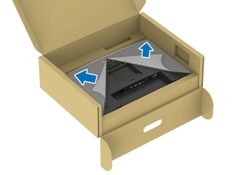
Figure 4: Lift protective cover
NOTE: Before attaching the stand assembly to the display, ensure that the front plate flap is fully opened, as shown below, to allow space for assembly.
- Attach the stand assembly to the display.
- Fit the two tabs on the upper part of the stand to the groove on the back of the display.
- Press the stand down until it snaps into place.

Figure 5: Attach the stand assembly to the display
- Hold the stand riser and lift the monitor carefully, then place it on a flat surface.
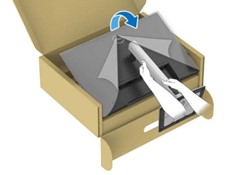
Figure 6: Hold the stand riser and lift the monitor carefully
NOTE: Lift the monitor carefully to prevent it from slipping or falling.
- Remove the protective cover from the monitor.
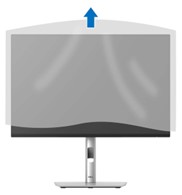
Figure 7: Remove the protective cover
Ergonomics
CAUTION: Improper or prolonged usage of a keyboard may result in injury.
CAUTION: Viewing the monitor screen for extended periods of time may result in eye strain.
For comfort and efficiency, observe the following guidelines when setting up and using your computer workstation:
- Position your computer so that the monitor and keyboard are directly in front of you as you work. Special shelves are commercially available to help you correctly position your keyboard.
- To reduce the risk of eye strain and neck, arm, back, or shoulder pain from using the monitor for a long period, we recommend you to:
- Set the distance of the screen between 20 to 28 in. (50 - 70 cm) from your eyes.
- Blink frequently to moisten your eyes or wet your eyes with water after prolonged usage of the monitor.
- Take regular and frequent breaks for 20 minutes every two hours.
- Look away from your monitor and gaze at a distant object that is 20 feet away for at least 20 seconds during the breaks.
- Perform stretches to relieve tension in the neck, arms, back, and shoulders during the breaks.
- Ensure that the monitor screen is at eye level or slightly lower when you are sitting in front of the monitor.
- Adjust the tilt of the monitor, its contrast, and brightness settings.
- Adjust the ambient lighting around you (such as overhead lights, desk lamps, and the curtains or blinds on nearby windows) to minimize reflections and glare on the monitor screen.
- Use a chair that provides good lower-back support.
- Keep your forearms horizontal with your wrists in a neutral, comfortable position while using the keyboard or mouse.
- Always leave space to rest your hands while using the keyboard or mouse.
- Let your upper arms rest naturally on both sides.
- Ensure that your feet are resting flat on the floor.
- When sitting, ensure that the weight of your legs is on your feet and not on the front portion of your seat. Adjust your chair's height or use a footrest if necessary, to maintain a proper posture.
- Vary your work activities. Try to organize your work so that you do not have to sit and work for extended periods of time. Try to stand or get up and walk around at regular intervals.
- Keep the area under your desk clear of obstructions and cables or power cables that may interfere with comfortable seating or present a potential trip hazard.

Figure 8: (English Only) For comfort and efficiency, observe the following guidelines when setting up and using your computer workstation
Connecting your monitor to the computer
To connect your Dell P2725HE monitor to your computer:
WARNING: Before you begin any of the procedures in this section, follow the Safety instructions.
NOTE: Dell monitors are designed to work optimally with the Dell supplied cables inside the box. Dell does not guarantee the video quality and performance if non-Dell cables are used.
NOTE: Route the cables through the cable-management slot before connecting them.
NOTE: Do not connect all the cables to the computer simultaneously.
NOTE: The images are for illustration only. The appearance of the computer may vary.
To connect your monitor to the computer:
- Turn off your computer and disconnect the power cable.
- Connect the DisplayPort or HDMI cable, and the USB Type-C cable from your monitor to the computer.
CAUTION: To avoid bending the connectors of the USB Type-C cable, gently hold both sides of the connector, and then vertically insert it into/pull it out from the USB Type-C port of the monitor.

Figure 9: USB Type-C cable handling best practice
- Connect the USB peripherals to the USB 3.2 Gen1 downstream ports on the monitor.
- Plug the power cables for your computer and monitor into a nearby outlet.
- Turn on the monitor and the computer.
Connecting the DisplayPort (DP to DP) cable

Figure 10: Connecting the DisplayPort (DP to DP) cable
Connecting the USB-C to the USB-C cable
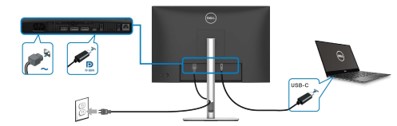
Figure 11: Connecting the USB-C to the USB-C cable
NOTE: Use the USB-C to USB-C cable shipped with your monitor only.
- This port supports DisplayPort Alternate Mode (DP1.4 standard only).
- The USB Type-C power delivery compliant port (PD Version 3.0) delivers up to 90 W of power.
- If your laptop requires more than 90 W to operate and the battery is drained, it may not be powered up or charged with the USB PD port of this monitor.
Connecting the HDMI cable (optional)
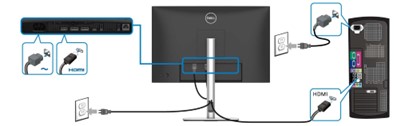
Figure 12: Connecting the HDMI cable (optional)
Connecting the monitor for DP Multi-Stream Transport (MST) function port.

Figure 13: Connecting the monitor for DP Multi-Stream Transport (MST) function port.
NOTE: This monitor supports the DP MST feature. Your PC graphics card must be certified to DP1.4 with MST option, to use this feature.
NOTE: Remove the rubber plug when using the DP out
Connecting the monitor for the USB-C Multi-Stream Transport (MST) function

Figure 14: Connecting the monitor for the USB-C Multi-Stream Transport (MST) function
NOTE: The maximum number of monitors supported through MST is subjected to the bandwidth of the USB-C source.
NOTE: Remove the rubber plug when using the DP out downstream port.
Connecting the monitor for RJ45 cable (optional)
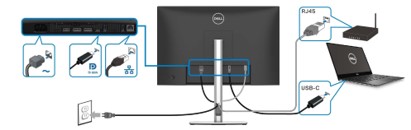
Figure 15: Connecting the monitor for RJ45 cable (optional)
NOTE: The RJ45 cable is not an in-box standard accessory.
Using the joystick control
Use the joystick at the rear of the monitor to access the On-Screen Display (OSD) menu of the monitor (Figure 5). To access the On-Screen Display (OSD) menu, press joystick at the rear of the monitor.
- Press the joystick button to launch the OSD main menu.
- Move the joystick up, down, left, or right to switch between options.
- Press the joystick button again to confirm the settings and exit.

Figure 16: Using Joystick control for OSD menu on Dell P2725HE monitor
Learn more about using the On-Screen Display (OSD) menu. Reference the Operating Your Monitor section in the User's Guide of the Dell P2725HE monitor.
NOTE: Any changes that you make are automatically saved. Whenever you move to another menu item, exit the OSD menu, or wait for the OSD menu to automatically close.
Resetting a monitor to factory defaults can help resolve many video or display issues. To reset your Dell P2725HE monitor to factory default settings, follow these instructions:
- Press the joystick button to launch the OSD main menu.
- Move the joystick up or down to highlight Others option in the menu, and press the joystick button again to select.
- Move the joystick up or down to highlight Factory Reset option in the menu and press the joystick button again to select.
- Press the joystick button again to confirm the reset action.
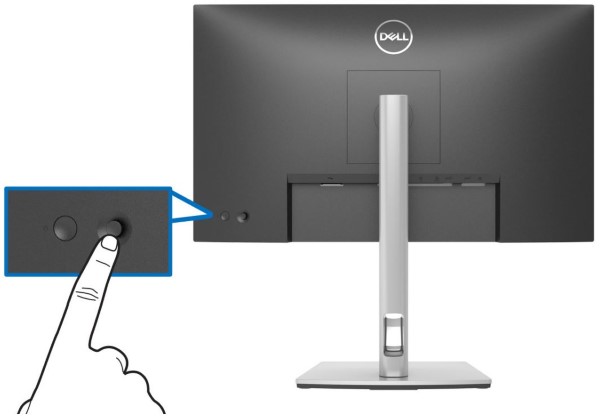
Figure 17: Dell P2725HE Joystick Control
If your Dell monitor has a blank or black screen, fuzzy or blurry image, flickering, distorted or any other screen abnormalities, running a diagnostic test helps determine if the Dell monitor is functioning normally. To learn more about diagnostic options on a Dell monitor, reference the Dell knowledge-base article: How do I run diagnostics on a Dell monitor?
It is always essential to isolate the monitor while troubleshooting your computer for the following scenarios:
- No Power - Your computer is not powering ON or showing any signs of power.
- No POST - Your computer is not showing any indication of activity, the screen might be blank and does not display the Dell logo during start-up.
- No Video - You are unable to see any display on the screen, able to hear the windows chime but no display is seen.
Your Dell P2725HE Monitor provides a self-test feature check that allows you to check whether the monitor is functioning properly. If the monitor and computer are properly connected but the monitor screen remains dark, run the monitor self-test by performing the following steps:
- Turn off both your computer and the monitor.
- Unplug the video cable from the back of the computer. To ensure proper Self-Test operation, remove the video cables (VGA, DVI, HDMI, or DisplayPort) from the back of the computer.
- Turn on the monitor.
- Turn off your monitor and reconnect the video cable, then turn on both your computer and the monitor.
- If your monitor screen remains blank after you use the previous procedure, check your video card (GPU) and computer, because your monitor is functioning properly.
Your Dell P2725HE monitor has an integrated diagnostic tool. It helps to determine if the screen abnormality you are experiencing is a problem with the monitor or with the video card on your computer.
When you notice screen abnormalities like distortion, clarity, horizontal or vertical lines, color fade, it is always a good practice to isolate the monitor by running the Built-In Diagnostics.
- Ensure that the screen is clean (no dust particles on the surface of the screen).
- Unplug the video cables from the back of the computer or the monitor. The monitor now enters self-test mode.
- On the back panel, move and hold the joystick up, down, left, or right for about 4 seconds.
- Move the joystick to highlight the Diagnostic icon and then press the joystick to confirm. A gray test pattern appears.
- Carefully inspect the screen for abnormalities.
- Press the joystick on the front panel again to change the test patterns.
- Repeat step 5 and step 6 to inspect the display in green, blue, black, white, and text screens.
- The test is completed when the white screen appears.
- Press the joystick to exit the diagnostic program.
NOTE: If you do not detect any screen abnormalities upon using the integrated diagnostic tool, the monitor is functioning properly. Check the video card (GPU) and the computer.
If you notice any abnormalities during Built-In Diagnostics, you may get the monitor repaired or replaced if it is under warranty by contacting Dell Technical Support.
If you notice any abnormalities during Built-In Diagnostics, you may get the monitor repaired or replaced if it is under warranty by contacting Dell Technical Support.
During the LCD Monitor manufacturing process, it is not uncommon for one or more pixels to become fixed in an unchanging state. Which is hard to see and do not affect the display quality or usability. For more information, reference the Dell knowledge-base article Dell LCD Monitor Pixel Guidelines.
This section provides information about troubleshooting steps that can help resolve the most common issues with the Dell P2725HE monitor. Alternatively, to learn more about troubleshooting common issues on Dell monitors, reference the Dell knowledge-base article Troubleshooting Display or Video Issues on a Dell Monitor or use our Monitor self-help Guide.
| Common Problem | What User Experiences | Possible Solution |
|---|---|---|
| No Video - Power LED Off | No picture |
|
| No Video - Power LED On | No picture or no brightness |
|
| Poor Focus | The picture is fuzzy, blurry, or ghosting. |
|
| Shaky or Jittery Video | Wavy picture or fine movement |
|
| Missing Pixels | LCD screen has spots. |
|
| Stuck-On/Off Pixels | LCD screen has a bright spot. |
|
| Brightness Problems | Picture too dim or too bright. |
|
| Geometric Distortion | The screen not centered correctly. |
NOTE: When using DisplayPort input, the positioning adjustments are not available.
|
| Horizontal or Vertical Lines | The screen has one or more lines. |
NOTE: When using DisplayPort input, the positioning adjustments are not available.
|
| Synchronization Problems | The screen is scrambled or appears torn. |
|
| Safety-Related Issues | Visible signs of smoke or sparks |
|
| Intermittent Problems | The monitor malfunctions on and off. |
|
| Missing Color | The picture does not have color. |
|
| Wrong Color | Picture color is not good. |
|
| Image Retention from a Static Image Left on the Monitor for a Long Period | A faint shadow from the static image appears on the screen. |
|
| The screen image is too small. | The image is centered on the screen, but does not fill the entire viewing area. |
|
| Unable to adjust the monitor with the joystick. | OSD does not appear on the screen. |
|
| No Input Signal when user controls are pressed. | No picture, the power LED light is white. |
|
| The picture does not fill the entire screen. | The picture cannot fill the height or width of the screen. |
|
| No video at HDMI/DisplayPort/USB Type-C port | When connected to some dongle/docking device at the port, there is no video when unplugging/plugging the cable from the laptop. | Unplug the HDMI/DisplayPort/USB Type-C cable from dongle/docking device, then plug the docking HDMI/DisplayPort/USB Type-C cable to the laptop. |
| No network connection | Network dropped or intermittent. | Do not turn Off the monitor during network connection. |
| The LAN port is not functioning. | OS setting or cable connection issue |
|
| Troubleshooting USB Issues | ||
|---|---|---|
| Specific Symptoms | What User Experiences | Possible Solution |
| USB interface is not working. | USB peripherals are not working. |
|
| USB Type-C port does not supply power. | USB peripherals cannot be charged. |
|
| SuperSpeed USB 5 Gbps (USB 3.2 Gen1) interface is slow. | SuperSpeed USB 5 Gbps (USB 3.2 Gen1) peripherals working slowly or not working at all |
|
| Wireless USB peripherals stop working when a USB 3.2 device is plugged in | Wireless USB peripherals responding slowly or only working as the distance between itself and its receiver decreases |
|
| Wireless USB mouse does not work properly | When plugged into one of the USB ports on the rear side of the monitor, the Wireless USB mouse lags or freezes during use | Unplug the Wireless USB Mouse receiver and re-plug it into one of the Quick Access USB ports at the bottom of the monitor. |
To learn more about how to view or download the User Guides and Manuals for your Dell product. Reference the Dell knowledge-base article Manuals and Documentation for your Dell Product.
- Dell P2725HE - User’s Guide
- Dell P2725HE - Quick Setup Guide
- Dell P2725HE - Dell Display Manager User’s Guide
Frequently asked questions
Using Windows Display Settings
In Windows 10, Windows 8 or 8.1 and Windows 7:
- For Windows 8 and Windows 8.1 only, select the Desktop tile to switch to the classic desktop view.
- Right-click the desktop and click Screen Resolution.
- Click the dropdown list of the Screen Resolution and select 1920 x 1080.
- Click OK
Using NVIDIA Control Panel
To change the resolution using the NVIDIA Control Panel:
- Right-click the desktop and click NVIDIA Control Panel.
- Click the + symbol next to Display on the left pane.
- Select Change Resolution under Display.
- In the dropdown menu on the right pane, select the resolution 1920 x 1080.
- Click Apply.
Using AMD Catalyst Control Center
To change the resolution using the AMD Catalyst Control Center:
- Right-click the desktop and click AMD Catalyst Control Center.
- Click the + symbol next to Display on the left pane.
- Select Change Resolution under Display.
- In the dropdown menu on the right pane, select the resolution 1920 x 1080.
- Click Apply.
NOTE: If you do not see the recommended resolution as an option. You may need to update the video card (GPU) driver by visiting the Dell Drivers & Downloads website or the video card (GPU) manufacturers website. To learn how to download and update a device driver, reference the Dell knowledge-base article: How do I download and install a device driver?
To reset the Dell P2725HE Monitor to factory defaults, reference the Reset to Factory Settings section of this article.
The Dell P2725HE monitor has two integrated diagnostics that are available:
- Self-Test Feature Check - The self-test feature check on the Dell P2725HE monitor allows you to check whether the monitor is functioning properly.
- Built-In Self-Test - The Dell P2725HE monitor has an integrated self-test that helps you identify if the screen abnormality is with the monitor or the video card (GPU) on your computer. When you notice screen abnormalities like distortion, clarity, horizontal or vertical lines, color fade. It is always a good practice to isolate the monitor by running the Built-In Diagnostics.
To learn how to run a diagnostic test, reference the Running Diagnostics on Dell P2725HE Monitor section of this Dell knowledge-base article.
The Troubleshooting section of this Dell knowledge-base article provides information about troubleshooting common issues with the Dell P2725HE monitor. The section has troubleshooting steps on how to resolve power issues, video issues, color or clarity issues, distortion issues, horizontal or vertical lines, brightness issues or pixel issues and so on.
To navigate the On-Screen Display (OSD) menu, use the buttons on the monitor. The monitor control buttons are usually on the right side, either on the side, front, or bottom of the monitor. To access the On-Screen Display (OSD) menu, press joystick on the monitor.
For more information about using the On-Screen Display (OSD) menu and different menu options, reference the Operating Your Monitor section in the User's Guide of your Dell P2725HE monitor.
.More monitor information like the model number, firmware version, and Service Tag can be accessed from the monitor's OSD (On-Screen Display).
- Press the joystick on the monitor to enter the On-Screen Display (OSD) Menu.
- Move joystick up or down to highlight Others option in the menu and press joystick to select.
- Move joystick up or down to highlight Model Number or Firmware Version option in the menu and press joystick to select.
- Move joystick left to exit the OSD menu.
Dell P2725HE supports both DisplayPort 1.4 connectivity with your PC. If the video or graphics card (GPU) on your PC supports DisplayPort 1.2, it is required to change the monitor to DisplayPort 1.2 mode.
NOTE: The default factory setting on the Dell P2725HE is DisplayPort 1.4 (DP1.4).
- Press the joystick on the monitor to enter the On-Screen Display (OSD) Menu.
- Move joystick up or down to highlight Input Source in the menu and press joystick to select.
- Move joystick up or down to highlight DP in the menu.
- Press and hold the joystick for approximately 10 seconds until the DisplayPort configuration message appears.
- Press the joystick to select Disable and change the display mode to DisplayPort version 1.2
Dell P2725HE supports both HDMI 2.0 and HDMI 1.4 connectivity with your PC. If the video or graphics card (GPU) on your PC supports HDMI 1.4, it is required to change the monitor to HDMI 1.4 mode.
NOTE: The default factory setting on the Dell P2725HE is HDMI 2.0.
- Press the joystick on the monitor to enter the On-Screen Display (OSD) Menu
- Move joystick up or down to highlight Input Source in the menu and press joystick to select.
- Move joystick up or down to highlight HDMI in the menu.
- Press and hold the joystick for approximately 10 seconds until the HDMI configuration message appears.
- Press the joystick to select Disable and change the display mode to HDMI version 1.4
USB Type-C port on your Dell P2725HE supports USB Power Delivery, Data, and DisplayPort video signal. The USB Type-C port can be used for video and data signal, and supply power (90 W) to a compatible laptop PC using a single USB Type-C cable that is provided with the monitor.
NOTE: Dell P2725HE can supply power using the USB Type-C cable only to a compatible laptop PC that supports Power Delivery (PD) over USB Type-C. Not all laptop PCs with USB Type-C support Power Delivery, for more information reference the User Manual or contact your laptop manufacturer.
NOTE: USB Type-C power delivery-compliant port (PD version 2.0) delivers up to 90 W of power. If your laptop PC requires more than 90 W to operate and the battery is drained. It is recommended you use the standard AC adapter of the laptop PC to power on and charge the laptop battery.
If you are using a Dell laptop PC that supports charging using USB Type-C. It is recommended to update the BIOS and Video or Graphics card (GPU) driver. To learn how to download and update a device driver, reference the Dell knowledge-base article: How do I download and install a device driver?
In a multiple monitor setup, the Dell P2725HE should not be rotated to 180° (landscape).
Caution: Dell P2725HE setup must comply with the recommended panel orientation and working angle only. Setting up the monitor in an orientation that is not recommended may cause.
When setting up your Dell P2725HE monitor, ensure that the monitor front panel buttons is on the bottom right.
Using the Tilt, Swivel, and Vertical Extension
NOTE: This is applicable for a monitor with a stand. When any other stand is bought, reference the respective stand setup guide for set-up instructions.
With the stand attached to the monitor, you can tilt and swivel the monitor for the most comfortable viewing angle.

Figure 7: Using tilt and swivel on a Dell P2725HE monitor
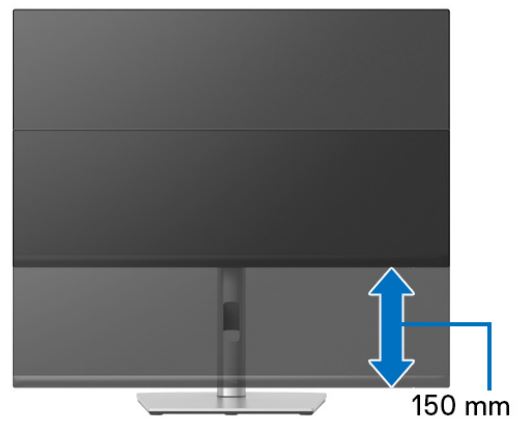
Figure 8: Using Vertical Extension on Dell P2725HE monitor
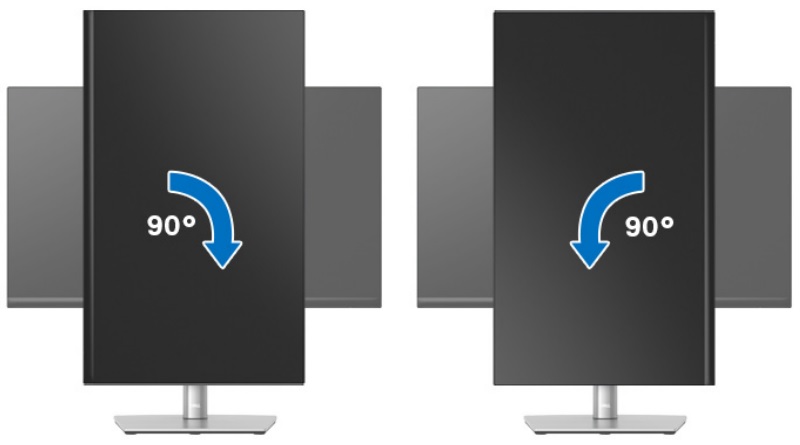
Figure 9: Rotating 90° clockwise and counter clockwise on a Dell P2725HE monitor
Warning: The monitor should not be rotated 180° (landscape).
Affected Products
Dell P2725HEArticle Properties
Article Number: 000223964
Article Type: How To
Last Modified: 19 Apr 2024
Version: 2
Find answers to your questions from other Dell users
Support Services
Check if your device is covered by Support Services.