How to Integrate Dell Trusted Device Data into CrowdStrike Next-Gen SIEM
Summary: Learn how Dell Trusted Device’s telemetry enhances CrowdStrike Next-Gen SIEM, empowering IT professionals to detect and respond to advanced threats with a comprehensive view of device health and security. ...
This article applies to
This article does not apply to
This article is not tied to any specific product.
Not all product versions are identified in this article.
Instructions
Affected Products:
- Dell Trusted Device
- CrowdStrike
Dell Trusted Device collects telemetry data from below the operating system, providing valuable insights for various actionable tasks. By uploading this telemetry to CrowdStrike Next-Gen SIEM, IT professionals can enhance their ability to detect and respond to advanced threats. This integration offers a comprehensive view of device health and security, enabling more effective monitoring and incident response. The following sections guide you through the complete setup process, which should be followed in the order presented.
Table of Contents
- Prerequisites
- Confirm Dell Trusted Device Installation
- Log in to CrowdStrike Falcon
- Configure and activate the HEC/HTTP data connector in CrowdStrike
- Configure the data shipper
- Installing the LogScale Collector
Prerequisites
- CrowdStrike Falcon Next-Gen SIEM
Confirm Dell Trusted Device Installation
Dell Trusted Device must be installed and generating telemetry. These articles help you download and install Dell Trusted Device if needed.
Log in to CrowdStrike Falcon
- In a Google Chrome or Microsoft Edge browser, go to your Falcon console login URL.
- Falcon US-1: https://falcon.crowdstrike.com/login/
- Falcon US-2: https://falcon.us-2.crowdstrike.com/login/
- Falcon EU-1: https://falcon.eu-1.crowdstrike.com/login/
- Falcon US-GOV-1: https://falcon.laggar.gcw.crowdstrike.com/login/
- Falcon US-1: https://falcon.crowdstrike.com/login/
- Log In to the Falcon Console.
Configure and activate the HEC/HTTP data connector in CrowdStrike
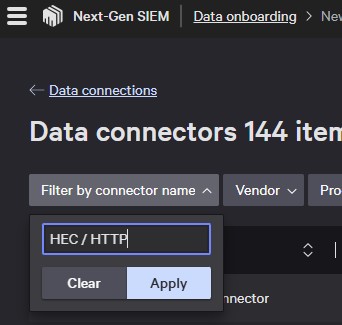
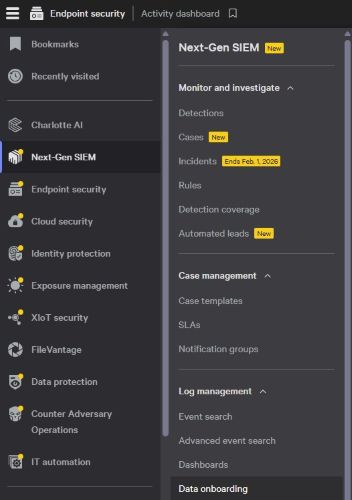
- In the left menu pane, Click Next-Gen SIEM and then select Data onboarding.

- In the Connections section, click + Add connection.

- Click Filter by connector name and enter HEC/HTTP Event Connector, then click Apply.
 Note: Alternatively, you can browse all connectors and locate HEC/HTTP manually.
 - Click HEC/HTTP Event Connector.

- On the New connection pane, click Configure.
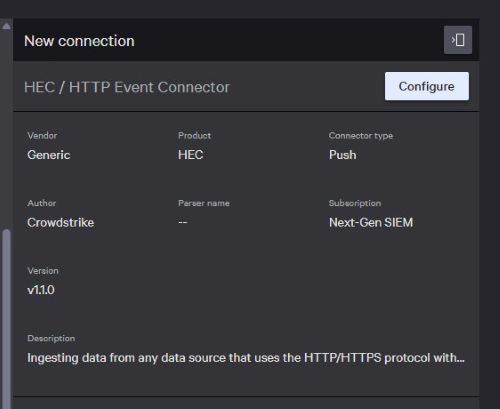
- On the Add new connector page enter the information below, click the checkbox to accept the Terms and Conditions, and click Create connection.
- Data Source: Customer Created
- Connector Name: Customer Created
- Description (Optional): Customer Created
- Parsers: dell-trusteddevice (Dell Trusted Device)

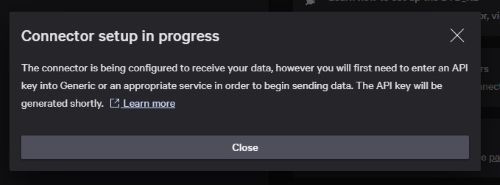
- On the Connector setup in progress dialog, click Close.
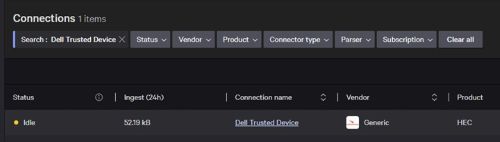
- Click Data connections on the upper left.
 Note: Alternatively, you can repeat Step 3 to return to the same area.
 - On the Data Onboarding page, locate the data connection created in Configure and activate the HEC/HTTP data connector in CrowdStrike (Step 6 from above), and select the Connection name.
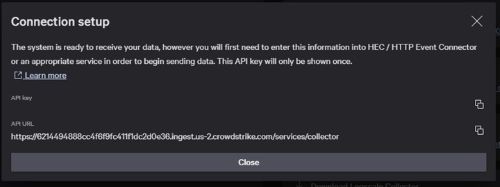
- Click Generate API key to generate a new API key.
 Note: The API key is only displayed once. Copy it and store it safely for use in a future step.
 - Once you have your API key documented, click Close.
 Note: If you must regenerate the API key, you can repeat Step 11 and use the Regenerate API Key button from the upper right.
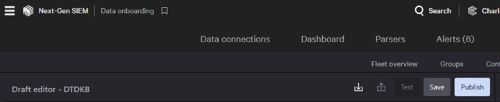
Configure the data shipper
- In the left menu pane, Click Next-Gen SIEM and then select Data onboarding.
- From the Data onboarding page, click Fleet management.

- From the Fleet management page, click Config overview.

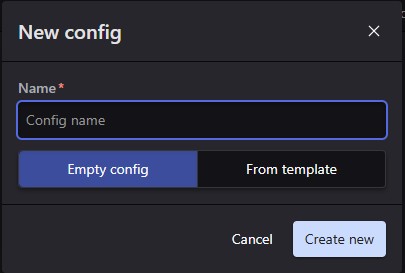
- On the Config overview page, click + New config

- In the New Config dialog, enter a Name, select Empty config, then click Create new.
- In the Draft editor, enter the information below. For the Token and URL values, refer to Configure and activate the HEC/HTTP data connector in CrowdStrike (Step 13).
//unformattedcode Example config using default listening port 514 sources: windowsEvents: type: wineventlog sink: logscaleSink channels: - name: "Dell Trusted Device" - name: Dell sinks: ngsiem: type: hec proxy: none token: <API_key_generated_during_data_connector_setup> url: <API_URL_generated_during_data_connector_setup> //unformattedcode - Once you have the information entered from Step 6 click Save, and then click Publish.
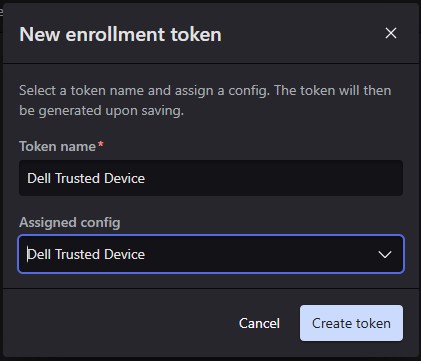
- From Fleet management, click Enrollment tokens.

- Click + New token.

- On the new Enrollment token dialog provide a token name, using the assigned config picklist select the configuration name from Step 5, then click Create token.
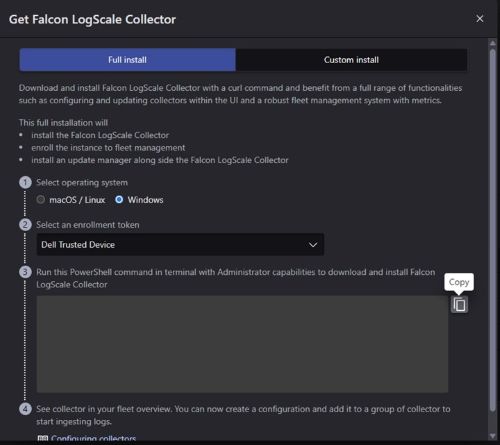
Installing the LogScale Collector
- In the left menu pane, Click Next-Gen SIEM and then select Data onboarding.

- From the Data onboarding page, click Fleet management.

- Click Get LogScale Collector.

- On the Get Falcon LogScale Collector dialog click Windows, in the Select an enrollment token picklist pick the token created during Configure the data shipper (Step 10), then click the Copy button.
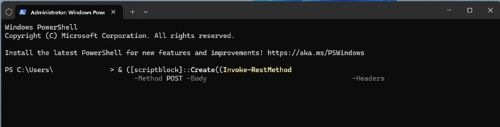
- In Windows Right the Start Button and select Terminal (Admin).
 Note: Click Yes if prompted for Windows User Account Control.
 - In the Terminal window paste the command copied from Configure the data shipper (step 6) and press Enter.
- Once the command successfully completes, you see a "Bootstrap complete" message like below.

Affected Products
CrowdStrike, Dell Trusted DeviceArticle Properties
Article Number: 000368563
Article Type: How To
Last Modified: 12 Sep 2025
Version: 1
Find answers to your questions from other Dell users
Support Services
Check if your device is covered by Support Services.