Article Number: 000192157
IDPA and PowerProtect DP Series: Internal VM Backups Resolution Path
Summary: This KB Article is a resolution path for IDPA Internal VM backups and covers several scenarios to remediate Internal VM backup failures.
Article Content
Instructions
Backup Workflow
Log Collection for Troubleshooting
KB 000157727: IDPA: Gathering log files for troubleshooting Avamar client backup and restore issues
Relevant log files for Troubleshooting
- Avamar Backup/Restore Activity Log: Download from Avamar Activity monitor tab. Instructions mentioned in the above topic "Log Collection for troubleshooting"
- Avamar Backup/Restore logs in Proxy: Activity logs can be found on proxy under the location "/usr/local/avamarclient/var" if unavailable using UI.
- Avamar Backup in Waiting-Client, Timed Out-Start, Proxy registration failure: Proxy Avagent service log which stores information about communication between the Avamar server and the proxy can be found under the location "/usr/local/avamarclient/var/avagent.log"
- Proxy Deployment: Proxy deployment logs can be found on the Avamar server under the location "/usr/local/avamar/var/log/vcs/deploymanager.log"
- Avamar Communication with vCenter: mcserver.out can be found on Avamar server under the location "/usr/local/avamar/var/mc/server_log/mcserver.out" to troubleshoot connection/communication issues between Avamar Server and vCenter. This log can be reviewed if updating vCenter username/password in the Avamar server fails.
Avamar Proxy:
IDPA Internal VM Backup Failure Scenarios
Scenario 1: Backups stay in "Waiting Client" State or fail with the "TimedOut-Start" error.
- SSH to AVProxy using IP Address or FQDN and login using "admin" user.
- Switch to the root user using the following command and enter common password:
su - - Verify that the proxy is registered successfully and request from Avamar/Backup Server:
tail -f /usr/local/avamarclient/var/avagent.log - If we connect errors or errors that state "Unable to connect", re-register the Internal Proxy:
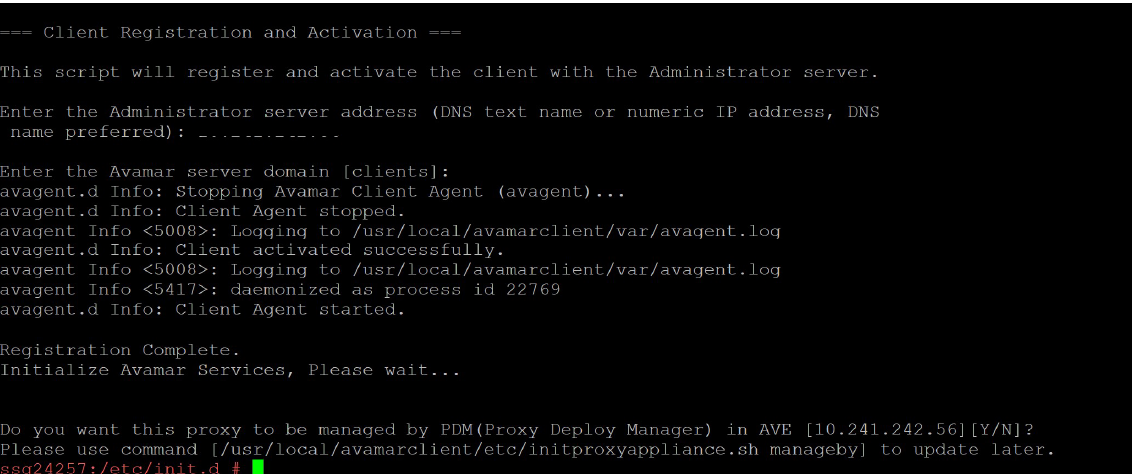
Register Avamar proxy with Avamar:- Log in to Avamar proxy through putty using admin user.
- Once that get completed, login as root using command:
su - - Run the following command
/etc/init.d/initproxyappliance --start - Once the script is ran, press any key to enter input form.
- Provide the Avamar (Backup Server) IP address and input the domain as "/clients".
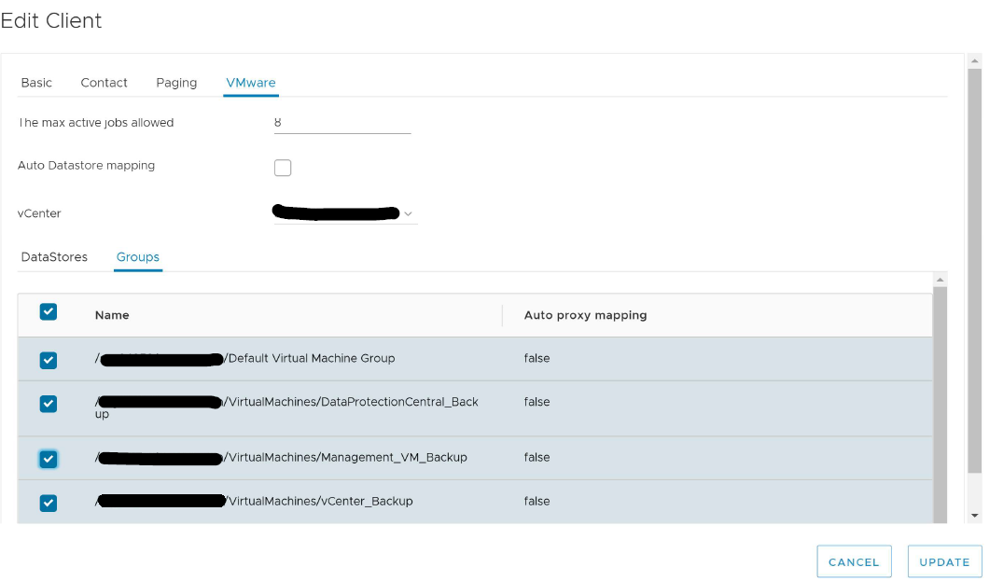
Scenario 2: Backups fail with "No Proxy" or "No eligible proxy" error.
Error Backup job failed: If the backup jobs which you triggered are getting this error. i.e. "Proxy does not protect any datastores”.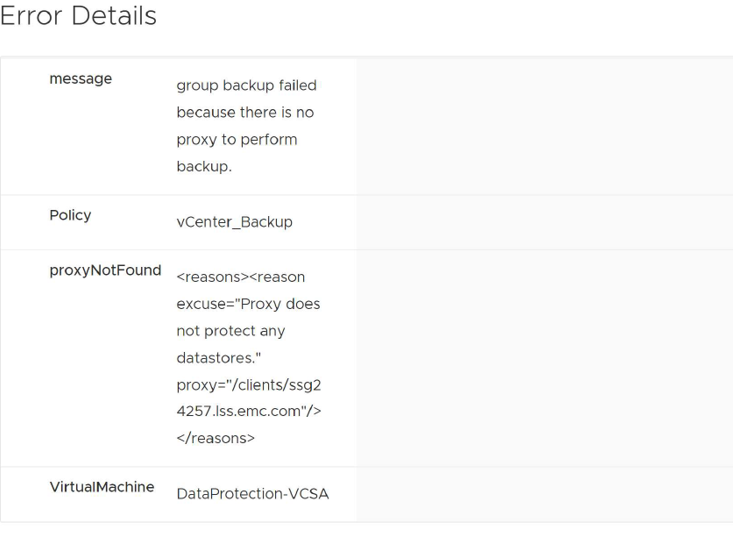
Verify the following:
- Traverse to "Asset Management" à "clients" domain.
- Select the IDPA Internal Proxy and select Edit client under more options:
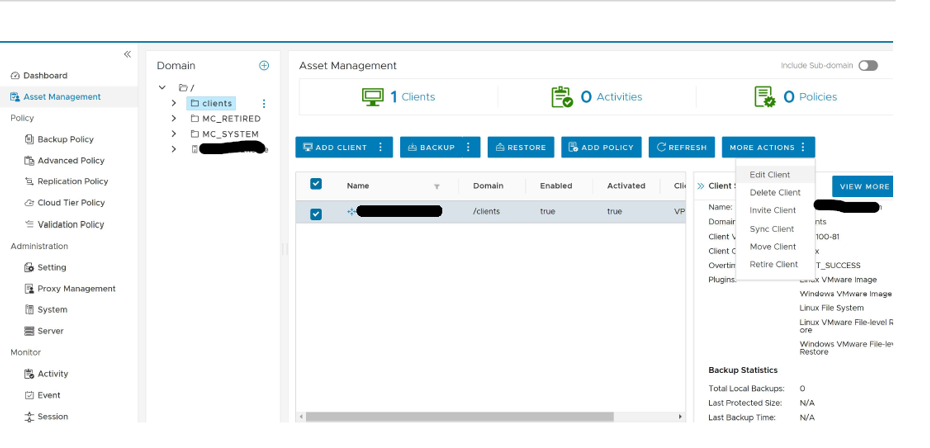
- li>Verify if all the "DataStores" and "Groups" are selected under the VMware tab. Once selected, click on "Update"

Scenario 3: IDPA vCenter services are down on Avamar, or vCenter connections are down.
To verify if we are hitting this scenario, perform the following steps:
- Log in to Avamar AUI using the following address: https://<AVAMAR-IP-ADDRESS-OR-FQDN>/aui
- Traverse to Server --> Services
- Locate the IDPA vCenter Services at the bottom. If connections state down, then we have a problem. If connections state "OK," then the Avamar can connect to vCenter without issues. vCenter services can be restarted to kill stale connections and reestablish connection between Avamar and vCenter.
If connections are down, the following steps can be tried to troubleshoot this scenario:
- Open SSH to Avamar Server as 'admin' user.
- Ping the IDPA vCenter hostname and IDPA ESXi hostname to ensure the DNS lookup works fine.
- If ping to either of the above components fails, then verify the "/etc/resolv.conf" file on the Avamar server to ensure the correct DNS servers and search domain is added.
- Open IDPA vCenter UI and login using "root" user. Verify the IDPA vCenter UI loads fine.
- Update the vCenter root credentials in Avamar as per the steps shown in Scenario 10.
Scenario 4: IDPA Internal VM backup policies are missing.
- The following KB Article can be used to re-create the IDPA Internal VM backup policies, datasets, retentions, schedules, etc.: KB 21318
Scenario 5: IDPA Internal VM backups fail post vCenter VM redeployment.
To verify if we are hitting this scenario, perform the following steps:
- Log in to Avamar AUI using the following address: https://<AVAMAR-IP-ADDRESS-OR-FQDN>/aui
- Traverse to Server --> Services
- Locate the IDPA vCenter Services at the bottom. If connections state down, then we have a problem. If connections state "OK," then the Avamar can connect to vCenter without issues. vCenter services can be restarted to kill stale connections and reestablish connection between Avamar and vCenter.
Steps to Readd/update vCenter in Avamar:
- Log in to Avamar AUI using the web browser
https://<Avamar_server>/AUI - In the AUI navigation page Click >> and then, click Asset Management

- Click on Vcenter -> Click on three dots -> Edit vCenter

- Go to VMware tab -> Update the Password and Confirm Password and Click on Update.
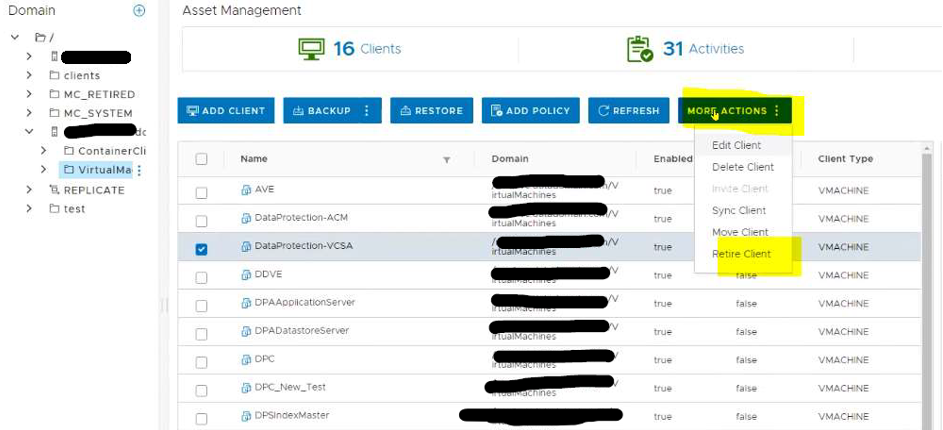
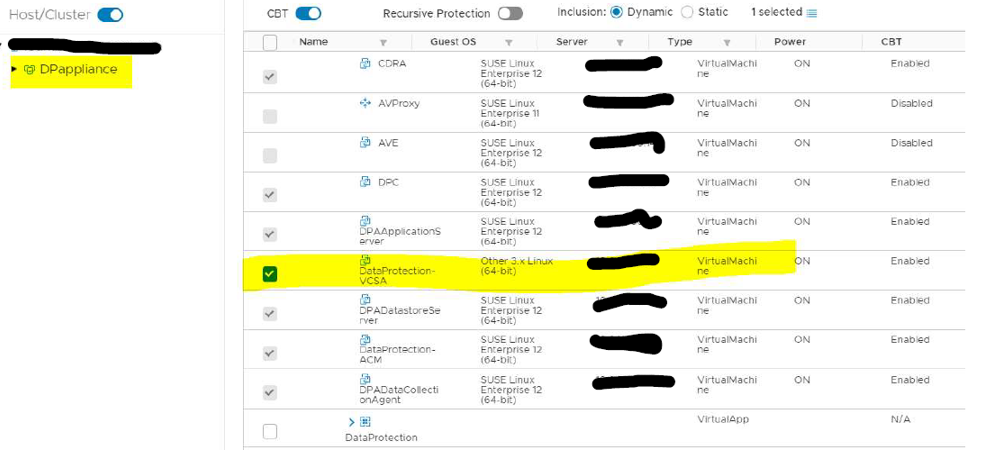
- Once that is done, Go IDPA Vcenter -> Go to Sub domain Virtual Machines.
- All the Virtual machines should be Enabled expect the old Vcenter VM i.e. DataProtection-VCSA.
- If the old vCenter (VCSA) VM is enabled, follow the steps below to retire the old vCenter (VCSA VM)

- Ensure no replication jobs are running on Avamar by reviewing the active/running sessions in the Activity tab. If no replication jobs are running, click on More Actions --> Retire this client.
- Select the default options and click on Submit.
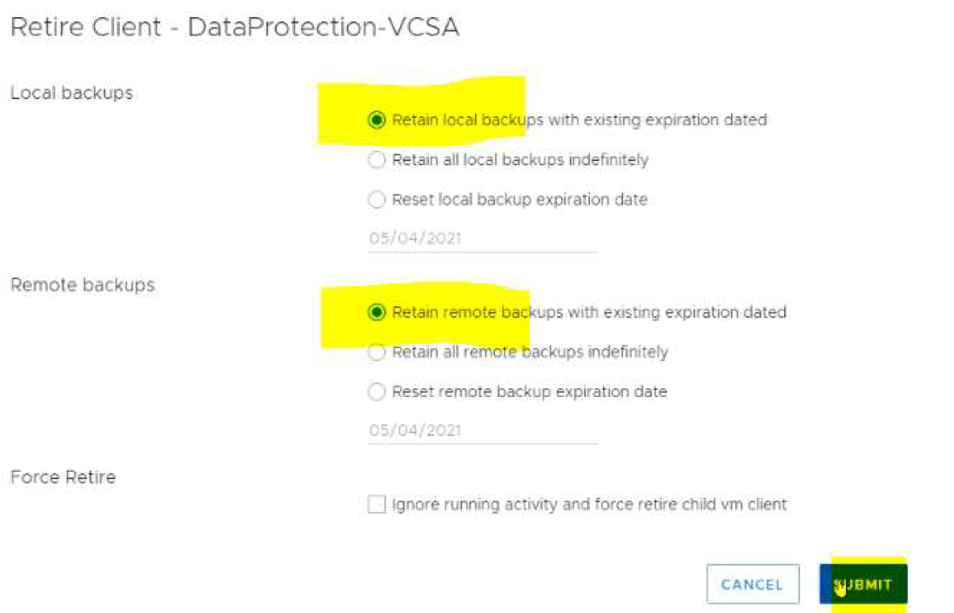
- If Replication is not running, the client would get retired from the domain.
- Traverse to the same Virtual Machine domain --> Add Client.
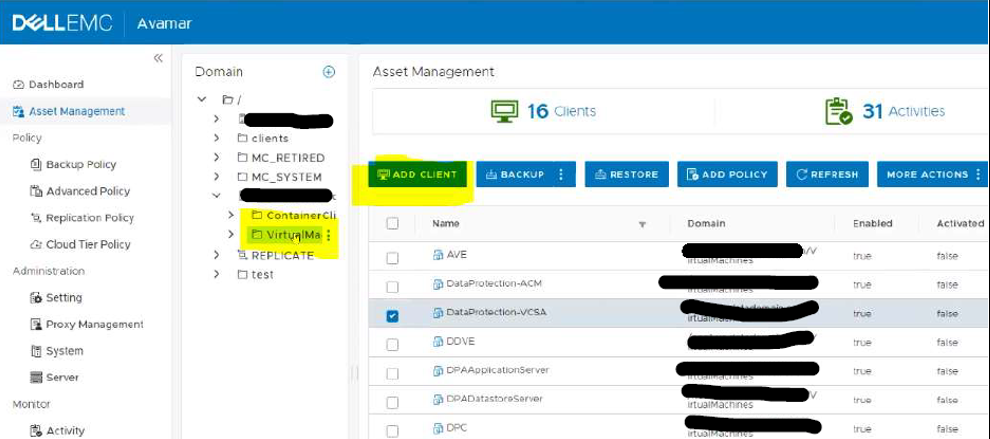
- Traverse to DPAppliance in the Client Add appear and browse for DataProtection-VCSA VM. Select the VCSA Client from the list and add it back. Click on Submit.
Scenario 6: All Internal VM Backups Failing due to M.2 SSD failure on DP4400 appliance
- Review the following Knowledge Base Article: KB 168746
Scenario 7: IDPA Internal VM backups failing with error 10058
- Review the following Knowledge Base Article: KB 182050
Scenario 8: IDPA Internal VM backups fail with error "avvcbimage Error <17782>: Snapshot cannot be performed because Host '<ESX_HOST_FQDN>' is disconnected".
- Review the following Knowledge Base Article: KB 166308
Scenario 9: IDPA Internal VM backups fail with "There are currently two usable fault domains. The operation requires one more usable fault domains."
- Review the following Knowledge Base Article: KB 000037917
- Review the following Knowledge Base Article: KB 000050824
Scenario 10: IDPA Internal VMs grayed out/disabled
Update IDPA vCenter in Avamar:
- Log in to Avamar AUI using the web browser
https://<AVAMAR-IP-ADDRESS-OR-FQDN>/aui - In the AUI navigation page Click >> and then, click Asset Management
- Click on vCenter --> Click on three dots --> Edit vCenter

- Traverse to VMware tab --> Update the password and confirm the password. Click on Update.

- Once the password has been updated, traverse to Sub domain Virtual Machines under the IDPA vCenter domain and verify the state of Virtual Machines.
- All the IDPA Internal Virtual Machines should be enabled/non-greyed out.
Additional Information
Appendix A
- How to redeploy IDPA Internal Proxy (AVProxy): KB 19136
Appendix B
1. Open the Avamar Java Console and login via MCUser. 2. Go to Navigation --> "Backup and Restore" tab. 3. On the upper left pane, select the IDPA vCenter and expand it. Select a Virtual Machines sub domain. 4. On the bottom left pane, select the Internal VM that we must recovery e.g "DataProtection-ACM" VM and verify if it has backups. 5. If the backups exist, choose the backup from the day before the issue. 6. Perform the restore for IDPA Internal VM: Method#1: Using Native Restore Method
a. From the Avamar Admin GUI, select the target Virtual machine and navigate to Restore Tab.
b. Select the appropriate backup that you would like to use for restore c. Select All virtual disk , right click and select RESTORE Now d. Select option Restore to a new VM and click on Configure Destination e. Under the new window, select the IDPA vCenter as Target vCenter and proceed with the Wizard f. Start the restore and your VM should be restored to the IDPA VC Environment. Note: Choose “<VM-OriginalName>-RESTORE” as the name for new restored VM in restore wizard. Method#2: Using Instant Access/Restore
a. From the Avamar Admin GUI, select the target Virtual machine and navigate to Restore Tab
b. Select the appropriate backup that you would like to use for restoring c. Select All virtual disk, right click and select INSTANT ACCESS d. You will be presented with a Wizard, click on Configure Destination, and select the IDPA vCenter as Target vCenter and proceed with the Wizard and perform the Restore e. Your Restored ACM Virtual Machine will be instantly accessible on the ESXi Host/vCenter UI. Note: If you need this machine, you can perform vMotion to your existing Datastore - Perform storage migration to DPappliance-datastore. f. Once done, right click on the machine and select Remove from Inventory (Do not delete the VM from Disk as this might delete the backup) g. Navigate back to the Avamar Admin GUI, under SERVER tab, select Data Domain NFS Datastores h. Click on the Datastore and click Unmount/Remove i. This will ensure a successful cleanup of the restore job 7. Login to the IDPA vCenter UI. 8. Gracefully shutdown the Original Corrupt IDPA VM. 9. Right Click on Original VM and click on Edit settings. 10. Under network adaptor --> Uncheck connected for all portgroups and save it. 11. Power on new Restored VM. 12. Open console for this VM and verify it boots up fine. Important Note: DO NOT DELETE ORIGINAL IDPA VM UNTIL WE ARE SURE THE NEW VM BOOTS UP FINE. KEEP OLD VM FOR ENGINEERING RCA IF REQUIRED. 13. If New restored IDPA VM works fine, rename original and suffix “-old” 14. Rename Restored IDPA VM to Original VM name. |
Follow the below KB Articles:
|
Article Properties
Affected Product
Integrated Data Protection Appliance Family
Product
PowerProtect DP4400, PowerProtect DP5300, PowerProtect DP5800, PowerProtect DP8300, PowerProtect DP8800, Integrated Data Protection Appliance Software, PowerProtect DP5900, PowerProtect DP8400, PowerProtect DP8900
Last Published Date
10 Oct 2023
Version
4
Article Type
How To