如何檢查 Dell Data Security 的原則更新
Сводка: 瞭解如何依照下列指示檢查 Dell Data Security 或 Dell Data Protection 軟體的原則更新。
Данная статья применяется к
Данная статья не применяется к
Эта статья не привязана к какому-либо конкретному продукту.
В этой статье указаны не все версии продуктов.
Инструкции
註:
- 截至 2021 年 2 月,Mac 版 Dell Encryption Enterprise 已達到維護結束的期限。Dell 已不再更新此產品及其文章。
- 截至 2022 年 5 月,Dell Endpoint Security Suite Enterprise 已達到維護結束的期限。Dell 已不再更新此產品及其文章。
- 截至 2019 年 1 月,Dell Endpoint Security Suite Pro 已達到維護結束的期限。Dell 已不再更新此產品及其文章。
- 如需更多資訊,請參閱 Dell Data Security 的產品生命週期 (支援結束及壽命結束) 政策。如果您對其他文章有任何疑問,請聯繫您的銷售團隊或聯繫 endpointsecurity@dell.com。
- 請參考端點安全性,以取得有關目前產品的其他資訊。
本文涵蓋如何使用 Dell Data Security (先前稱為 Dell Data Protection) 檢查政策更新。
受影響的產品:
- Dell Encryption Enterprise
- Dell Data Protection Enterprise Edition
- Dell Encryption Enterprise for Mac
- 適用於 Mac 的 Dell Data Protection Enterprise Edition
- Dell Encryption Enterprise Self-Encrypting Drive Manager
- Dell Data Protection 自我加密磁碟機管理員
- Dell Encryption External Media
- Dell Data Protection External Media Edition
- Dell BitLocker Manager
- Dell Data Protection BitLocker Manager
- Dell Endpoint Security Suite Pro
- Dell Data Protection Endpoint Security Suite
- Dell Endpoint Security Suite Enterprise
- Dell Data Protection Endpoint Security Suite Enterprise
- Dell Full Disk Encryption
受影響的作業系統:
- Windows
- Mac
檢查原則更新會根據使用中產品的作業系統而有所不同。按一下 Windows 或 Mac 以取得更多資訊。
Windows
以下項目之間的原則更新不同:
- Shield
- Dell Encryption Enterprise
- Dell Data Protection Enterprise Edition
- Dell Encryption External Media
- Dell Data Protection External Media Edition
- Encryption Management Agent (EMAgent)
- Dell Encryption Enterprise Self-Encrypting Drive Manager
- Dell Data Protection 自我加密磁碟機管理員
- Dell BitLocker Manager
- Dell Data Protection BitLocker Manager
- Dell Endpoint Security Suite Pro
- Dell Data Protection Endpoint Security Suite
- Dell Endpoint Security Suite Enterprise
- Dell Data Protection Endpoint Security Suite Enterprise
- Dell Full Disk Encryption
如需詳細資訊,請按一下 Shield 或 EMAgent 。
Shield
您可以使用 UI 或 登錄檢查原則更新。如需詳細資訊,請選取適當的選項。
UI
注意: 只有當端點原則包含 將顯示器本機加密處理控制 設定為 True 時,才能使用此選項。
- 登入 Windows 電腦。
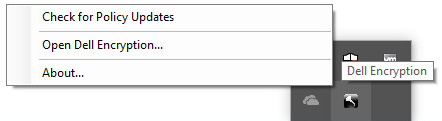
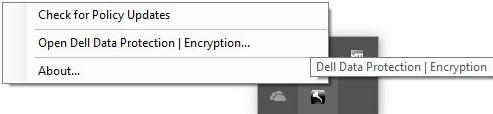
- 在 Windows 系統匣中,以滑鼠右鍵按一下 Dell Encryption (先前稱為 Dell Data Protection |加密) 圖示,然後選取 檢查原則更新。
下圖顯示 8.15.0 版及更新版本的 Dell Encryption 圖示。
下圖示例顯示 Dell Data Protection | 8.0.0 版至 8.13.0 版的加密圖示。
 注意: 為避免效能問題, 檢查原則更新 通訊僅限一分鐘。
登錄檔
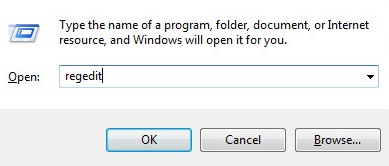
- 以滑鼠右鍵按一下 Windows 開始功能表,然後按一下執行。

- 在 「執行 」使用者介面 (UI) 中輸入 regedit ,然後按下 確定。這會開啟 Registry Editor。
- 在 Registry Editor 中,前往
HKEY_LOCAL_MACHINE\Software\Credant\CMGShield\Notify。 - 以滑鼠右鍵按一下通知資料夾,選取新增,然後按一下 DWORD (32 位元) 值。
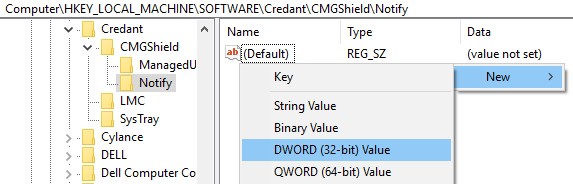
- 將 DWORD 命名為 PingProxy。

- 按兩下 PingProxy。
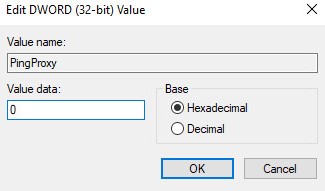
- 以 1 填 入值資料 ,然後按一下 確定。
 注意: 端點查詢伺服器後, PingProxy 值資料會恢復為 0。
EMAgent
- 登入 Windows 電腦。
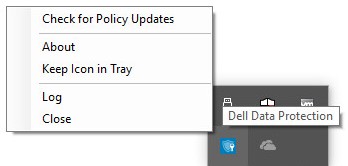
- 在 Windows 系統匣中,以滑鼠右鍵按一下 Dell Data Security (先前稱為 Dell Data Protection) 圖示,然後選取 檢查原則更新。
下圖顯示版本 8.15.0 及更新版本的 Dell Data Security 圖示。

下圖顯示 8.0.1 版至 8.13.0 版的 Dell Data Protection 圖示。
Mac
- 登入 Mac 電腦。
- 按一下系統偏好設定。

- 按兩下 Dell Encryption Enterprise (先前稱為 Dell Data Protection)。
下圖顯示 8.15.0 版及更新版本的 Dell Encryption Enterprise 圖示。

下圖顯示版本 8.0.0 至 8.13.2 的 Dell Data Protection 圖示。

- 按一下原則。

- 按一下接近視窗底部的「重新整理」按鈕。
 注意: 為避免效能問題,檢查原則更新通訊僅限一分鐘。
Дополнительная информация
Видео
Затронутые продукты
Dell EncryptionСвойства статьи
Номер статьи: 000126722
Тип статьи: How To
Последнее изменение: 13 июл. 2026
Версия: 11
Получите ответы на свои вопросы от других пользователей Dell
Услуги технической поддержки
Проверьте, распространяются ли на ваше устройство услуги технической поддержки.