如何为 Dell Data Security 检查策略更新
Сводка: 了解如何按照以下说明检查 Dell Data Security 或 Dell Data Protection 软件的策略更新。
Данная статья применяется к
Данная статья не применяется к
Эта статья не привязана к какому-либо конкретному продукту.
В этой статье указаны не все версии продуктов.
Инструкции
注:
- 从 2021 年 2 月起,Dell Encryption Enterprise for Mac 停止维护。戴尔不再更新本产品及其文章。
- 从 2022 年 5 月起,Dell Endpoint Security Suite Enterprise 停止维护。戴尔不再更新本产品及其文章。
- 从 2019 年 1 月起,Dell Endpoint Security Suite Pro 停止维护。戴尔不再更新本产品及其文章。
- 有关详细信息,请参阅 Dell Data Security 产品生命周期(结束支持和停售)政策。如果您对备用文章有任何疑问,请联系您的销售团队或联系 endpointsecurity@dell.com。
- 请参阅端点安全性,了解有关当前产品的其他信息。
本文介绍如何使用 Dell Data Security(以前称为 Dell Data Protection)检查策略更新。
受影响的产品:
- Dell Encryption Enterprise
- Dell Data Protection Enterprise Edition
- Dell Encryption Enterprise for Mac
- Dell Data Protection Enterprise Edition for Mac
- Dell Encryption Enterprise Self-Encrypting Drive Manager
- Dell Data Protection Self-Encrypting Drive Manager
- Dell Encryption External Media
- Dell Data Protection External Media Edition
- Dell BitLocker Manager
- Dell Data Protection BitLocker Manager
- Dell Endpoint Security Suite Pro
- Dell Data Protection Endpoint Security Suite
- Dell Endpoint Security Suite Enterprise
- Dell Data Protection Endpoint Security Suite Enterprise
- Dell Full Disk Encryption
受影响的操作系统:
- Windows
- Mac
策略更新检查因正在使用的产品的操作系统而异。单击 Windows 或 Mac 以了解更多信息。
Windows
策略更新在以下两个方面有所不同:
- 护罩
- Dell Encryption Enterprise
- Dell Data Protection Enterprise Edition
- Dell Encryption External Media
- Dell Data Protection External Media Edition
- 加密管理代理程序 (EMAgent)
- Dell Encryption Enterprise Self-Encrypting Drive Manager
- Dell Data Protection Self-Encrypting Drive Manager
- Dell BitLocker Manager
- Dell Data Protection BitLocker Manager
- Dell Endpoint Security Suite Pro
- Dell Data Protection Endpoint Security Suite
- Dell Endpoint Security Suite Enterprise
- Dell Data Protection Endpoint Security Suite Enterprise
- Dell Full Disk Encryption
护罩
可以使用 UI 或 注册表检查策略更新。选择相应的选项以了解更多信息。
UI
注意:仅当端点策略包括设置为 True的 Display Local Encryption Processing Control 时,此选项才可用。
- 登录 Windows 计算机。
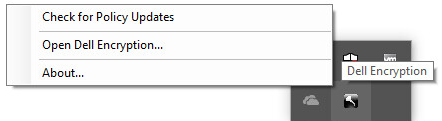
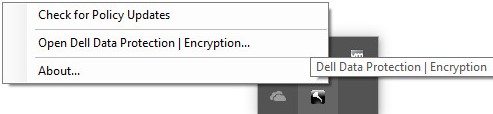
- 在 Windows 系统托盘中,右键单击 Dell Encryption (以前称为 Dell Data Protection |加密)图标,然后选择 检查策略更新。
下图示例显示了版本 8.15.0 及更高版本的 Dell Encryption 图标。
下图显示了 Dell Data Protection | 版本 8.0.0 到版本 8.13.0 的加密图标。
 注意: 为防止出现性能问题, 策略更新检查 通信限制为一分钟。
注册表
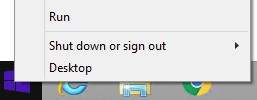
- 右键单击 Windows 的“开始”菜单,然后单击运行。
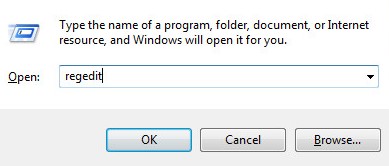
- 在 “运行” 用户界面 (UI) 中,键入 regedit ,然后按 确定。这将打开 注册表编辑器。
- 在 注册表编辑器中,转至
HKEY_LOCAL_MACHINE\Software\Credant\CMGShield\Notify。 - 右键单击 Notify 文件夹,选择新建,然后单击 DWORD(32 位)值。
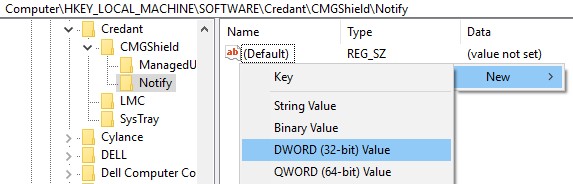
- 将 DWORD 命名 为 PingProxy。

- 双击 PingProxy。
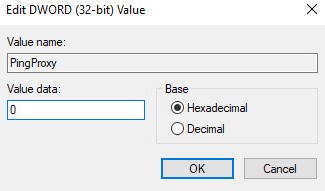
- 使用 1 填充 值数据 ,然后单击 确定。
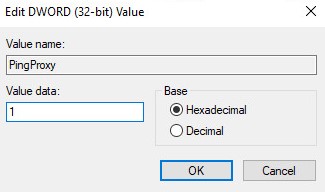 注意: 端点查询服务器后, PingProxy 值数据将恢复为 0。
EMAgent
- 登录 Windows 计算机。
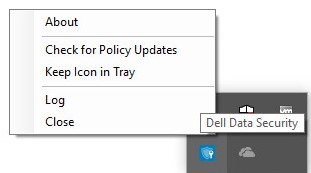
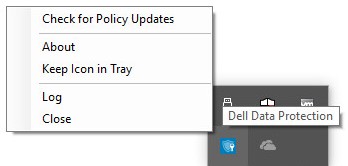
- 在 Windows 系统托盘中,右键单击 Dell Data Security (以前称为 Dell Data Protection)图标,然后选择 检查策略更新。
下图示例显示了版本 8.15.0 及更高版本的 Dell Data Security 图标。
下图示例显示了版本 8.0.1 到版本 8.13.0 的 Dell Data Protection 图标。
Mac
- 登录 Mac 计算机。
- 单击 System Preferences。

- 双击 Dell Encryption Enterprise (以前称为 Dell Data Protection)。
下图示例显示了版本 8.15.0 及更高版本的 Dell Encryption Enterprise 图标。

下图示例显示了版本 8.0.0 到版本 8.13.2 的 Dell Data Protection 图标。

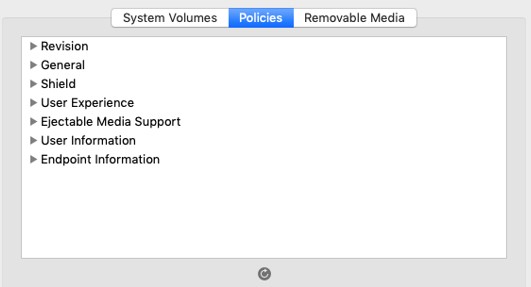
- 单击策略。

- 单击窗口底部附近的“Refresh”按钮。
 注意: 为防止出现性能问题,策略更新检查通信限制为一分钟。
Дополнительная информация
Видео
Затронутые продукты
Dell EncryptionСвойства статьи
Номер статьи: 000126722
Тип статьи: How To
Последнее изменение: 13 июл. 2026
Версия: 11
Получите ответы на свои вопросы от других пользователей Dell
Услуги технической поддержки
Проверьте, распространяются ли на ваше устройство услуги технической поддержки.