Connectrix: Brocade: CLI를 통해 LDAP 인증서를 스위치로 가져오는 방법
Summary: 이 문서에서는 CSR 생성, CSR 파일 내보내기 및 스위치 CLI를 통한 LDAP 인증서 가져오기와 관련된 단계에 대해 설명합니다.
This article applies to
This article does not apply to
This article is not tied to any specific product.
Not all product versions are identified in this article.
Instructions
1. 스위치에서 사용 가능한 인증서를 나열하려면 다음 명령을 사용합니다.
3. 다음 명령을 사용하여 스위치에서 CSR 파일을 내보냅니다. FTP 클라이언트를 전송할 준비가 되었는지 확인합니다.
4. CA(루트 및 중간) 번들 인증서를 가져옵니다.
5. 그런 다음 서버 역할에서 번들 인증서를 가져오고 4단계와 동일한 파일을 사용합니다.
6. 이전 단계에서 내보내고 인증서 관리자가 서명한 스위치/클라이언트 인증서를 가져옵니다.
>seccertmgmt show --all
Switch_1:FID128:admin> seccertmgmt show -all
ssh private key:
   Does not Exist
ssh public keys available for users:
   None
Certificate Files:
--------------------------------------------------------------------------------------------------------------------
Protocol   Client CA                 Server CA                 SW                        CSR     PVT Key Passphrase
--------------------------------------------------------------------------------------------------------------------
FCAP       Empty                     NA                        Empty                     Empty   Empty   Empty
RADIUS     Empty                     Empty                     Empty                     Empty   Empty   NA
LDAP       Empty                     Empty                     Empty                     Empty   Exist   NA
SYSLOG     Empty                     Empty                     Empty                     Exist   Exist   NA
HTTPS      NA                        Exist                     Exist                     Exist   Exist   NA
KAFKA      NA                        Empty                     NA                        NA      NA      NA
ASC        NA                        Empty                     NA                        NA      NA      NA
2. 다음을 사용하여 .csr(Certificate Signing Request)를 생성합니다.
>seccertmgmt generate -csr ldap생성된 파일 이름은 .csr 확장자로 끝나야 합니다.
3. 다음 명령을 사용하여 스위치에서 CSR 파일을 내보냅니다. FTP 클라이언트를 전송할 준비가 되었는지 확인합니다.
>seccertmgmt export -csr ldap -protocol ftp인증서 관리자가 CSR 파일에 서명하도록 합니다.
4. CA(루트 및 중간) 번들 인증서를 가져옵니다.
seccertmgmt import -ca -client ldap
Switch_1:admin> seccertmgmt import -ca -client ldap
Select protocol [ftp or scp]: ftp
Enter IP address: 10.xx.xx.xx
Enter remote directory: /CSR/LDAP
Enter certificate name (must have ".crt" or ".cer" or ".pem" suffix):chain.pem
Enter Login Name: _v800503
Enter Password:
Success: imported ldap client CA certificate [chain.pem].
5. 그런 다음 서버 역할에서 번들 인증서를 가져오고 4단계와 동일한 파일을 사용합니다.
seccertmgmt import -ca -server ldap
Switch_1:FID128:admin> seccertmgmt import -ca -server ldap
Select protocol [ftp or scp]: ftp
Enter IP address: 10.xx.xx.xx
Enter remote directory: /CSR/LDAP
Enter certificate name (must have ".crt" or ".cer" or ".pem" suffix):chain.pem
Enter Login Name: _v800503
Enter Password:
Success: imported ldap server CA certificate [chain.pem].
6. 이전 단계에서 내보내고 인증서 관리자가 서명한 스위치/클라이언트 인증서를 가져옵니다.
>seccertmgmt import -cert ldap
Switch_1:FID128:admin> seccertmgmtis  import -cert ldap
Select protocol [ftp or scp]: ftp
Enter IP address: 10.xx.xx.xx
Enter remote directory: /CSR/LDAP
Enter certificate name (must have ".crt" or ".cer" or ".pem" suffix):FCS50.pem
Enter Login Name: _v800503
Enter Password:
Success: imported ldap switch certificate [FCS50.pem].
Switch_1:FID128:admin> seccertmgmt show -all
ssh private key:
   Does not Exist

ssh public keys available for users:
   None

Certificate Files:
--------------------------------------------------------------------------------------------------------------------
Protocol   Client CA                 Server CA                 SW                        CSR     PVT Key Passphrase
--------------------------------------------------------------------------------------------------------------------
FCAP       Empty                     NA                        Empty                     Empty   Empty   Empty
RADIUS     Empty                     Empty                     Empty                     Empty   Empty   NA
LDAP       Exist                     Exist                     Exist                     Exist   Exist   NA
SYSLOG     Empty                     Empty                     Empty                     Exist   Exist   NA
HTTPS      NA                        Exist                     Exist                     Exist   Exist   NA
KAFKA      NA                        Empty                     NA                        NA      NA      NA
ASC        NA                        Empty                     NA                        NA      NA      NA
Additional Information
루트, 하위 및 중간 인증서를 번들에 연결하려면 다음 단계를 따르십시오.
1. .p7b 형식의 인증서를 다운로드합니다. 파일의 압축을 풀고 두 번 클릭하여 Windows 인증서 관리자로 엽니다.
본보기:

2. sub/int/root의 경우 마우스 오른쪽 버튼을 클릭하고 모든 작업, 내보내기 및 base-64로 인코딩된 파일을 하나씩 저장하고 파일을 .pem 형식으로 저장합니다.
메모장을 열고 sub / int / root의 내용을 복사하고 파일을 하나로 결합 / 체인 한 다음 먼저 sub, int 및 마지막으로 root를 사용하여 PEM으로 저장하고 UNIX EOL로 변경합니다.
본보기: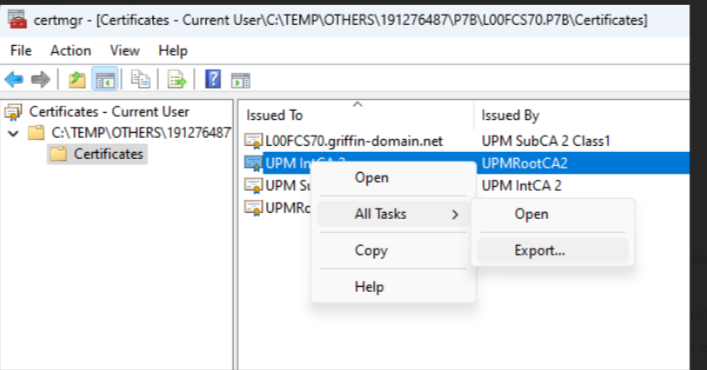
Affected Products
Connectrix B-SeriesProducts
Connectrix B-Series Fabric OS 9.X, Connectrix B-Series HardwareArticle Properties
Article Number: 000226132
Article Type: How To
Last Modified: 20 Jun 2024
Version: 1
Find answers to your questions from other Dell users
Support Services
Check if your device is covered by Support Services.