How to Modify Netskope Notifications
Summary: Learn how to modify Netskope notifications for Mac or Windows by following these instructions.
This article applies to
This article does not apply to
This article is not tied to any specific product.
Not all product versions are identified in this article.
Instructions
Several default templates are available for client notifications using Netskope. Notification templates can be modified to suit your needs. You can use the templates to customize different pages that are shown to users and upload your company logo, so that it appears on all notifications.
Affected Products:
- Netskope
Affected Operating Systems:
- Mac
- Windows
- In a web browser, go to the Netskope web console:
- United States Datacenter: https://[TENANT].goskope.com/
- European Union Datacenter: https://[TENANT].eu.goskope.com/
- Frankfurt Datacenter: https://[TENANT].de.goskope.com/
Note: [TENANT] = The tenant name in your environment - Log in to the Netskope web console.
- From the Netskope home screen, click Settings.

- From Settings, click Tools.

- From the Tools menu, click Templates.

- From the Templates page, click the template that you would like to edit.
To customize the logo, button, and notification templates, click the link for each item on this page.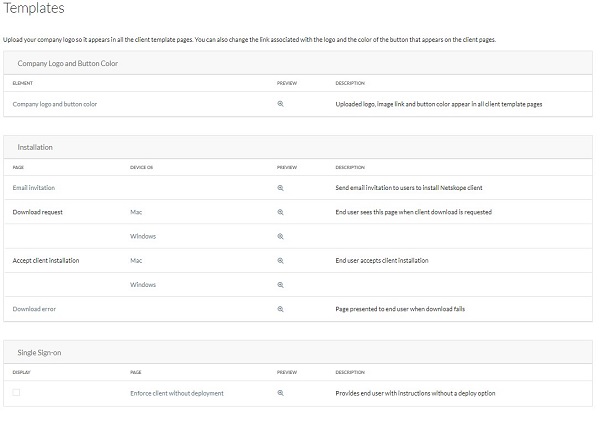
Note: To preview changes, click the magnifying glass icon in the Preview column.
For more information about notifications, click the appropriate option.
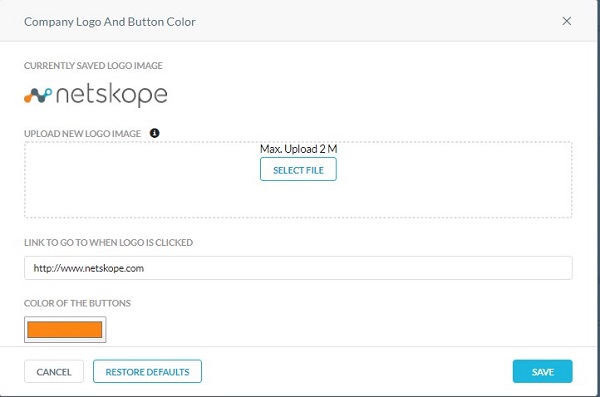
- From the Company Logo and Button Color page:
- Click Select File to upload a new logo.
- Optionally, populate the URL in the Link to go to When Logo is Clicked box.
- Optionally, click Color of the Buttons to select a custom color for email templates.
- Click Save.
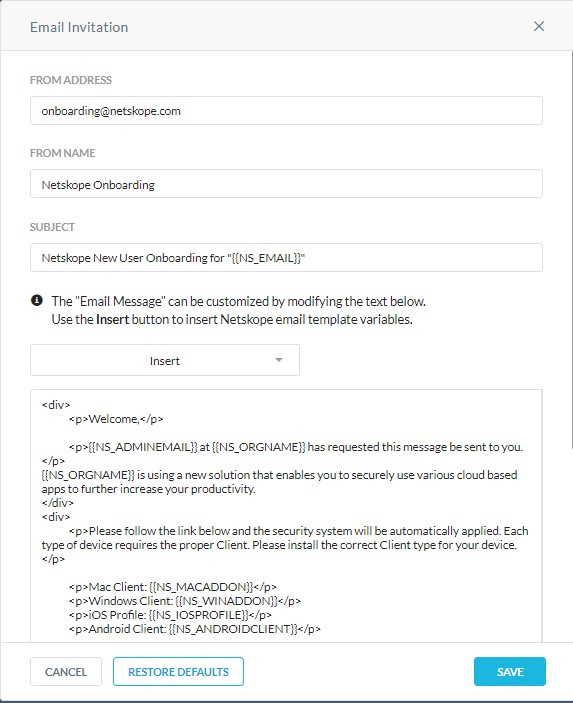
Use the default or customize the email invitations that are sent to users to install the Netskope client.
If the email link is not used to install the client within seven days of being received, or following a successful client install, the link expires. You cannot use the same link again. Contact your network administrator to resend the email invitation.
- From the Email Invitation page, you can customize multiple email invitation values:
- From Address
- From Name
- Subject
- HTML of the email body
 Note:
Note:- You can click the Insert drop-down menu to choose from preconfigured Netskope variables to further customize your email message.
- Netskope clients that are installed on Windows support the following HTML tags that can be used to compose notification messages.
- Underline text (
<u> </u>) - Bold text (
<b> </b>) - Italics text (
<i> </i>) - Hyperlink (
<a href></a>) - One level unordered bullet list (
<ul><li></li></ul>) - Line break (
<br>)
- Underline text (
- The example image message may differ in your environment.
You can configure a Download Request notification for Mac or Windows. Click the operating system to configure.
Mac
The end user sees this page when the client download is requested. Use the default or customize the verbiage in this page.
- From the Download Request - Mac page, you can customize the Heading and Instruction information that displays to the end user.
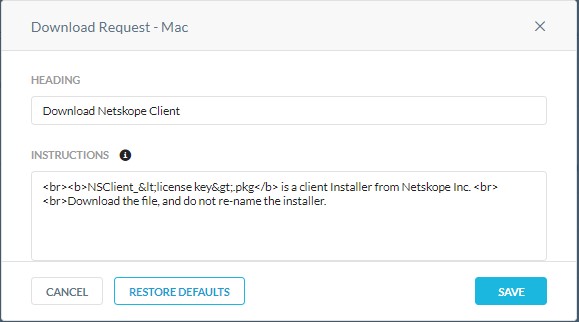
- Once completed, click Save.
 Note:
Note:- Netskope clients that are installed on Windows support the following HTML tags that can be used to compose notification messages.
- Underline text (
<u> </u>) - Bold text (
<b> </b>) - Italics text (
<i> </i>) - Hyperlink (
<a href></a>) - One level unordered bullet list (
<ul><li></li></ul>) - Line break (
<br>)
- Underline text (
- The example image message may differ in your environment.
- Netskope clients that are installed on Windows support the following HTML tags that can be used to compose notification messages.
Windows
The end user sees this page when the client download is requested. Use the default or customize the verbiage in this page.
- From the Download Request - Windows page, you can customize the Heading and Instruction information that displays to the end user.
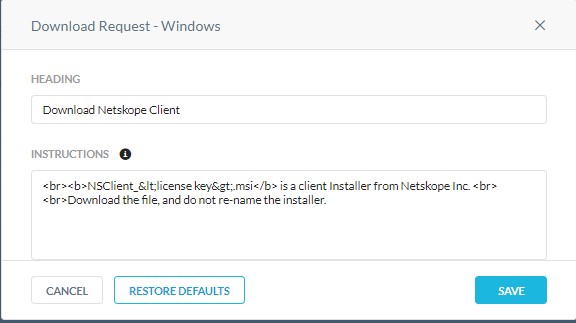
- Once completed, click Save.
 Note:
Note:- Netskope clients that are installed on Windows support the following HTML tags that can be used to compose notification messages.
- Underline text (
<u> </u>) - Bold text (
<b> </b>) - Italics text (
<i> </i>) - Hyperlink (
<a href></a>) - One level unordered bullet list (
<ul><li></li></ul>) - Line break (
<br>)
- Underline text (
- The example image message may differ in your environment.
- Netskope clients that are installed on Windows support the following HTML tags that can be used to compose notification messages.
You can configure an Accept Client Installation notification for Mac or Windows. Click the operating system to configure.
Mac
This page is shown when the end user accepts the client installation. You can use the default or customize this page.
- From the Accept Client Installation - Mac page, you can customize the Heading and Instruction information that displays to the end user.
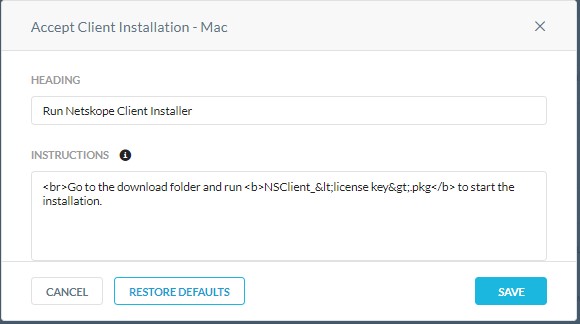
- Once completed, click Save.
 Note:
Note:- Netskope clients that are installed on Windows support the following HTML tags that can be used to compose notification messages.
- Underline text (
<u> </u>) - Bold text (
<b> </b>) - Italics text (
<i> </i>) - Hyperlink (
<a href></a>) - One level unordered bullet list (
<ul><li></li></ul>) - Line break (
<br>)
- Underline text (
- The example image message may differ in your environment.
- Netskope clients that are installed on Windows support the following HTML tags that can be used to compose notification messages.
Windows
This page is shown when the end user accepts the client installation. You can use the default or customize this page.
- From the Accept Client Installation - Windows page, you can customize the Heading and Instruction information that displays to the end user.
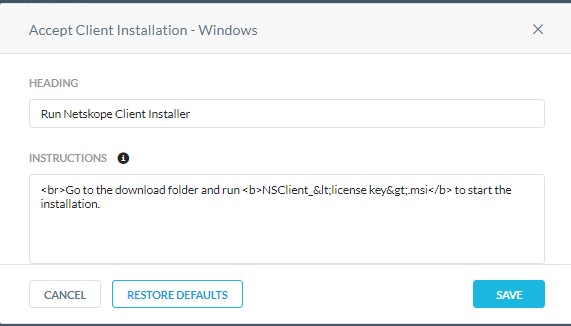
- Once completed, click Save.
 Note:
Note:- Netskope clients that are installed on Windows support the following HTML tags that can be used to compose notification messages.
- Underline text (
<u> </u>) - Bold text (
<b> </b>) - Italics text (
<i> </i>) - Hyperlink (
<a href></a>) - One level unordered bullet list (
<ul><li></li></ul>) - Line break (
<br>)
- Underline text (
- The example image message may differ in your environment.
- Netskope clients that are installed on Windows support the following HTML tags that can be used to compose notification messages.
This page is shown to the end user when the client download fails.
- From the Download Error page, you can customize the Heading and Instruction information that displays to the end user.
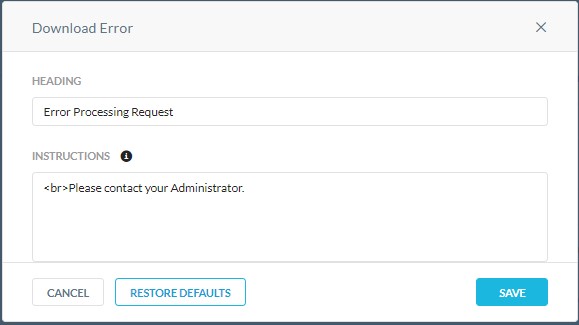
- Once completed, click Save.
 Note:
Note:- Netskope clients that are installed on Windows support the following HTML tags that can be used to compose notification messages.
- Underline text (
<u> </u>) - Bold text (
<b> </b>) - Italics text (
<i> </i>) - Hyperlink (
<a href></a>) - One level unordered bullet list (
<ul><li></li></ul>) - Line break (
<br>)
- Underline text (
- The example image message may differ in your environment.
- Netskope clients that are installed on Windows support the following HTML tags that can be used to compose notification messages.
The following template is available for Client enforcement using single sign-on.
Client enforcement allows administrators to implement cloud security by making sure that the user traffic is always steered through Netskope. The administrator can implement client enforcement by integrating with the single sign-on solutions or using Netskope as the SAML proxy.
By default, when you are enforcing client, users are automatically redirected to the download page to download and install the client.
However, you can choose to show a custom page to users to provide more information about the company security policy without redirecting to the download page.
- From the Enforce Client Without Deployment Option page, you can customize the Heading and Instruction information that displays to the end user.
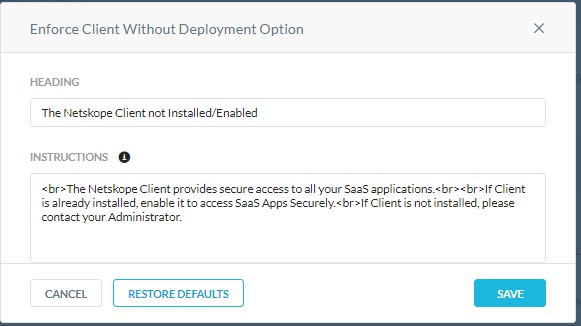
- Once completed, click Save.
 Note:
Note:- Netskope clients that are installed on Windows support the following HTML tags that can be used to compose notification messages.
- Underline text (
<u> </u>) - Bold text (
<b> </b>) - Italics text (
<i> </i>) - Hyperlink (
<a href></a>) - One level unordered bullet list (
<ul><li></li></ul>) - Line break (
<br>)
- Underline text (
- The example image message may differ in your environment.
- Netskope clients that are installed on Windows support the following HTML tags that can be used to compose notification messages.
To contact support, reference Dell Data Security International Support Phone Numbers.
Go to TechDirect to generate a technical support request online.
For additional insights and resources, join the Dell Security Community Forum.
Affected Products
NetskopeArticle Properties
Article Number: 000130786
Article Type: How To
Last Modified: 04 Nov 2024
Version: 12
Find answers to your questions from other Dell users
Support Services
Check if your device is covered by Support Services.