Dell Data Protection Virtual Edition Fails to Update with an SSL Error
Summary: An error appears with the message "WGET error: Code 5, Description: SSL verification failure", when attempting to update Dell Data Protection | Virtual Edition.
Symptoms
Affected Products:
- Dell Data Protection | Virtual Edition
Affected Versions:
- v9.10 and Earlier
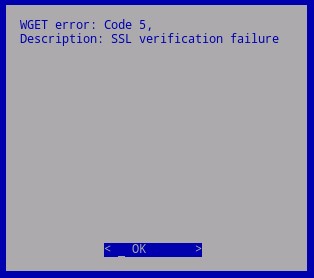
Figure 1: (English Only) WGET error: Code 5
Due to a change in certificate handling, the industry deprecation of SHA1 certificates, Dell was required to update to SHA256 certificates on the servers hosting the Dell Data Protection | Virtual Edition updates. Certificates that get signed by these new authorities but not recognized by the operating system that lies underneath Dell Data Protection | Virtual Edition. The local certificate store that holds validated and trusted root authorities must be updated to support these new signing authorities.
Other changes to the underlying operating system’s package update repositories also require that these repositories be updated before the local certificate store can be updated.
Cause
Not Applicable
Resolution
To update the certificate store:
- Log in to the Dell Enterprise Server Virtual administration console.

Figure 2: (English Only) Login to the administration console
- The default credentials for Dell Data Protection Enterprise Server Virtual Edition are:
- Username:
ddpuser - Password:
ddpuser
- Username:
- An administrator can change the default password within the product’s virtual appliance menu.
For information about enabling SSH, reference How to Enable SSH in Dell Security Management Server Virtual / Dell Data Protection Virtual Edition.
- From the Main Menu, select Launch Shell and then press Enter.
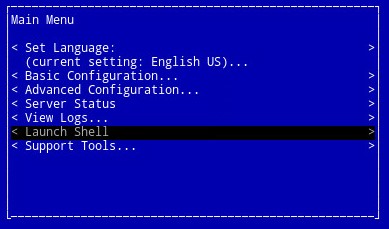
Figure 3: (English Only) Launch Shell
- Type
su ddpsupportand then press Enter.

Figure 4: (English Only) Type su ddpsupport
- Type the password for
ddpsupportand then press Enter.

Figure 5: (English Only) Type the password for ddpsupport
- The default credentials for Dell Data Protection Enterprise Server Virtual Edition are:
- Username:
ddpsupport - Password:
ddpsupport
- Username:
- An administrator can change the default password within the product’s virtual appliance menu.
- Rename the existing sources files by running the command:
sudo mv /etc/apt/sources.list /etc/apt/sources.list.bak
- Generate a new sources.list file and open it with the command:
sudo nano /etc/apt/sources.list
- Copy and paste the repositories below into the new file:
deb http://old-releases.ubuntu.com/ubuntu precise main restricted universe multiverse
deb-src http://old-releases.ubuntu.com/ubuntu precise main restricted universe multiverse
deb http://old-releases.ubuntu.com/ubuntu precise-updates main restricted universe multiverse
deb-src http://old-releases.ubuntu.com/ubuntu precise-updates main restricted universe multiverse
- The resulting output should look like:

Figure 6: (English Only) Resulting Output of adding repositories
- Save and close the file by holding Left CTRL and pressing X.
- A prompt appears to confirm the changes, press Y to confirm.

Figure 7: (English Only) Save and close the file
- Press Enter to confirm the file name.

Figure 8: (English Only) Confirm the file name
- Update the operating system, and ensure that the latest certificates are present by typing running the following command.
sudo apt-get update && sudo apt-get upgrade -y && sudo apt-get install --only-upgrade ca-certificates -y

Figure 9: (English Only) Type sudo apt-get update && sudo apt-get upgrade -y && sudo apt-get install --only-upgrade ca-certificates -y
sudo apt-get updateand then press Enter.sudo apt-get install --only-upgrade ca-certificates and then press Enter
- Several lines of data appear, until done, is displayed twice, and the context to
ddpsupportis presented again.
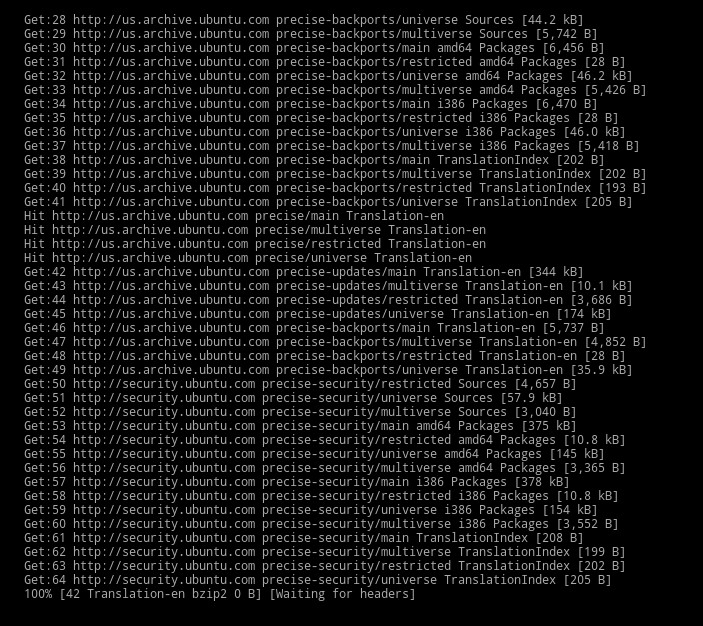
Figure 10: (English Only) Several lines of data appear

Figure 11: (English Only) Wait for done to be displayed twice
- Type
exitand then press Enter to log out ofddpsupport.

Figure 12: (English Only) Type exit
- Type
exitand then press Enter to log out of the shell to the UI.

Figure 13: (English Only) Type exit
- The update now runs successfully.
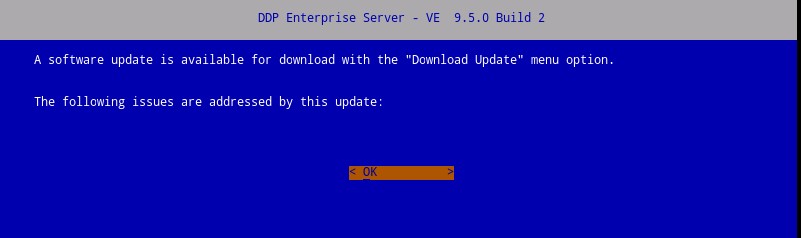
Figure 14: (English Only) Dell Enterprise Server update
To contact support, reference Dell Data Security International Support Phone Numbers.
Go to TechDirect to generate a technical support request online.
For additional insights and resources, join the Dell Security Community Forum.