Resolving a Windows 10 1903 Install Error on Dell AMD RAID and AMD Ryzen Systems
Summary: Information about a Windows 10 1903 update error on Dell systems using the AMD Ryzen CPU
This article applies to
This article does not apply to
This article is not tied to any specific product.
Not all product versions are identified in this article.
Symptoms
AMD RAID and AMD Ryzen Windows 10 1903 Install Error.
Are you experiencing an issue when attempting to update to Windows 10 1903, and your system is using the AMD Ryzen or AMD Ryzen Threadripper configured in SATA or NVMe RAID Mode?
Troubleshooting has identified that Toshiba SSDs use the backbone of AMD processors for their Chipsets and this is causing this update issue.
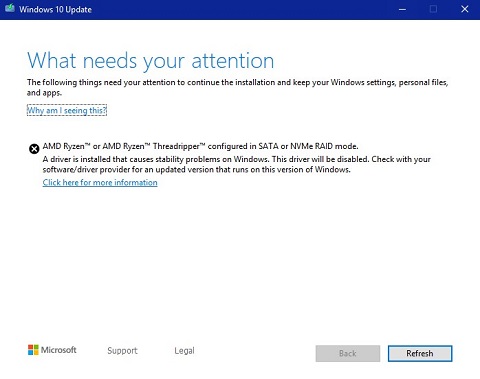
(Figure.1 AMD Ryzen or AMD Ryzen Threadripper configured in SATA or NVMe RAID mode.)
Cause
Affected Systems
- Any Dell System using the AMD Ryzen CPU and Windows 10
Resolution
Our engineers have identified that this issue can be resolved by one of the following three methods:
Ensure that your BIOS is properly configured:
Note: If you must change any of these settings, first go back to the operating system, and backup anything you cannot afford to lose. Modification of Boot Mode and SATA Operation mode can potentially lead to a No Boot.
-
BIOS Settings:
-
General -> Boot Sequence: Set to UEFI
-
General -> Advanced Boot Options: Clear Enable Legacy Option ROMs
-
System Configuration -> SATA Operation: Set to RAID and RAID On
-
Apply and then Exit
-
Update the AMD driver from the AMD website:
-
Go to the AMD RAID Driver
.
-
Go to the option that is titled: AMD RAID Installer (SATA, NVMe RAID) and download the file to your computer, and then install it. This driver requires a reboot, and then you can retry the Windows 10 update.
-
Carry out a clean install of Windows 10 1903 using the Microsoft Media Creation Tool:
-
Get Windows 10 Install Media:
-
Download the Microsoft Media Creation Tool from the following link: Microsoft - Create Windows 10 installation media
-
Click on Download Tool Now to download the Microsoft Media Creation Too
-
Run the tool (if saving, do not save it to the USB you are formatting)
-
Click Accept
-
Select the option Create installation media (USB flash drive, DVD, or ISO file) for another personal computer
-
Ensure that Language, Edition, and Architecture match with what was sold on the system
-
Select USB Flash Drive
-
Select the drive
-
The media should then download and start burning automatically
-
Ensure that the Finish button is clicked at the end
-
Safely eject the USB
-
-
Reinstalling the Operating System:
-
Insert the Windows 10 Boot USB
-
Power up the system while tapping F12 on the keyboard
-
Select the USB UEFI option
-
Ensure Language, Time/Currency, and Keyboard Input are all correct for your region
-
Click Install Now
-
Select I do not have a product key (this is loaded in later)
-
Select Custom: Install Windows only (advanced)
-
Select the partitions one at a time and select the Delete option
Note: If there are multiple drives in the system, ensure that only the operating system drive is cleared (typically Drive 0). -
Once the Drive shows only Unallocated Space, select Next and let the installation begin
-
Article Properties
Article Number: 000134519
Article Type: Solution
Last Modified: 30 Apr 2026
Version: 8
Find answers to your questions from other Dell users
Support Services
Check if your device is covered by Support Services.