PowerFlex 4.x How to replace NVMe RDM in HCI node
Summary: This article explains step by step how to do an NVMe device replacement and do the RDM config in the SVM to be correctly mapped to the ESXi host
Instructions
Steps
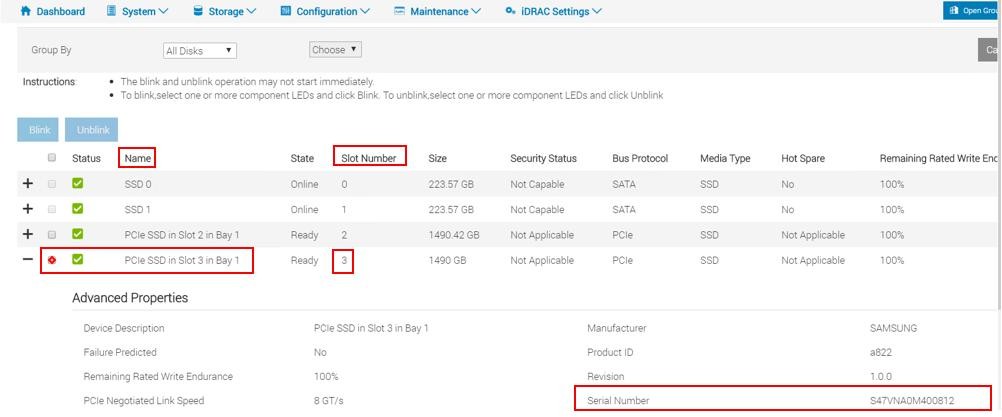
1- Locate the drive's properties
Use the iDRAC utility to gather information about the NVMe drive.
- From your Internet browser, go to http://<iDRAC_IP_address>.
- In the DELL Console Login window, enter the user name and password, and then click Login. The Integrated Dell Remote Access Controller screen appears.
- In the navigation pane, select Storage >Overview, and then click Physical Disks. iDRAC displays the list of physical drives installed on the server.
- In the Status column, search for the drive with the Failed state.
- Record the drive's Name, Slot number, and serial number in the NVMe information table in the
Drive name, Drive slot, and Drive serial number rows.
2- Gather SDS information on a hyperconverged node
Use the PowerFlex Manager Platform (PFMP) to gather information about the PowerFlex SDS with the faulty NVMe drive on a hyperconverged node.
- In your web browser, enter the PFMP IP address and log in as an admin user.
- click Block > SDSs. and select the impacted SDS node with a faulty NVMe
- In the right pane, click Devices under the selected SDS

- Note down the faulty device path and SP name
For example
SSD => /dev/sdX
NVMe => /dev/nvmeXn1 -
For a device encrypted with CloudLink, the device path appears as:
SSD => /dev/mapper/svm_sdX
NVMe => /dev/mapper/nvmeXn1 - Connect to the ESXi host using SSH
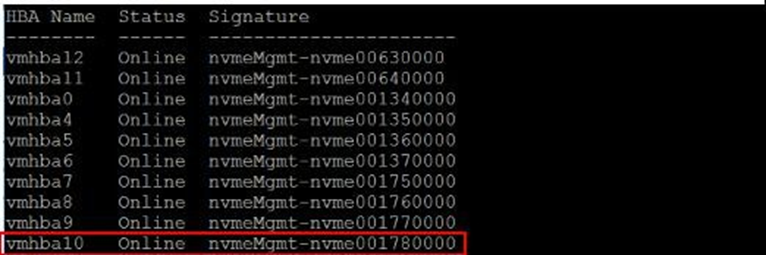
- Run the following command to find the name of the faulty device:
esxcli nvme device listOutput similar to the following is displayed:
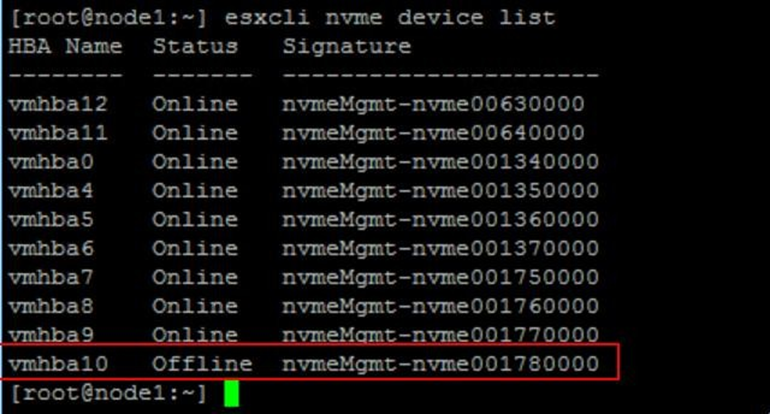
-
The faulty device is displayed as Offline in the device list's Status column.
Note down the device name ex: vmhba10 - Locate the adapter for the device vmhbaX and find the serial number:
For example:esxcli nvme device get -A vmhbaX | grep -i serialesxcli nvme device get -A vmhba10 | grep -i serialThe output displays the drive's details, including the serial number.

3- Remove the faulty NVMe drive from PowerFlex on a hyperconverged node
- Log in to the PFMP if you have not already done so.
- In the PFMPGUI left pane, click Block >SDSs > list the SDS devices from the devices hyperlink on the right chart
- Select the check box for the failed device. Ensure that the storage device you select is the same device you noted down in step 2
-
In the upper menu, click More Actions > Remove.
-
In the Remove Device dialog box, click Remove to confirm.
- If the faulted drive is encrypted using CloudLink, unencrypt the device or else skip this step if CloudLink is not used:
- Connect to the node using SSH.
- Run the following command:
- If the faulted drive is encrypted using CloudLink, unencrypt the device or else skip this step if CloudLink is not used:
-
svm -y erase /dev/nvmeXn1
Where X is the numeric drive identifier
4- Remove the RDM for the faulty device from the SVM
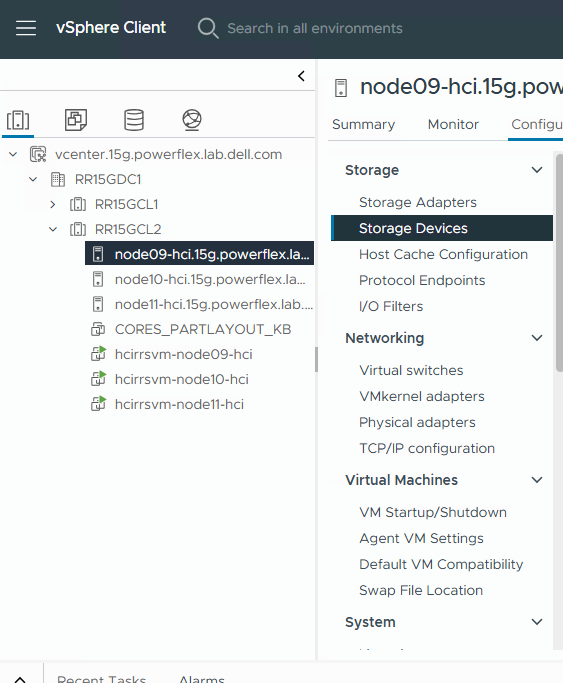
- Log back in to vCenter.
- In the Inventories pane, select Hosts and Clusters.
- In the navigation pane, select the impacted ESXi HCI server.
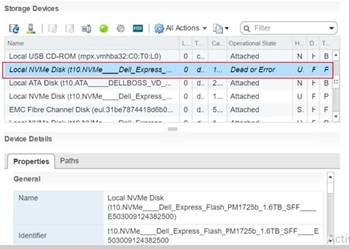
- In the Configure tab, select the Storage >Storage Devices to view the storage devices on the host.
- Find the NVMe device with an operational state of Dead or Error. (For details, see "Correlate the device slot and OS path on an ESXi server", below.
- In the Device Details >Properties tab, find the device's PowerFlex drive name and NVMe identifier and write them down.
-
In the navigation pane, right-click the SVM located on the impacted HCI ESXi host and select Edit Settings.
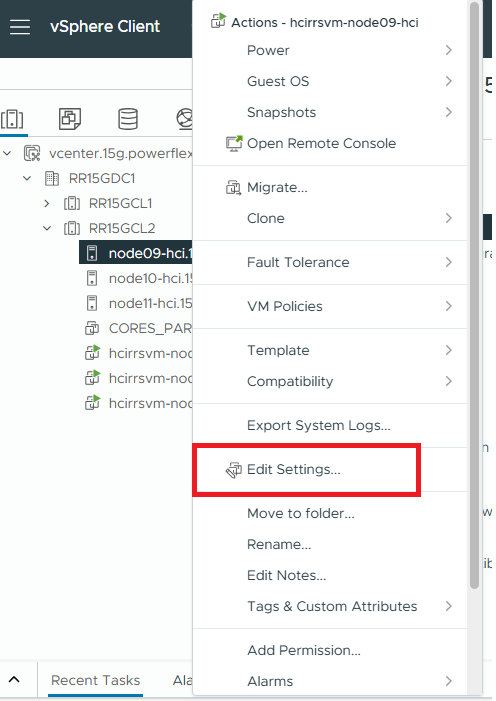
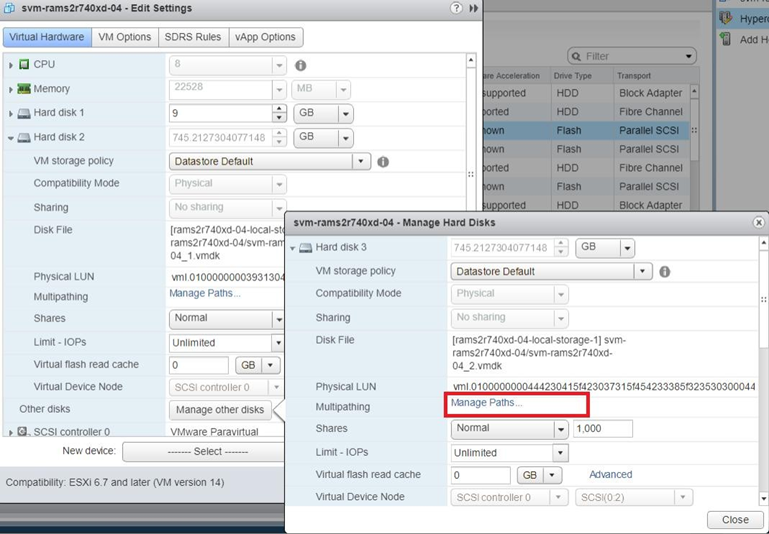
In the Edit Settings window, the Virtual Hardware tab is displayed. The SVM details include the hard drives. Every hard drive that is dimmed is an RDM device.
- Expand the properties for each RDM.
In the Physical LUN field, look for the NVMe device's identifier value you obtained in a previous step.

-
If the identifier value is displayed as part of the Physical LUN value, this is the faulty device. Otherwise, select Manage other disks to view the other hard drives on the SVM and check their Physical LUN value, and click Manage Path to identify the faulty device.
-
When you have identified the hard drive with the faulty device using its physical LUN value, click the X to the right of the hard drive to remove the device.
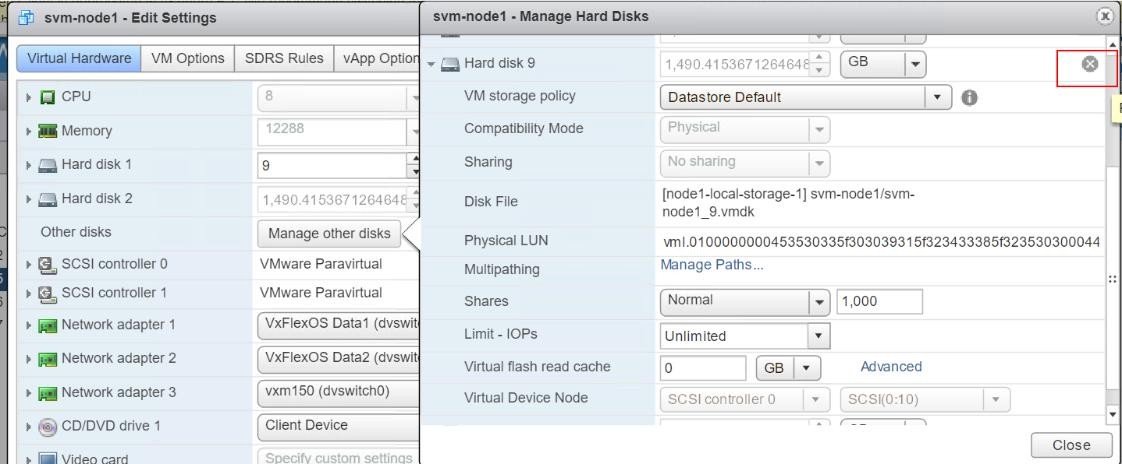
Select Delete files from datastore, and then click Close.

5- Physically replace the faulty NVMe Disk with the new healthy one
Stop NVMe device activities on a PowerFlex node
- Log in to iDRAC.
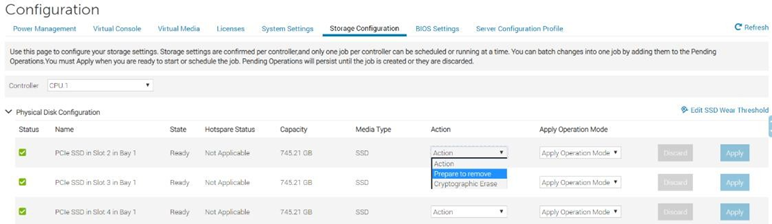
- On the main menu, select Configuration > Storage Configuration.
- In the Controller field, select the appropriate controller from the list according to the server model:
- PowerFlex R650 node: CPU
- PowerFlex R750 node: PCIe Extender
- PowerFlex R6525 node: PCIe Extender

- A new page opens with a list of physical drives associated with that controller.
- Select the physical drive that needs to be replaced, and then click Prepare to Remove >Apply Now.
You can now physically remove the faulted NVMe device from the server.
6- Prepare the NVMe device and add it to the PowerFlex system on an ESXi server
Use the following task to prepare the NVMe device for use and add it to the PowerFlex system by correlating the device slot and the operating path on an ESXi-based server.
- From your Internet browser, go to http://<iDRAC_IP_address>.
- In the DELL Console Login window, type the username and password, and then click Login.
- From the main menu, select Storage >Overview, and then click Physical Disks. iDRAC displays the list of physical drives installed on the server.
- Locate the row with the slot number that matches the slot for the drive you just replaced.
- Click the plus sign in the left column to display the drive's Advanced Properties.
- Search for the serial number of the new drive and write it down. For example: 50000396DC89A872.
NOTE: If iDRAC does not display the drive's serial number, the replacement drive may be installed improperly.
- Log in to the SVM using SSH.
- Run the following command to check the operating system device path:
ls -l /dev/disk/by-id/
Output similar to the following is displayed:
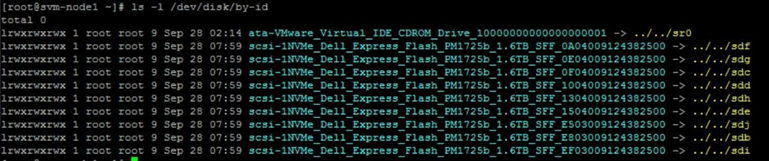
- Locate the line with sdX at the end and write down the SFFxxxxx number.
- Run the following command to check the status of the replacement device.
esxcli nvme device listOutput similar to the following is displayed:
- (Optional ) Run the following command to check the firmware version of the replacement device:
esxcli nvme device get -A vmhbaX | grep -i RevisionWhere vmhbaX is the name of the new NVMe device.
For example, for the replacement device shown in the image in the previous step, the command is:
esxcli nvme device get -A vmhba10 | grep -i RevisionOutput similar to the following appears, with the actual firmware version:
Verify whether the firmware version is in compliance with RCM or IC
- Locate the adapter for the device vmhbaX and find the serial number :
esxcli nvme device get -A vmhbaX | grep -i serialFor example:
esxcli nvme device get -A vmhba10 | grep -i serialThe output displays the drive's details, including the serial number.
 |
7- (Optional) Encrypt the new NVMe device on the PowerFlex node , skip this step if not using Cloudlink
If the NVMe drive you replaced was encrypted using CloudLink, perform the following steps to encrypt the new NVMe drive. If the faulty drive was not encrypted, skip this task.
- Connect to the SDS node using SSH.
- Run this command to encrypt the new drive:
svm encrypt /dev/nvme<xxx>where nvme<xxx> is the name of the device you just replaced. For example:
svm encrypt /dev/nvmeXn1After about 60 seconds, the new device will be encrypted.
- Run the following command to verify the new device location:
svm statusOutput similar to the following should be displayed:
State: Connected (server 192.168.150.32)
Group: MG-12 Policy: Manual
AES-NI HW acceleration: Yes
Volumes:
/             unencrypted
/home         unencrypted


Devices:
/dev/nvme0n1    encrypted       (sds	SN:9486948577248625  /dev/mapper/svm_nvme0n1)
/dev/nvme10n1	encrypted	(sds	SN:948694857725248625/dev/mapper/svm_nvme10n1)
/dev/nvme11n1	encrypted	(sds	SN:948694857725258625/dev/mapper/svm_nvme11n1)
/dev/nvme12n1	encrypted	(raw	SN:948694857725268625/dev/mapper/svm_nvme12n1)
/dev/nvme13n1	encrypted	(raw	SN:948694857725278625/dev/mapper/svm_nvme13n1)
/dev/nvme14n1	encrypted	(raw	SN:948694857725288625/dev/mapper/svm_nvme14n1)
/dev/nvme15n1	encrypted	(raw	SN:948694857725298625/dev/mapper/svm_nvme15n1)
/dev/nvme16n1	encrypted	(raw	SN:948694857725308625/dev/mapper/svm_nvme16n1)
/dev/nvme17n1	encrypted	(raw	SN:948694857725318625/dev/mapper/svm_nvme17n1)
- Locate the /dev/nvmeX device and ensure it is encrypted, and then record its new device path in the drive information table.
For example:
/dev/mapper/svm_nvme17n1
8-Add the device to the PowerFlex system on a hyperconverged node
Map the new NVMe as an RDM to an SVM, and then add it to the PowerFlex system.
- Open an SSH session to the impacted HCI ESX host.
- List the disks that are attached to the ESXi host, using the command:
# ls -l /vmfs/devices/disks- From the list, identify the local device you want to configure as an RDM and copy the device name.
Note: The device name will likely be prefixed with t10. And look similar to : t10.F405E46494C4540046F455B64787D285941707D203F45765 - To configure the device as an RDM and output the RDM pointer file to your chosen destination, run the command:
# vmkfstools -z /vmfs/devices/disks/ /vmfs/volumes///_x.vmdkFor Example:
# vmkfstools -z /vmfs/devices/disks/t10.F405E46494C4540046F455B64787D285941707D203F45765 /vmfs/volumes/Datastore2/SVM-1/svm-1_1.vmdkNote: The size of the newly created RDM pointer file appears to be the same size as the Raw Device it is mapped to; this is a dummy file and is not consuming any storage space.
- When you have created the RDM pointer file, attach the RDM to a virtual machine using the vSphere Client:
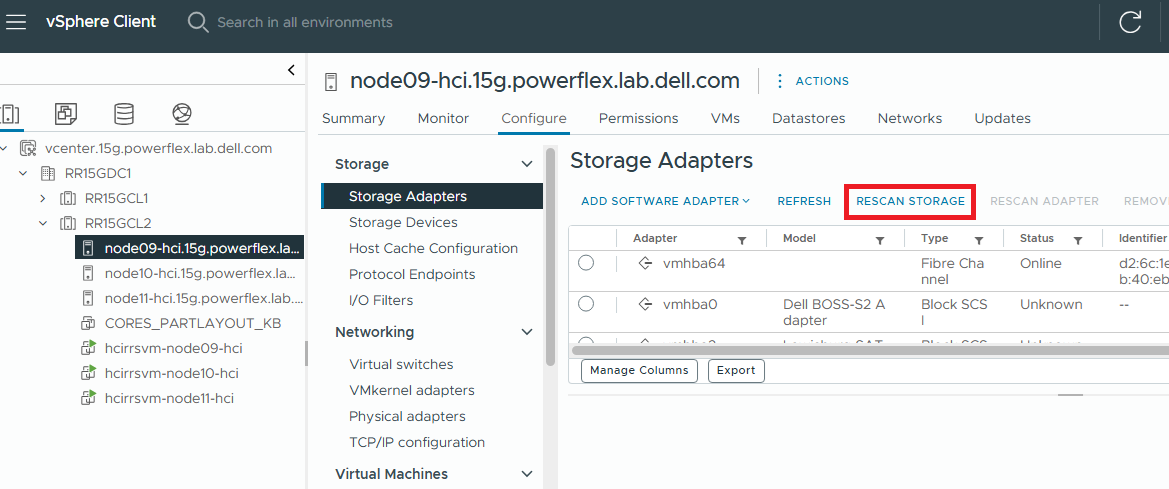
- From the vSphere client, rescan the ESXi storage to expose the added device.
- Select the impacted HCI ESXi host > Storage Adapters > RESCAN STORAGE
- Right-click the SVM located on the impacted HCI ESXi host and select Edit Settings.
- From the top right, select ADD NEW DEVICE > Existing Hard Disk
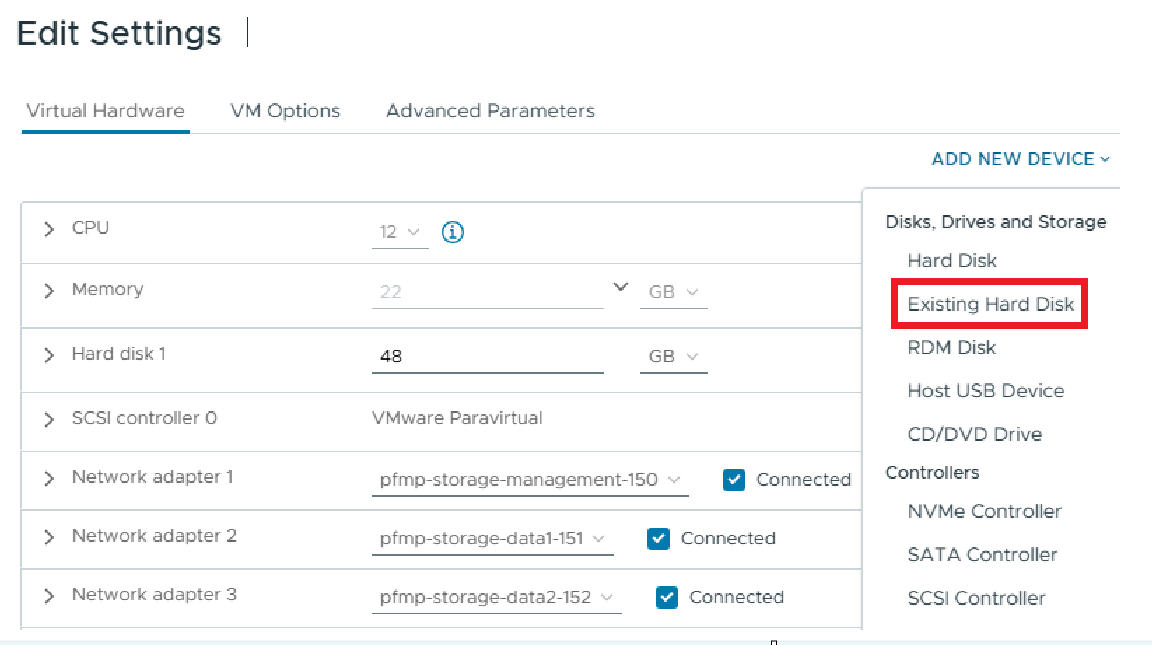
- Select Hard Disk.
- Select Use an existing virtual disk.
- Browse to the directory that you saved the RDM pointer to in step 4 and select the RDM pointer file, and click Next.
- Choose the virtual SCSI controller that you want to attach the disk to and click Next.
- Click Finish.
You should now see your new hard disk in the virtual machine inventory as Mapped Raw LUN