Integrated Data Protection Appliance: How to change DNS entries in a deployed IDPA
Summary: This KB article provides the procedure for changing DNS servers in a deployed Integrated Data Protection Appliance (IDPA).
This article applies to
This article does not apply to
This article is not tied to any specific product.
Not all product versions are identified in this article.
Instructions
Procedure for updating DNS servers in a deployed Integrated Data Protection Appliance (IDPA) for version 2.6.1 and below: (see end of article for 2.7.0 and above)
Old entry:
Nameserver 10.2XX.XX.23
New Entry:
Nameserver 10.2XX.XX.24
Updating DNS Setting in IDPA 2.7.0 and above:
Starting with 2.7.0, the ACM now includes an automated process to update DNS Setting on all IDPA components.


Monitor progress, if successful, you are done. Nothing else to do.
- Ensure that the new DNS has the same hostname to IP mapping as the previous DNS. Verify the hostname in the Active Directory (AD).
- Verify that the reverse and forward lookup is working for new DNS.
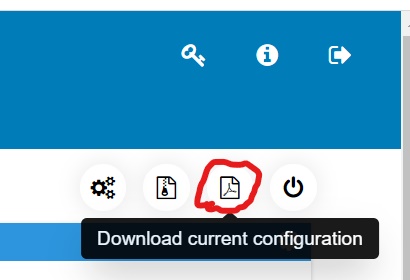
- Download the DataProtectionConfig.pdf as per the below screenshot from the ACM UI to get all the needed VM s IP addresses.
- Follow the below steps on all VMs other than Data Domain, ESXi, and vCenter:
- SSH to every VM using PuTTY
- Edit the resolv.conf file to reflect the new IP of the DNS.
cd /etc/
vi resolv.conf
For example:
Old entry:
Nameserver 10.2XX.XX.23
New Entry:
Nameserver 10.2XX.XX.24
- For changing Cloud Disaster Recovery Add-On (CDRA) VM, DNS servers, see KB article 542912: Cloud DR - How to change the DNS servers on-premise Cloud Disaster Recovery Add-On (CDRA)
- For Data Domain, follow the below steps to update the DNS entries:
- SSH to Data Domain using sysadmin credentials.
- Run command:
net show dns
Example output:
sysadmin@datadomain]# net show dns
#   Server
-   ------------
1   10.2XX.XX.23
2   10.2XX.XX.24
-   ------------
Showing DNS servers configured manually.
- Run command:
net reset dns
Example output:
sysadmin@datadomain]# net reset dns
The Name (DNS) server list is empty.
- Run command:
net set dns <dns_ip1> <dns_ip2>
Example output:
sysadmin@datadomain]# net set dns 10.2XX.XX.23 10.2XX.XX.24
The Name (DNS) server list is:
        10.2XX.XX.23, 10.2XX.XX.24
- For all the ESXi hosts, follow the below steps to update the DNS entries:
- SSH to ESXi using root credentials
- Run the following command to list down the registered DNS entries:
esxcli network ip dns server list
Example output:
[root@lXXXedmh085:~] esxcli network ip dns server list
DNSServers: 10.2XX.XX.23
- Run the following command to remove the old DNS IP:
esxcli network ip dns server remove --server=<old_dns_ip>
Example output:
[root@lXXXh085:~] esxcli network ip dns server remove --server=10.2XX.XX.23
- Run the following command to remove the old DNS IP:
esxcli network ip dns server add --server=<new_dns_ip>
Example output:
[root@lXXXh085:~] esxcli network ip dns server add --server=10.2XX.XX.24
Note: 7.c and 7.d must be done for other nameservers as well if the list command in 7.b shows a secondary DNS.
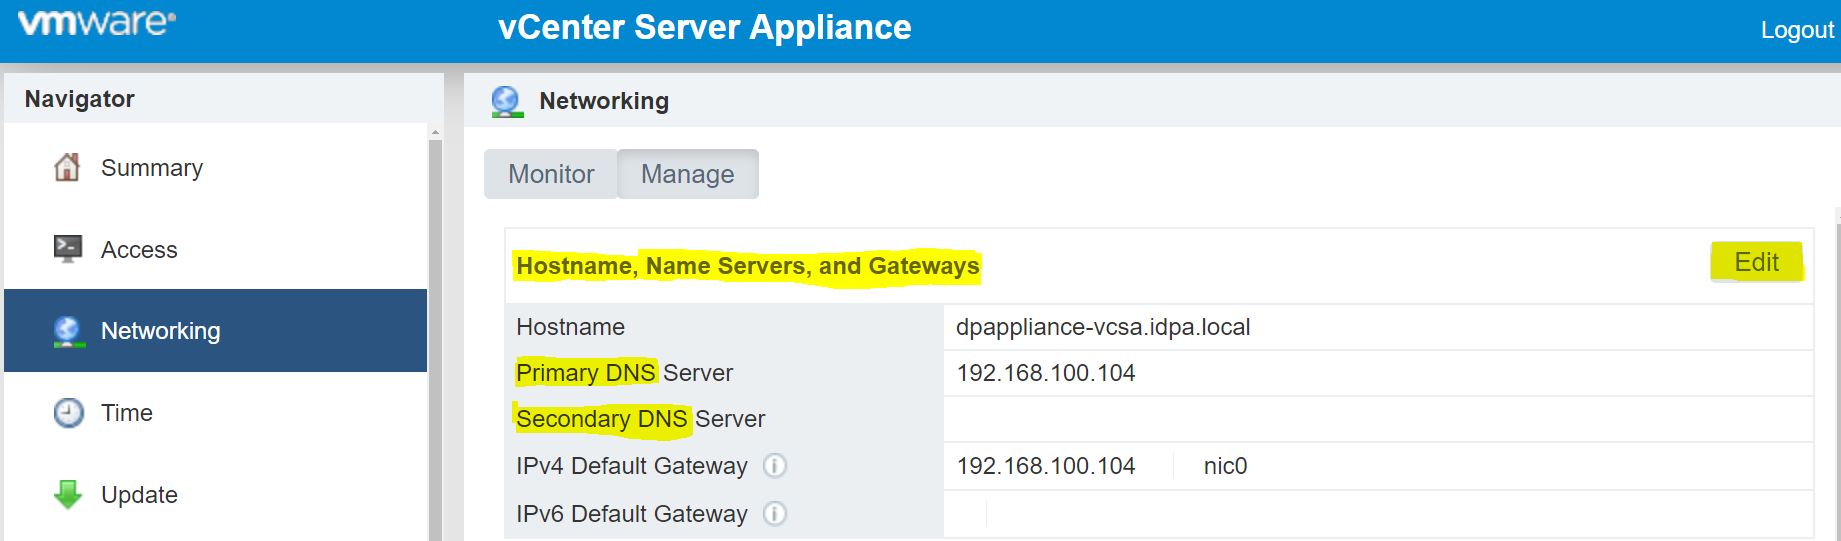
- For vCenter, follow the below steps to update the DNS entries:
- Open Web UI of vCenter using: https://<vcenter_ip>:5480
- Go to Networking > Manage tab.
- Locate entries of Hostname, Name Servers, and Gateways.
- Click the Edit button as highlighted in the above screenshot and change the entries of DNS server.
- SSH to ACM, edit commonconfig.xml to reflect the new DNS entries.
cd /usr/local/dataprotection/var/configmgr/server_data/config/
vi commonconfig.xml
Edit the below entries with the new DNS IP
<primaryDns>10.2XX.XX.23</primaryDns>
<secondaryDns>10.2XX.XX.24</secondaryDns>
- Appliance is ready to be used. Restart of any service on any VM is not required.
Updating DNS Setting in IDPA 2.7.0 and above:
Starting with 2.7.0, the ACM now includes an automated process to update DNS Setting on all IDPA components.
- Open the ACM UI.
- In the General Setting section, click the "gear" Icon:
- Select "Configure DNS"
- Enter the new DNS information and click Save.
Monitor progress, if successful, you are done. Nothing else to do.
Affected Products
Integrated Data Protection Appliance FamilyProducts
Integrated Data Protection Appliance FamilyArticle Properties
Article Number: 000021476
Article Type: How To
Last Modified: 25 Mar 2022
Version: 3
Find answers to your questions from other Dell users
Support Services
Check if your device is covered by Support Services.