How to Prepare a CSV of Users to Import to Wyse Management Suite
Summary: Learn how to create a CSV of users to import into Wyse Management Suite by following these instructions.
This article applies to
This article does not apply to
This article is not tied to any specific product.
Not all product versions are identified in this article.
Instructions
Wyse Management Suite can import a CSV of users to import multiple users at once. This can be built in Excel or a Text Editor. Click the appropriate method for more information.
- Open Microsoft Excel.

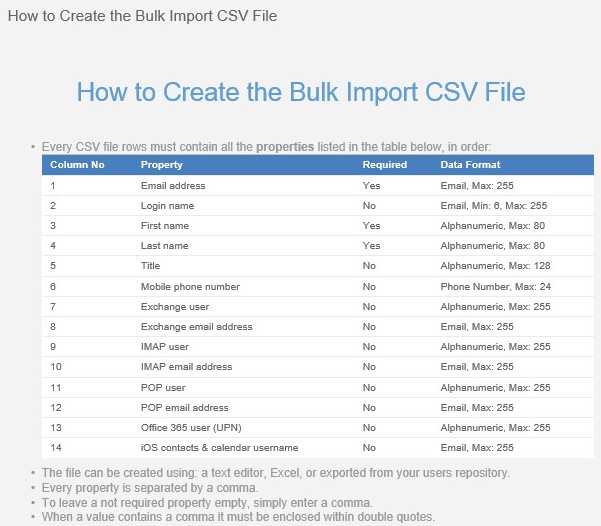
- In the first horizontal line, input the following categories across the first fourteen cells:
- Email address
- Login name
- First name
- Last name
- Title
- Mobile phone number
- Exchange user
- Exchange email address
- IMAP user
- IMAP email address
- POP user
- POP email address
- Office 365 user (UPN)
- iOS Contacts & calendar username
 Note: When creating the file by Excel:
- Properties are not separated by commas.
- Not required properties should have the cell left blank.
- By line, populate the user information for each account under the relevant category. Email address, Login name, First name, and Last name are required, all other fields are optional.
- Open a text editor.

- In the first line, input the following categories separated by commas:
- Email address
- Login name
- First name
- Last name
- Title
- Mobile phone number
- Exchange user
- Exchange email address
- IMAP user
- IMAP email address
- POP user
- POP email address
- Office 365 user (UPN)
- iOS Contacts & calendar username
 Note: When creating the file by text editor:
- Properties are separated by commas.
- Not required properties require a comma to move to the next property.
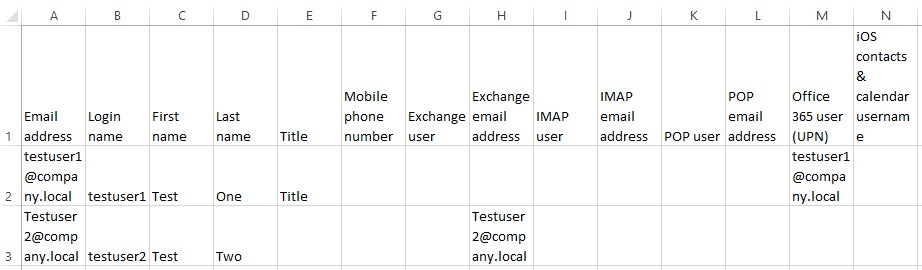
- By line, populate the user information for each account under the relevant category. Email address, Login name, First name, and Last name are required, all other fields are optional. An example CSV created by text editor may look like:
Email address,Login name,First name,Last name,Title,Mobile phone number,Exchange user,Exchange email address,IMAP user,IMAP email address,POP user,POP email address,Office 365 user (UPN),iOS contacts & calendar username
testuser1@company.local,testuser1,Test,One,Title,,,,,,,,testuser1@company.local,
Testuser2@company.local,testuser2,Test,Two,,,,Testuser2@company.local,,,,,,
Affected Products
Wyse Management SuiteArticle Properties
Article Number: 000126010
Article Type: How To
Last Modified: 01 Aug 2024
Version: 5
Find answers to your questions from other Dell users
Support Services
Check if your device is covered by Support Services.