PowerFlex 3.X: How to Upgrade to Version 3.7.0 Using Backup and Restore Method
Summary: PowerFlex Manager (PFxM) 3.7.0 has introduced file system sizing changes on the appliance. For all users to get these changes, we recommend using the backup and restore method to upgrade instead of the standard PowerFlex Manager upgrade process. This article provides the steps to upgrade PowerFlex Manager using the backup and restore method. ...
This article applies to
This article does not apply to
This article is not tied to any specific product.
Not all product versions are identified in this article.
Instructions
You must upgrade your current PowerFlex Manager appliance to version 3.6.1 before performing this procedure.
To back up the PowerFlex Manager appliance, follow these steps:
Resynchronize the compliance and OS repositories after restore: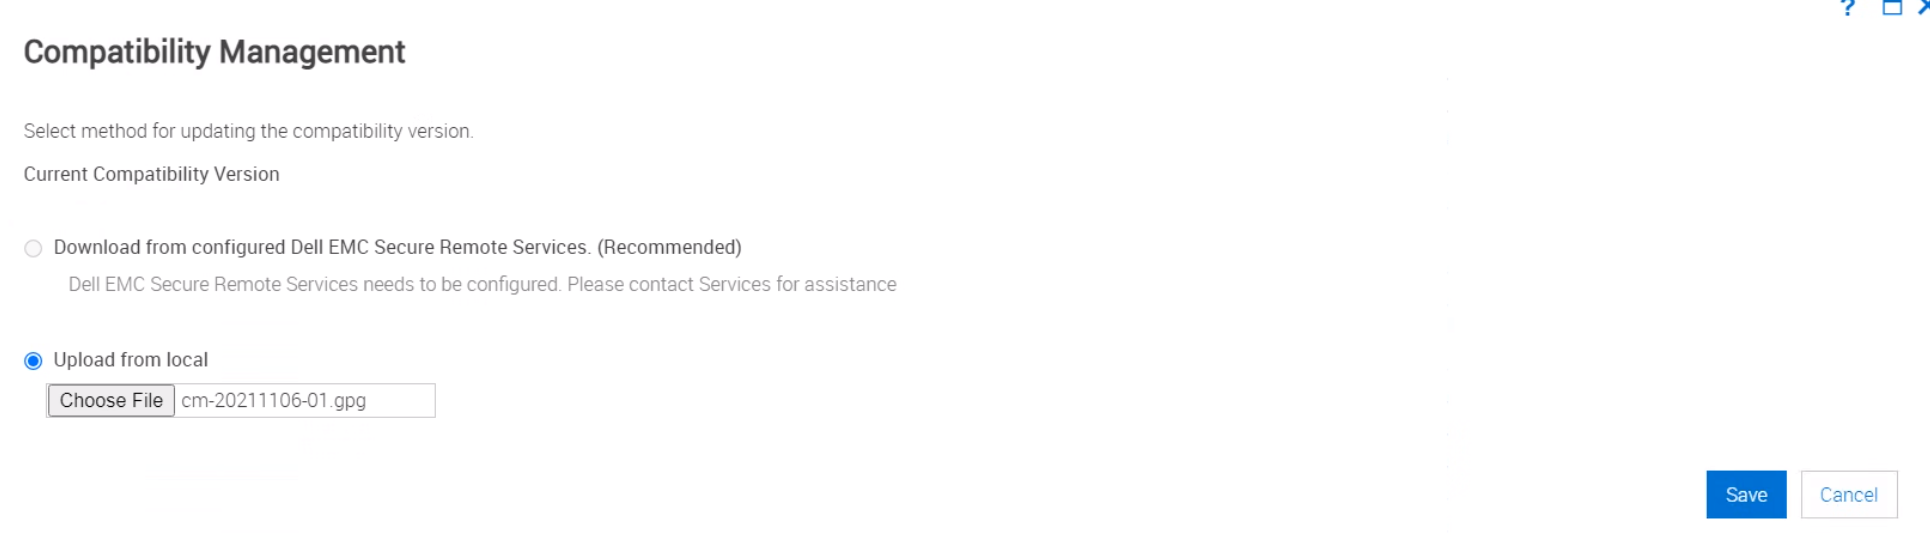
Once you have completed a restore and all is functioning as expected, perform the following steps:
To back up the PowerFlex Manager appliance, follow these steps:
- From the PFxM UI, click Settings > Backup and Restore.
- From the Backup and Restore page, click Backup Now.
- Select one of the following:
- To use existing backup settings, check the box next to Use Backup Directory Path and Encryption Password from Backup Settings and Details.
- To use custom backup settings, perform the following:
- In the Backup Directory Path box, enter a file path where the backup file is saved using either NFS (host:/share_path) or CIFS (\\host\share_path\).
- If a username and password are required to access the backup location, enter them in the appropriate boxes. (Backup Directory User Name and Backup Directory Password)
- In the Encryption Password and Confirm Encryption Password boxes, enter the password that is used to encrypt the backup. (This password is required to restore the file, so write it down.)
- Click Test Connection
- If successful, go to the next steps
- If unsuccessful, check your settings and try again.
- Click Backup Now
- This process may take some time depending on the size of your PFxM appliance.
- A job shows as in progress on the Settings > Jobs page until the backup is completed.
- Once the job is complete, confirm it was successful by checking the following:
- Settings > Backup and Restore page, under Settings and Details, it should show the Last Backup Date and Last Backup Status.
- Check the share location where you backed up the file for the backup tar.gz and tar.gz.sum files.
- SSH to the PFxM appliance
- The default login is
delladmin/delladmin
- The default login is
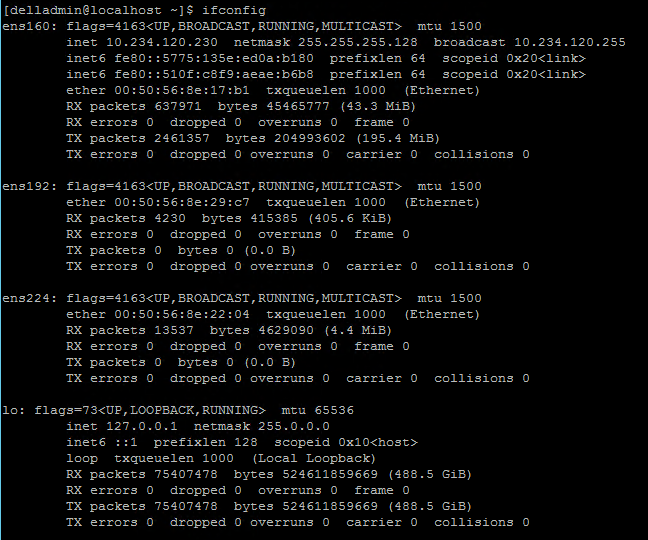
- Run the following command to list the configured interfaces:
ifconfig
- The output shows something similar to the following. You should have at a minimum an IP address configured on ens160, but also configured IP addresses on ens192 (iDRAC interface) and ens224 (OS Installation/PXE interface) for most systems. Write down the configured IPs for use later when deploying the new PFxM OVA.
- Get the default gateway and DNS information for the appliance by running this command:
cat /etc/sysconfig/network-scripts/ifcfg-ens160
Shut down the PFxM appliance:
- Log in to the Management Controller VMware vCenter.
- Right-click the PowerFlex Manager appliance.
- Click Power > Shutdown Guest OS
- Log in to the Management Controller VMware vCenter.
- Right-click the PFxM appliance.
- Select Snapshots > Take Snapshot.
- Clear Snapshot the virtual machine's memory and enter a description.
- Click OK.
- Once the snapshot is complete, rename the existing PowerFlex Manager appliance to something similar <PFxM_VM_name>_old if you want to use the same VM name.
- Before you begin, download the PowerFlex Manager OVA and compatibility management file from the Dell Technologies support website and save them to a location that is accessible by vCenter and PowerFlex Manager locally.
-
Note: The compatibility management file is a new file required in PowerFlex Manager 3.7 and must be uploaded to the appliance later in this process.
-
- Log in to the Management Controller VMware vCenter or Management ESXi host.
- Right-click the Management host or cluster and select Deploy OVF Template. The Deploy OVF Template wizard opens.
- On the Select Template page, enter the URL where the OVA is located or select Local File and browse to the location where the OVA is saved and click Next.
- On the Selected Name and Folder page, enter a name for the VM (up to 80 characters), and select a data center to deploy it to. Click Next.
- On the Select a Compute Resource page, select a location where the VM is deployed. Click Next.
- On the Review Details page, verify that the details are correct and click Next.
- On the License Agreements page, read the agreement, select I accept all license agreements, and click Next.
- On the Select Storage page, complete the following:
- Select Thin provision from the Select virtual disk format menu.
- Select a Datastore from the Datastore Clusters menu to use and click Next.
- On the Select Networks page, complete the following:
- Select a Destination Network for the ESXi Management (ens160) source network.
- Select a Destination Network for the OS Installation (ens224) source network.
- Select a Destination Network for the OOB Management (ens192) source network.
- Click Next
- On the Ready to Complete page, review the configuration data and click Finish to deploy the PowerFlex Manager appliance.
- Wait for the OVA to finish deploying and then go to the next step.
- Connect to the console of the new PFxM VM.
- You should see the Initial Appliance Configuration UI when you log in. If not, run pfxm_init_shell to open it.
- Click Network Configuration
- To configure the ESXi Management network (ens160), complete the following:
- On the Network Connections page, select ens160 and click Edit the selected connection.
- On the General tab, ensure the Automatically connect to this network when it is available box is checked.
- Click the IPv4 Settings tab and from the Method list, select Manual.
- In the Addresses pane, click Add, and enter the IP address, Netmask, and Gateway for this network.
- Enter the DNS IP addresses in the DNS servers box.
- Enter the DNS suffix in the search domain box.
- Click Save.
- To configure the OOB management network, which is the dedicated iDRAC network, complete the following:
- On the Network Connections page, select ens192 and click Edit the selected connection.
- On the General tab, ensure the Automatically connect to this network when it is available box is checked.
- Click the IPv4 Settings tab and from the Method list, select Manual.
- In the Addresses pane, click Add, and enter the IP address and Netmask for this network.
- Click the Routes button and ensure the Use this connection only for resources on this network box is checked and click OK.
- Click Save.
- To configure the operating system installation network, which is the PXE network, complete the following:
- On the Network Connections page, select ens224 and click Edit the selected connection.
- On the General tab, ensure the Automatically connect to this network when it is available box is checked.
- Click the IPv4 Settings tab and from the Method list, select Manual.
- In the Addresses pane, click Add, and enter the IP address and Netmask for this network.
- Click the Routes button and ensure the Use this connection only for resources on this network box is checked and click OK.
- Click Save and close the Network Connections window by clicking the X button in the upper-right corner.
- Click Logout from the Initial Appliance Configuration UI.
- Log back into the PFxM appliance command line using
delladmin - To enable SSH on the PFxM appliance, complete the following:
- Sudo to the root user: sudo su -
- Enter the
delladminpassword - Type the following command to enable and start SSH:
systemctl enable sshd
systemctl start sshd
- Type Exit to return to the
delladminuser prompt, and type Exit again to log out of the appliance.
- Log in to the PFxM web UI by entering the management IP address in a web browser.
- The default login is admin/admin.
- In the UI, click Settings and click Backup and Restore.
- On the Backup and Restore page, click Restore Now.
- Enter the full path to the file that must be restored in one of the following formats:
- NFS - host:/share/filename.tar.gz
- CIFS - \\host\share\filename.tar.gz
- Enter the username and password in the Backup Directory User Name and Backup Directory Password fields to access the location where the backup file is stored.
- Enter the encryption password in the Encryption Password field that was set when the backup was performed.
- Click Test Connection
- If successful, click Close and go to restore.
- If unsuccessful, check the path and credentials and test again.
- Click Restore Now and Click Yes when the confirmation message is displayed.
- The restore process starts and could take a couple of hours. The PFxM appliance reboots as a part of the process.
Note: If you restore a PFxM backup to an appliance with a different IP address, the alert connector comes up in an error state. The Secure Remote Services gateway allows communication on only the original IP address. If this happens, you must de-register the alert connector and re-register after the restore.
Resynchronize the compliance and OS repositories after restore:
- Go to Settings > Compliance and OS repositories in the PFxM web UI.
- To resync the compliance bundle, click the Compliance Version tab, and the bundle is in an error state.
- In the available actions drop-down, click Resynchronize for any repositories in an Error state.
- It begins the resync process and the repository status change to Copying.
- To resync OS bundles, click the OS Image Repositories tab.
- From the available actions drop-down, click Resynchronize for any repositories in an Error state. The resynchronize OS repository page is displayed.
- Enter the user credentials and click Test Connection. You cannot edit the Source path and filename.
- If successful, go to the next step.
- If unsuccessful, check the credentials and test again.
- Click Resynchronize. The repository state changes to Copying.
- Go to Settings > Virtual Appliance Management in the PFxM web UI.
- In the Compatibility Management section, click Add and choose the method to load the file.
- Option1: Download from configured Dell Secure Remote Services
- Option2: Upload from local
- This allows you to browse your local files and upload them to the PFxM appliance.
- Click Save.
Once you have completed a restore and all is functioning as expected, perform the following steps:
- Delete the snapshot of an old PFxM appliance.
- Delete the old PFxM VM.
- Take a backup of the new PFxM appliance so there is a recovery point based on the new version.
Affected Products
PowerFlex rack, PowerFlex Appliance, PowerFlex SoftwareArticle Properties
Article Number: 000189267
Article Type: How To
Last Modified: 10 May 2026
Version: 7
Find answers to your questions from other Dell users
Support Services
Check if your device is covered by Support Services.