NVP-vProxy: Failed to lock Virtual Machine for backup: Another vProxy operation is active on VM
Summary: The NetWorker VMware Protection (NVP) integration is configured with the vProxy Appliance. The virtual machine (VM) backup for some VMs fails with a consolidation error message.
This article applies to
This article does not apply to
This article is not tied to any specific product.
Not all product versions are identified in this article.
Symptoms
The vProxy backup session log shows:
YYYY/MM/DD HH:MM:SS INFO: Found virtual machine "VM-NAME" with MORef "vm-###".
YYYY/MM/DD HH:MM:SS NOTICE: Virtual machine "VM-NAME" requires consolidation of its virtual disks.
YYYY/MM/DD HH:MM:SS ERROR: Failed to complete consolidation of virtual disks for "VM-NAME" (vm-###): Unable to access file since it is locked
YYYY/MM/DD HH:MM:SS WARN: Failed to consolidate virtual disks of virtual machine "VM-NAME" (vm-###): Failed to complete consolidation of virtual disks for "VM-NAME" (vm-###): Unable to access file since it is locked.
YYYY/MM/DD HH:MM:SS WARN: Failed to consolidate virtual disks of virtual machine "VM-NAME" (vm-###): Failed to complete consolidation of virtual disks for "VM-NAME" (vm-###): Unable to access file since it is locked.
YYYY/MM/DD HH:MM:SS NOTICE: Snapshot "snapshot-###" of virtual machine "VM-NAME" (vm-###) was removed.
The VM session logs are found on the vProxy under: /opt/emc/vproxy/runtime/logs/recycle/vbackupd/DATE
You can also find the Virtual Machine (VM) backup session logs on the NetWorker server:
- Linux:
/nsr/logs/policy/POLICY_NAME/WORKFLOW_NAME - Windows (Default):
C:\Program Files\EMC NetWorker\nsr\logs\policy\POLICY_NAME\WORKFLOW_NAME\
NOTE: The NetWorker policy logs follow the NetWorker server jobsdb retention (default 72 hours). After the retention period has passed, the logs are removed from the NetWorker server, but exist on the vProxy.
Cause
A previous backup terminated unexpectedly, and the snapshot disks are still mounted on a vProxy appliance.
Resolution
To resolve this issue, remove the Virtual Machine Disk (VMDK) from the vProxy appliance.
Option One:
Use ProxyHC to remove left-over disks and clean up stale sessions (if found).
For instructions on ProxyHC, see: NVP-vProxy: How to use health check tool ProxyHC on vProxy appliance
The ProxyHC options required are: ProxyHC disk tasks cleanup
Option Two:
Remove the VM disks from the vProxy.
NOTE: If no VM backup or restore operations are running, the vProxy VM should only contain two disks.
CAUTION: Only perform the below steps when no backup or restore actions are running on the vProxy. You can confirm from the NetWorker Management Console (NMC), NetWorker Web User Interface (NWUI), or
nsrwatch command-line on the NetWorker server.
- Log in to the vSphere web interface.
- Right-click the backup vProxy appliance.
- Click Edit Settings.
- Expand all the Hard Disks.
- Select the Hard Disks which belong to the virtual machine that has the problem. The VM hard disks should show the VM name in the disk file path:
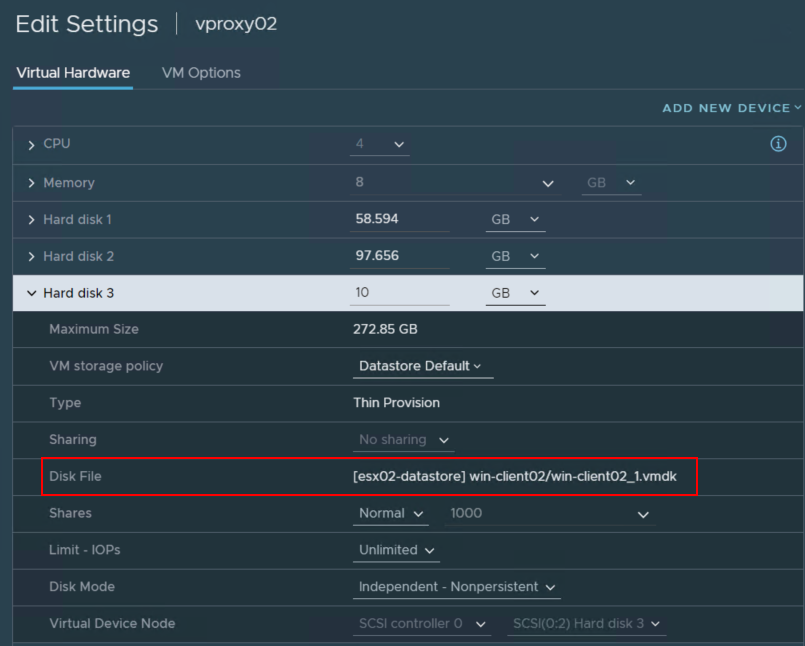
- Click the X beside the Hard Disk to unmount the Hard Disk from the VM.
CAUTION: Do NOT select Delete files from the datastore.
- Click OK.
- Consolidate/Delete the snapshot on the VM using the vSphere web client.
Additional Information
- NVP-vProxy: VM disk failing to backup with "VDDK Error: 13: You do not have access rights to this file....mount point already exists"
- NVP-vProxy: VM backup or restore operation fails with "Failed to lock Virtual Machine for backup"
- Reference VMware KB: Snapshot consolidation fails due to locks held by Third party backup software.
Article Properties
Article Number: 000195596
Article Type: Solution
Last Modified: 02 Feb 2026
Version: 3
Find answers to your questions from other Dell users
Support Services
Check if your device is covered by Support Services.