Windows Server: Add a Cumulative Update to an Offline Windows Image
Summary: This article shows how to add an update to an offline Windows Server image file.
This article applies to
This article does not apply to
This article is not tied to any specific product.
Not all product versions are identified in this article.
Instructions
Adding updates to an offline Windows Server image is useful in deployment scenarios, as it keeps the installation source image up to date. It may also be necessary in order to successfully perform operating system (OS) repairs with the dism or sfc commands. These commands require source files whose versions match those being repaired. Up-to-date source files are also required when adding roles or features that have been removed using the Uninstall-WindowsFeature command with the -Remove switch. Removing roles or features with this command reduces disk usage by deleting the corresponding source files from the side-by-side (WinSxS) store. Attempting to add one of the removed features typically results in error 0x800F081F, indicating that the source files could not be found.
To add an update to a Windows Server image, perform the following steps:
- On the affected server, create folders named image, mount, and update. In this example, those folders are created on the C: drive, but they can be created anywhere there is adequate free space. Adjust the paths in the commands below as needed.
- Open Windows Update and check Update History. Note the most recent monthly cumulative OS update that was successfully installed on the server.
- From the Microsoft Update Catalog
, download the .msu file for the cumulative update in step 2. Save it in C:\update.
- Mount the OS installation ISO image or insert the installation media into the optical drive. If a popup appears, cancel it.
- In File Explorer, browse to the sources folder on the installation media or image. Copy the install.wim file from this folder to C:\image.
- Launch an elevated PowerShell prompt.
- Run this command to list all indexes contained within the install.wim file:
Get-WindowsImage -ImagePath C:\image\install.wim - Note the index number that corresponds to the running Windows Server version. In this example, Windows Server 2022 Standard (Desktop Experience) is installed, which is index #2. Change the index number as needed in the commands below.
- Mount the install.wim file using this command:
Mount-WindowsImage -Path C:\mount -ImagePath C:\image\install.wim -Index 2 - Attempt to add the update to the mounted image with this command:
In the command, <filename> is the name of the update file, which is long. It may be easier to copy and paste the filename into the command than to type it.Add-WindowsPackage -PackagePath C:\update\<filename>.msu -Path C:\mount - Skip this step if no error is returned. If the previous command returns error 0x800F0823, then another update must be added to the image first. This depends on the age of the installation media and is due to a servicing stack update (SSU) dependency.
- Read the Microsoft article that corresponds to the update, looking for information about a required SSU version or other dependency. This information can often be found in the How to get this update section of the article, as shown here:
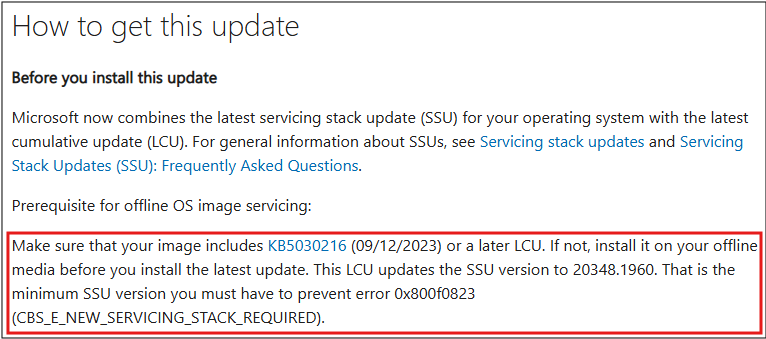
Figure 1: This article shows that the update in question requires update KB5030216 to be added to the image first. - From the Microsoft Update Catalog, download the .msu file for the prerequisite update mentioned in the article. Save the file in C:\update.
- Run the previous command, but with the filename of the prerequisite update.
- Dismount and save the image with this command:
Dismount-WindowsImage -Path C:\mount -Save - Mount the image again with the command in step 9.
- Perform step 10 again to add the original update to the image.
- Read the Microsoft article that corresponds to the update, looking for information about a required SSU version or other dependency. This information can often be found in the How to get this update section of the article, as shown here:
- Dismount and save the image with this command:
Dismount-WindowsImage -Path C:\mount -Save
The install.wim file now includes the cumulative update. It can be used for OS deployment or as a file source for dism, sfc, and addition of roles or features.
Additional Information
Refer to this video:
Add a Cumulative Update to an Offline Windows Image
Duration: 00:09:49 (hh:mm:ss)
When available, closed caption (subtitles) language settings can be chosen using the CC icon on this video player.
You can also view this video on YouTube.
Affected Products
Microsoft Windows Server 2016, Microsoft Windows Server 2019, Microsoft Windows Server 2022, Microsoft Windows Server 2025Article Properties
Article Number: 000323298
Article Type: How To
Last Modified: 22 Jan 2026
Version: 3
Find answers to your questions from other Dell users
Support Services
Check if your device is covered by Support Services.