Camera Not Functioning in Ubuntu 24.04 After Kernel Update
Summary: This article provides more information about the XPS 13 9350 running Ubuntu 24.04 following an update to OS kernel version 6.17.0‑1012.
This article applies to
This article does not apply to
This article is not tied to any specific product.
Not all product versions are identified in this article.
Symptoms
Affected Platforms:
- XPS 13 9350
Affected Operating Systems:
- Ubuntu 6.17.9-1012
The camera may stop working or become non‑functional after updating the OS kernel from version 6.14.0‑1013 to 6.17.0‑1012 (or after updating directly to kernel 6.17.0‑1012). The Canonical team has confirmed that similar issues have been reported and is investigating the root cause and developing a fix.
Cause
During an online update, a software component related to the camera (libcamhal‑ipu7x) is upgraded to a newer version. This change affects the order in which computer resources needed by the camera are initialized. As a result, the camera driver cannot access the required resources at startup and fails to load correctly.
Resolution
Dell Technologies recommends using the original Dell factory image provided with the computer. If a different image is used, the solution below may not apply. The critical step is to downgrade the kernel to version 6.14.0-101 or an earlier release.
Warning: The recovery procedure below will not work if the installed version is Ubuntu 24.04.4, as it already includes kernel 6.17.
Recovery:
There are three ways to recover functionality of the camera.
Manually switch to an older version of the kernel:
- Power on the unit
- Press F4 and select Advanced option for Ubuntu
- Select kernel v6.14.0-1013 or older version kernel to boot.
Make the target kernel persistent:
- Open Terminal
- Type
sudo update-grub - Enter password for sudo user, if requested (the below image shows the command output):
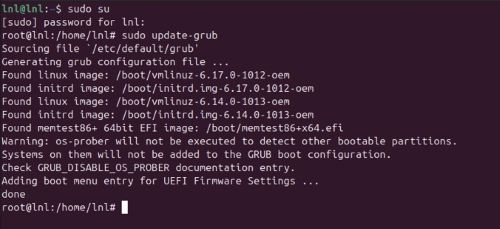
- Count the target kernel (the first entry is 0, the second is 1, and so on)
- Kernel 6.14.0-1013-oem for example is 2
- Edit the grub settings (this opens the nano text editor):
sudo nano /etc/default/grub - Change the line
GRUB_DEFAULT=0toGRUB_DEFAULT=”1>2”(to change to Kernel 6.14.0-1013-oem from the example above)
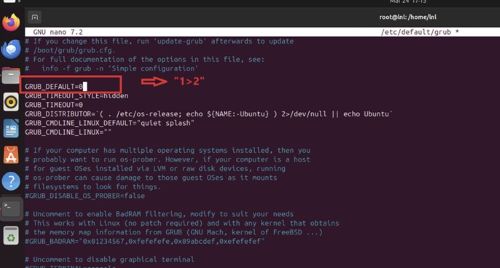
- To save the file, press CTRL + X, then Shift + Y and Enter
- To update Grub, type
sudo update-grub - Reboot the computer
- To verify changes have been made, Open Terminal and type
uname –a
Set the target kernel as default:
- Open Terminal and type
sudo update-grub - Enter password for sudo user, if requested
- Edit the grub settings, type
sudo nano /etc/default/grub - Update the below two lines:
GRUB_DEFAULT=saved
GRUB_SAVEDEFAULT=true

- To save the file, press CTRL + X, then Shift + Y and Enter
- To update Grub, type
sudo update-grub - Reboot the computer and press F4 and select Advanced option for Ubuntu
- Select kernel v6.14.0-1013 or older version kernel to boot
Resolution
The Canonical team will release kernel version 6.17.0-1017 and later, with a planned release date of April 6, 2026. it will be provided through an over-the-air (OTA) update.
To update the kernel:
- Open
terminal - Type:
sudo add-apt-repository ppa:canonical-kernel-team/ppa2(provide password if prompted) - Type:
sudo apt update - Type:
sudo apt install linux-image-6.17.0-1017-oem linux-headers-6.17.0-1017-oem - Reboot the computer
- Once back to the desktop, open
terminal: - Type:
sudo apt update - Type:
sudo apt upgrade(press Y if prompted) - Reboot the comptuer
The camera should operate correctly.
Affected Products
XPS 13 9350Article Properties
Article Number: 000444502
Article Type: Solution
Last Modified: 24 May 2026
Version: 3
Find answers to your questions from other Dell users
Support Services
Check if your device is covered by Support Services.