NX Series: The Operating System partition on Windows Server 2016 is too small
Summary: Steps to extend the Windows OS partition on a Dell NX server.
This article applies to
This article does not apply to
This article is not tied to any specific product.
Not all product versions are identified in this article.
Instructions
The Windows OS partition on the NX systems is smaller than ~128 GB. To expand this partition, follow the guidelines and steps below.
Information on NX system partitions
Dell Rapid Appliance Self-Recovery (RASR) has not been tested to work after this modification.
The action of expanding the C: drive on the NX systems is not Dell supported. Use at your own risk.

Figure 1: NX partitions in Diskpart
It is typically best practice to install applications to a separate partition than Windows, however, some customers prefer to keep applications and OS together for simplicity.
NX32x0 and NX33x0 (13G and 14G servers):
- Ships with two drives configured in a RAID 1 for OS
- This is configured in a sliced RAID (figure below in Figure 2)
- 140 GB RAID 1 for OS, labeled in the PowerEdge RAID Controller (PERC) settings as "Virtual Disk0"
- Remainder of the space in a separate RAID 1 for data, labeled in the PERC settings as "Virtual Disk1"
- This is configured in a sliced RAID (figure below in Figure 2)
- The remainder of the disks configured as a RAID 5 for data, labeled in the PERC settings as "Virtual Disk2"
- The RAID 5 may also be sliced depending on total size, labeled in the PERC settings as "Virtual Disk#"
- Any internal drives are typically not configured at the factory and show up as non-RAID drives
NX4x0 (13G and 14G servers):
- Ships with all drives configured as a RAID 5
- This is configured as a sliced RAID
- 140 GB RAID 5 for OS, labeled in the PERC settings as "Virtual Disk0"
- Remainder of the space in a separate RAID 5 for data, labeled in the PERC settings as "Virtual Disk1
- This is configured as a sliced RAID
Illustration of sliced RAID array on the same physical media (Figure 2):
Figure 2: Sliced RAID array
In order to extend the OS partition, it is necessary to create contiguous space after the OS partition so it is possible to extend the OS partition into available free space.
All RAID slices that reside on the same disks containing the OS RAID slice (Virtual Disk0) must be deleted in order to extend the OS RAID slice. All this can be done online in OMSA.
Confirm that no data resides on the RAID slices to be deleted. Any data remaining is lost.
-
Launch Server Administrator from the desktop of the NX system and log in with administrator credentials
-
Click Storage in the middle pane or expand Storage in the navigation tree on the left
-
Click the PERC H730P in the middle pane or expand the PERC H730P in the navigation tree on the left
-
Click Virtual Disks in the middle pane or in the navigation tree on the left
-
Document the RAID level for Virtual Disk 0 then click Virtual Disk0 in the middle pane (Figure 3)

Figure 3: Click VirtualDisk0 -
Document the drives listed in this view then click the back button in the web browser (Figure 4)
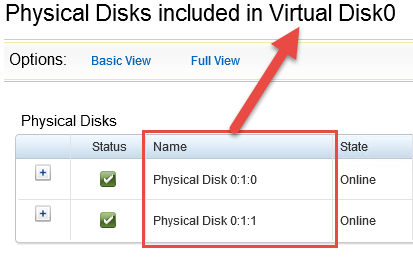
Figure 4: Document Physical Disks -
Click Virtual Disk1 in the middle pane
-
Check if the drives listed match the drives documented from Virtual Disk0
If so, document the Virtual disk # for a later step (Figure 5)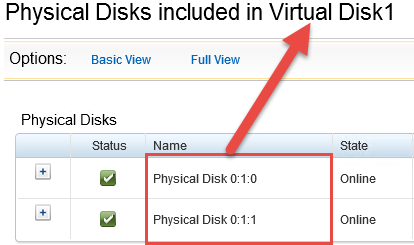
Figure 5: Document Virtual Disk# -
Repeat steps 6 through 8 for the remaining virtual disks shown in OMSA
-
From the virtual disks view in OMSA, click the available tasks dropdown for one of the virtual disks that share disks with Virtual Disk0 then select Delete… (Do not delete Virtual Disk0)
-
Click Execute (Figure 6)
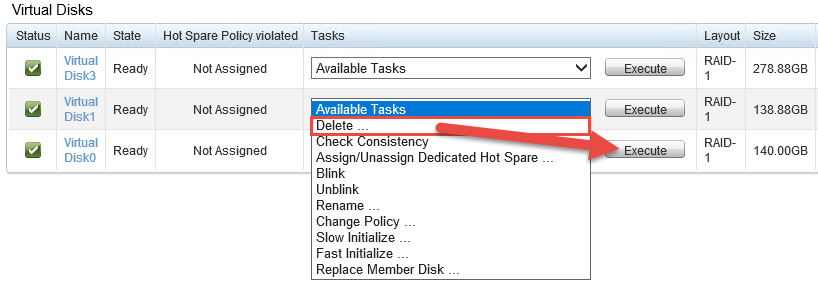
Figure 6: Click Execute -
On the message that confirmation that data will be lost on this virtual disk, click Delete (Figure 7). Double-check that there is no necessary data on this particular Virtual disk.

Figure 7: Click Delete to confirm deletion of Virtual Disk -
One more confirmation window appears, click OK
-
Repeat steps 11 through 14 for any additional Virtual Disks sharing hard drives with VD0
-
From the Virtual Disks view click the Available Tasks dropdown next to Virtual Disk0, select Reconfigure…, then click Execute (Figure 8)

Figure 8: Click Reconfigure… next to Virtual Disk0 -
All the disks should be selected with a size displayed as (Free)
-
Click the Expand Capacity button (Figure 9). Do not click Continue on this window.

Figure 9: Click the Expand Capacity button -
The RAID level is automatically populated, enter a percentage of the free space to add to Virtual Disk0 then click Continue (Figure 10)
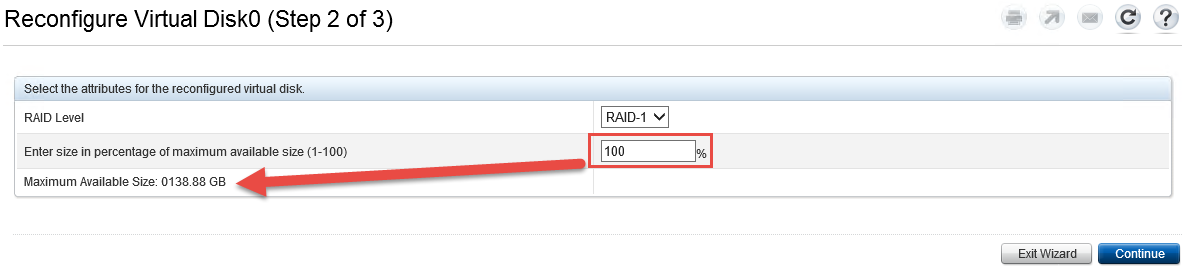
Figure 10: Click Continue after adding free space percentage to Virtual Disk0 -
Review the information in this window and if its acceptable, click Finish
-
A Background Init starts, note the new size on Virtual Disk0 (Figure 11)

Figure 11: Background initialization process starts -
Go to Windows disk management by right clicking the Windows start icon and selecting Disk Management (Figure 12)
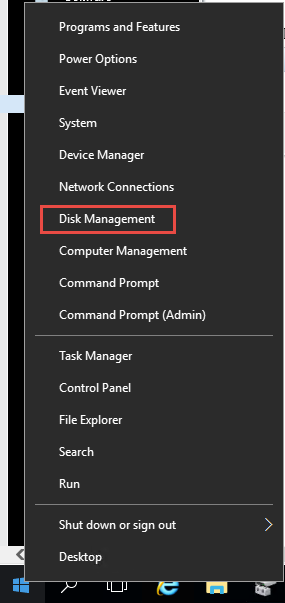
Figure 12: Open Windows disk management -
In the Disk Management window, click Action then click Rescan Disks (Figure 13)
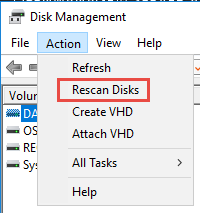
Figure 13: Click Rescan Disks in the Disk Management/Action menu -
In the lower pane, locate the OS partition and there should now be an unallocated space next to it (Figure 14)

Figure 14: Verify unallocated space on OS partition -
Right-click the OS partition and select Extend Volume… (Figure 15)
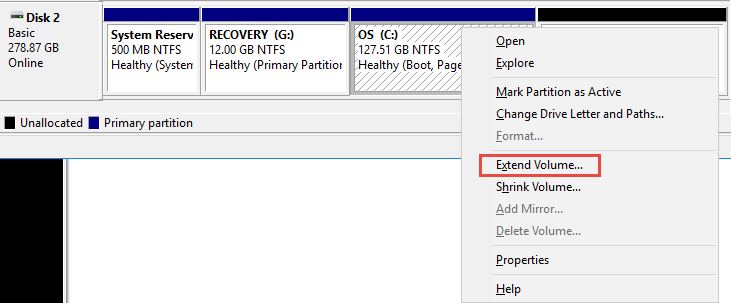
Figure 15: Select Extend Volume… on OS partition -
Click Next
-
Enter the amount of space in MB to extend the OS partition. It defaults to all the remaining space. Then click Next (Figure 16)
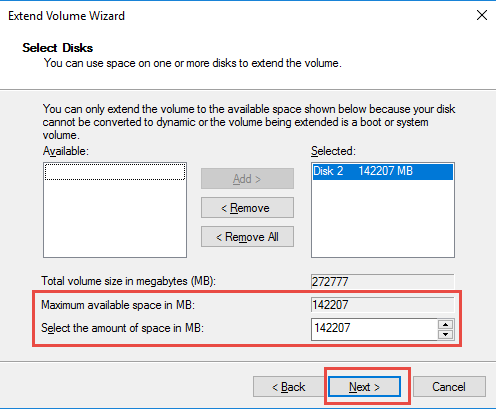
Figure 16: Enter amount in MB to extend OS partition -
Click Finish
-
Confirm that the OS partition is now larger (Figure 17)

Figure 17: Confirm that the OS partition size is larger -
The process is now complete. Close any remaining open windows.
Affected Products
Dell Storage NX3230, Dell Storage NX3330Article Properties
Article Number: 000124432
Article Type: How To
Last Modified: 18 Mar 2025
Version: 5
Find answers to your questions from other Dell users
Support Services
Check if your device is covered by Support Services.